However, most WordPress users are only familiar with its graphical workflow; very few people have explored its terminal side.
This tutorial will introduce you to WP-CLI, a command-line tool for managing WordPress sites.
Let us dive into the world of WP-CLI:
How to Install WP-CLI
Installing WP-CLI is relatively easy. The tool is in the form of a PHP archive which you can download and execute.
Start by downloading the archive using wget or cURL as:
For cURL users, use the command:
Once downloaded, make the file executable and move the archive to a PATH in your system such as /usr/local/bin as:
To confirm that you have successfully installed it and it’s working, use the command:
This should give you an output similar to the one shown below, indicating that you’ve installed the tool successfully.
NOTE: Ensure you have PHP installed; otherwise, you will get an env error.
WP-CLI vendor dir: phar://wp-cli.phar/vendor
WP_CLI phar path: /home/root
WP-CLI packages dir:
WP-CLI global config:
WP-CLI project config:
WP-CLI version: 2.4.0
How to Use WP-CLI
WP-CLI is a terminal or command line alternative to the wp-admin dashboard. Hence, there is a WP-CLI command for all the tasks you can perform with the WordPress admin web interface.
Let us learn how to use them, but before that:
How to enable WP-CLI Bash Completion
The WP-CLI tool allows you to enable the Bash Completion Feature to view and autocomplete commands using the TAB key. Let us enable it to make our tasks easier.
We begin by downloading the Bash Completion Script with the command:
To load the Bash Completion Script on every terminal session, let us edit our bash profile config file. Enter the following entry in the .bashrc file.
Next, reload the bash profile to load all the changes:
Once completed, you should have Bash Completion enabled. If you are using another shell, perhaps ZSH, check the official documentation for information on how to enable completion.
To test if it is working, enter the command wp + TAB. That should give you all available commands as:
option rewrite shell term cap
cron export maintenance-mode package
role sidebar theme cli db
help media plugin scaffold
site transient comment embed i18n
menu post search-replace super-admin
user config eval import network
post-type server taxonomy widget
Installing WordPress with WP-CLI
Before we get to the WordPress admin, we have to install WordPress first. Let’s discuss how to install it using WP-CLI.
NOTE: Ensure you have a web server and MySQL database installed.
First, log in to MySQL shell and create a database
Enter Password:
Next, we need to create a database:
Next, we need to create a user and grant all privileges as:
GRANT ALL PRIVILEGES ON wp.* TO wpadmin;
FLUSH PRIVILEGES;
The next step is to download the WordPress installation file. For this, we are going to use the /var/www/html directory.
Change to /var/www/html
To ensure we have r/w permission to that directory, chown the www-data user created by apache as:
sudo chown www-data:www-data .
Next, download WordPress using WP-CLI. You will need to invoke the wp command as www-data as the user has to write permission to the /var/www/html directory. Avoid using root.
This will download WordPress and extract it into the current directory. Ignore the error shown below:
Warning: Failed to create directory '/var/www/.wp-cli/cache/': mkdir(): Permission denied.
md5 hash verified: e9377242a433acbb2df963966f98c31d Success: WordPress downloaded.
Confirm you have WordPress installed by listing the contents of the /var/www/html directory:
-rw-r--r-- 1 www-data www-data 405 Feb 5 22:22 index.php
-rw-r--r-- 1 www-data www-data 19915 Feb 5 22:22 license.txt
-rw-r--r-- 1 www-data www-data 7278 Feb 5 22:22 readme.html
-rw-r--r-- 1 www-data www-data 7101 Feb 5 22:22 wp-activate.php drwxr-xr-x 1 www-data www-data 4096 Feb 5 22:23 wp-admin
-rw-r--r-- 1 www-data www-data 351 Feb 5 22:23 wp-blog-header.php
-rw-r--r-- 1 www-data www-data 2328 Feb 5 22:23 wp-comments-post.php
-rw-r--r-- 1 www-data www-data 2913 Feb 5 22:23 wp-config-sample.php drwxr-xr-x 1 www-data www-data 4096 Feb 5 22:23 wp-content
-rw-r--r-- 1 www-data www-data 3939 Feb 5 22:23 wp-cron.php drwxr-xr-x 1 www-data www-data 4096 Feb 5 22:24 wp-includes
Next, we need to generate the WordPress configuration file and add the relevant information. Use the command below and replace the values appropriately.
Once we have all the relevant configuration setup, we can finally run the installer setting up the WordPress user as:
Success: WordPress installed successfully.
With that, you have WordPress installed on the system. You can test the site by navigating to http://localhost, which should display the default WordPress:

How to Manage a WordPress Site with CLI
Now you have an entire WordPress site installed and managed using WP-CLI. How about we try to perform basic tasks such as installing a plugin.
Install a Plugin with WP-CLI
While still in the WordPress site installation directory (/var/www/html), let us search for a plugin to install. Let us use the Elementor Page Builder as an example:
Running this command should give you all the possible plugins in tabular form—as shown below:

Cool right? Now let us see how we can install the plugin once we find the appropriate name.
To install it, use the plugin slug as:
Warning: Failed to create directory '/var/www/.wp-cli/cache/': mkdir(): Permission denied.
Downloading installation package from https://downloads.wordpress.org/plugin/elementor.3.1.1.zip...
Unpacking the package...
Installing the plugin...
Plugin installed successfully.
Success: Installed 1 of 1 plugins.
Once we have successfully installed the plugin we need, we can simply activate it using a similar command as:
Success: Activated 1 of 1 plugins.
Uninstall a Plugin with WP-CLI
If you can install a plugin with WP-CLI, you can uninstall it.
Success: Deactivated 1 of 1 plugins.
Once deactivated, you can uninstall it easily as:
Success: Uninstalled 1 of 1 plugins.
Installing WordPress Themes with WP-CLI
Themes are a common WordPress feature. Let’s discuss how to manage them from the command line.
To search for a theme, use the command:
+--------+--------+--------+
| name | slug | rating |
+--------+--------+--------+
| Astra | astra | 100 |
| Astral | astral | 100 |
+--------+--------+--------+
Once you have the theme you wish to install, use the command as shown below:
Warning: Failed to create directory '/var/www/.wp-cli/cache/': mkdir(): Permission denied.
Downloading installation package from https://downloads.wordpress.org/theme/astra.3.0.2.zip...
Unpacking the package...
Installing the theme...
Theme installed successfully.
Success: Installed 1 of 1 themes.
Once you install the theme, you can activate it with the command:
To install it from a zip file, use the command shown below:
Installing the theme...
Theme installed successfully.
Success: Installed 1 of 1 themes.
Uninstalling a WordPress theme with WP-CLI
To remove a theme with CLI, first, activate another theme and then uninstall the one you want to uninstall using the command:
Deleted ‘astra’ theme.
Success: Deleted 1 of 1 themes.
View Themes and Plugins
To list all the themes and plugins in the WordPress instance, use the commands shown below:
wp plugin list
This command should list available themes and plugins, respectively, as shown below:
| name | status | update | version |
+-----------------+----------+--------+---------+
| oceanwp | active | none | 2.0.2 |
| twentynineteen | inactive | none | 1.9 |
| twentytwenty | inactive | none | 1.6 |
| twentytwentyone | inactive | none | 1.1 |
+-----------------+----------+--------+---------+
+---------+----------+--------+---------+
| name | status | update | version |
+---------+----------+--------+---------+
| akismet | inactive | none | 4.1.8 |
| hello | inactive | none | 1.7.2 |
+---------+----------+--------+---------+
Updating Themes and Plugins with WP-CLI
You can also update plugins and themes using the CLI. For example, to update all themes, use the command;
Success: Theme already updated.
NOTE: You can specify the specific theme name to update a single theme.
Updating WordPress from CLI
When the WordPress team releases a new version, you can update from the command line with a few single commands:
The first step is to update the site’s files first as:
Next, we need to update the database as:
Success: WordPress database already at latest db version 49752.
Creating a WordPress post with CLI
To create a post using WP-CLI, use the command below:
Success: Created post 5.
Deleting a Post
To delete a post, specify its numerical identifier as:
Success: Trashed post 5.
Conclusion
This guide has shown you how you use the powerful WP-CLI to manage a WordPress site from the command line. If you want to learn more about how to work with WordPress CLI, consider the documentation resource provided below:
Installing PHP, Apache and MariaDB:
As I’ve said earlier, WordPress is written on PHP programming language. So, you must have a working LAMP server installed on CentOS 8 in order to run WordPress.
First, update the DNF package repository with the following command:
Now, install Apache, PHP, MariaDB with the following command:
httpd-tools php php-cli php-json php-gd php-mbstring php-pdo php-xml \
To confirm the installation, press Y and then press <Enter>.
Apache, PHP and MariaDB should be installed.
Apache httpd service won’t be running (inactive) by default on CentOS 8.
Now, start the Apache httpd service with the following command:
Now, Apache httpd service should be running (active).
Now, add Apache httpd service to the system startup with the following command:
mariadb service won’t be running (inactive) by default on CentOS 8.
Now, start the mariadb service with the following command:
Now, mariadb service should be running (active).
Now, add mariadb service to the system startup with the following command:
Creating a Database for WordPress:
Now, you have to create a new MariaDB database for WordPress.
First, login to the MariaDB shell with the following command:
Now, type in your password and press <Enter>. By default, no password is set. So just press <Enter> if you’re following along.
You should be logged into the MariaDB console.
Now, create a new MariaDB database wordpress with the following SQL statement:
Now, create a new user wordpress with the password secret and grant the user wordpress all privileges (read, write, modify etc.) to the database wordpress with the following SQL statement:
Now, for the changes to take effect, run the following SQL statement:
Now, exit out of the MariaDB database console as follows:
Downloading and Installing WordPress:
WordPress is not available in the official package repository of CentOS 8. So, you must download it from the official website of WordPress and install it on CentOS 8. It’s very easy.
First, navigate to the /var/www directory as follows:
Now, download the latest WordPress archive from the official website of WordPress with the following command:
wget is downloading WordPress archive. It may take a few minutes to complete.
WordPress archive should be downloaded.
The WordPress archive file latest.tar.gz should be in the /var/www directory as you can see in the screenshot below.
Now, extract the WordPress archive file latest.tar.gz with the following command:
Once the WordPress archive file latest.tar.gz is extracted, a new directory wordpress/ should be created as you can see in the screenshot below.
Now, you can remove the latest.tar.gz file as follows:
Now, change the owner and group of the wordpress/ directory and its contents to apache as follows:
Now, change the permission or the wordpress/ directory and its content to 775 as follows:
If you have SELinux enabled (which is very likely on CentOS 8/RHEL 8), run the following command to set the correct SELinux context to the /var/www/wordpress directory and its contents.
"/var/www/wordpress(/.*)?"
For the SELinux changes to take effect, run the following command:
Now, create a new Apache configuration file wordpress.conf for WordPress with the following command:
Vi text editor should open. Now, press i to go to INSERT mode.
Now, type in the following lines of codes in the wordpress.conf file.
ServerAdmin root@localhost
DocumentRoot /var/www/wordpress
<Directory "/var/www/wordpress">
Options Indexes FollowSymLinks
AllowOverride all
Require all granted
</Directory>
ErrorLog /var/log/httpd/wordpress_error.log
CustomLog /var/log/httpd/wordpress_access.log common
</VirtualHost>
Finally, the wordpress.conf file should look as shown in the screenshot below.
Now, press <Esc>, type in :wq! and press <Enter> to save the file.
Now, restart the Apache httpd service with the following command:
Apache http service should be active without any errors as you can see in the screenshot below.
Accessing WordPress:
In order to access WordPress installed on your CentOS 8 machine, you must know the IP address or domain name of your CentOS 8 machine.
You can find the IP address of your CentOS 8 machine with the following command:
As you can see, the IP address of my CentOS 8 machine is 192.168.20.129. It will be different for you. So, make sure to replace it with yours from now on.
Now, open your favorite web browser and visit http://192.168.20.129. You should see the following page. Click on Let’s go.
Now, type in the MariaDB database information (i.e. Database Name, Username, Password). Leave the Database Host and Table Prefix as it is if you don’t know what they are. Once you’re done, click on Submit
Now, click on Run the installation.
Now, type in your site details and click on Install WordPress.
Don’t forget to take a note of the Username and Password you’re setting here as you will need them very shortly.
WordPress should be installed. Now, click on Log In.
Now, type in your site Username and Password and click on Log In.
You should be logged in to the WordPress admin panel. You can manage your site from here.
So, that’s how you install WordPress on CentOS 8. Thanks for reading this article.
]]>Installation
WPScan comes pre-installed in Kali Linux. For other distros, installing WPScan is very easy, according to official documentation. Type
ubuntu@ubuntu:~$ sudo apt install patch build-essential zlib1g-dev liblzma-dev ruby-dev
ubuntu@ubuntu:~$ gem install nokogiri
Then
ubuntu@ubuntu:~$ gem install wpscan
OR
ubuntu@ubuntu:~$ git clone https://github.com/wpscanteam/wpscan
ubuntu@ubuntu:~$ cd wpscan/
ubuntu@ubuntu:~$ bundle install && rake install
To update installed WPScan to the latest, type
OR
OR in Kali Linux
Usage
Now we’ll learn how to perform quick scan of your wordpress website, themes and plugins. WordPress will scan your website with multiple scan options and will show you the vulnerabilities and their details on the terminal. WPScan will also tell you a lot about your wordpress installation details and versions of themes and plugins installed. It can also enumerate usernames registered and brute force them to find passwords.
To perform a scan of your website, type
[+][32m0m] Started: Fri Oct 18 20:58:54 2019
Interesting Finding(s):
[+][32m0m] http://www.redacted.com/
| Interesting Entry: Server: Apache
| Found By: Headers (Passive Detection)
| Confidence: 100%
[+][32m0m] http://www.redacted.com/xmlrpc.php
| Found By: Headers (Passive Detection)
| Confidence: 100%
| Confirmed By:
| - Link Tag (Passive Detection), 30% confidence
| - Direct Access (Aggressive Detection), 100% confidence
| References:
| - http://codex.wordpress.org/XML-RPC_Pingback_API
| - https://www.rapid7.com/db/modules/auxiliary/scanner/http/wordpress_ghost_scanner
| - https://www.rapid7.com/db/modules/auxiliary/dos/http/wordpress_xmlrpc_dos
| - https://www.rapid7.com/db/modules/auxiliary/scanner/http/wordpress_xmlrpc_login
| - https://www.rapid7.com/db/modules/auxiliary/scanner/http/wordpress_pingback_access
[+][32m0m] http://www.redacted.com/readme.html
| Found By: Direct Access (Aggressive Detection)
| Confidence: 100%
[+][32m0m]Upload directory has listing enabled: http://www.redacted.com/wp-content/uploads/
| Found By: Direct Access (Aggressive Detection)
| Confidence: 100%
[+][32m0m] http://www.redacted.com/wp-cron.php
| Found By: Direct Access (Aggressive Detection)
| Confidence: 60%
| References:
| - https://www.iplocation.net/defend-wordpress-from-ddos
| - https://github.com/wpscanteam/wpscan/issues/1299
[+][32m0m] WordPress version 2.7.1 identified (Insecure, released on 2009-02-10).
| Detected By: Unique Fingerprinting (Aggressive Detection)
|- http://www.redacted.com/wp-admin/js/common.js md5sum is 4f0f9bdbe437f850430fae694ca046ba
[+][32m0m] WordPress theme in use: sliding-door
| Location: http://www.redacted.com/wp-content/themes/sliding-door/
| Last Updated: 2016-01-02T00:00:00.000Z
| Readme: http://www.redacted.com/wp-content/themes/sliding-door/README.txt
| [!][33m0m] The version is out of date, the latest version is 3.2.4
| Style URL: http://www.redacted.com/wp-content/themes/sliding-door/style.css
| Style Name: Sliding Door
| Style URI: http://mac-host.com/slidingdoor/
| Description: A template featuring sliding images in the menu, based on Samuel
Birch's phatfusion image menu....
| Author: Wayne Connor
| Author URI: http://www.macintoshhowto.com/
|
| Detected By: Css Style (Passive Detection)
| Confirmed By: Urls In Homepage (Passive Detection)
|
| Version: 1.5 (80% confidence)
| Detected By: Style (Passive Detection)
|- http://www.redacted.com/wp-content/themes/sliding-door/style.css, Match: 'Version: 1.5'
[i][34m0m] Plugin(s) Identified:
[+][32m0m] all-in-one-seo-pack
| Location: http://www.redacted.com/wp-content/plugins/all-in-one-seo-pack/
| Latest Version: 3.2.10
| Last Updated: 2019-10-17T15:07:00.000Z
|
| Detected By: Comment (Passive Detection)
|
| The version could not be determined.
[+][32m0m] google-analyticator
| Location: http://www.redacted.com/wp-content/plugins/google-analyticator/
| Last Updated: 2019-03-04T22:57:00.000Z
| [!][33m0m] The version is out of date, the latest version is 6.5.4
|
| Detected By: Urls In Homepage (Passive Detection)
|
| Version: 4.1.1 (80% confidence)
| Detected By: Readme - Stable Tag (Aggressive Detection)
| - http://www.redacted.com/wp-content/plugins/google-analyticator/readme.txt
[+][32m0m] nextgen-gallery
| Location: http://www.redacted.com/wp-content/plugins/nextgen-gallery/
| Latest Version: 3.2.18
| Last Updated: 2019-09-18T16:02:00.000Z
|
| Detected By: Urls In Homepage (Passive Detection)
|
| The version could not be determined.
[+][32m0m] qtranslate
| Location: http://www.redacted.com/wp-content/plugins/qtranslate/
|
| Detected By: Urls In Homepage (Passive Detection)
|
| Version: 2.3.4 (80% confidence)
| Detected By: Readme - Stable Tag (Aggressive Detection)
| - http://www.redacted.com/wp-content/plugins/qtranslate/readme.txt
[+][32m0m] wp-spamfree
| Location: http://www.redacted.com/wp-content/plugins/wp-spamfree/
| Last Updated: 2016-09-23T05:22:00.000Z
| [!][33m0m] The version is out of date, the latest version is 2.1.1.6
|
| Detected By: Urls In Homepage (Passive Detection)
| Confirmed By: Comment (Passive Detection)
|
| Version: 2.1 (60% confidence)
| Detected By: Comment (Passive Detection)
| - http://www.redacted.com/, Match: 'WP-SpamFree v2.1'
[i][34m0m] No Config Backups Found.
[!][33m0m] No WPVulnDB API Token given, as a result vulnerability data has not been output.
[!][33m0m] You can get a free API token with 50 daily requests by registering at
https://wpvulndb.com/users/sign_up.
[+][32m0m] Finished: Fri Oct 18 21:02:01 2019
[+][32m0m] Requests Done: 89
[+][32m0m] Cached Requests: 8
[+][32m0m] Data Sent: 45.16 KB
[+][32m0m] Data Received: 288.769 KB
[+][32m0m] Memory used: 133.965 MB
[+][32m0m] Elapsed time: 00:03:07
To check for vulnerable plugins
To check for vulnerable plugins, you can add an options ‘–enumerate vp’ to your command. WPScan will show all the plugins used by your WordPress website, highlighting the vulnerable ones along with other details. Type the following
//to list all plugins, use ‘ap’ instead of ‘vp’
azad@kali:~$ wpscan --url http://www.redacted.com --rua --enumerate vp -o
output-plugins.txt
To check for vulnerable Themes
To check for vulnerable plugins, add the option ‘–enumerate vt’ in your terminal command. WPScan will show you the vulnerabilities in your theme. Type the following
azad@kali:~$ wpscan --url http://www.redacted.com --rua --enumerate vt
To enumerate users in WordPress site
When registered usernames in websites are found, it becomes easier for hackers to brute force their password and compromise the access. After compromising an admin or privileged account, it becomes more easy to gain access to the whole WordPress website. That’s why you should always disable username enumeration in your WordPress configuration.
WPScan can also enumerate registered users in your WordPress installation. Type the following to enumerate users using WPScan
azad@kali:~$ wpscan --url http://www.redacted.com --rua --enumerate
U /path/to/user-dictionary.txt
// Using default dictionary
azad@kali:~$ wpscan --url http://www.redacted.com --rua --enumerate u
...snip...
[i][34m0m] User(s) Identified:
[+][32m0m] Shani
| Detected By: Rss Generator (Passive Detection)
| Confirmed By: Login Error Messages (Aggressive Detection)
[+][32m0m] InterSkill
| Detected By: Rss Generator (Passive Detection)
| Confirmed By: Login Error Messages (Aggressive Detection)
...snip...
Brute forcing passwords using WPScan
After getting usernames from the above step, you can guess passwords for these users by brute forcing. Using this method, you can see which user of your website is using poor strength password.
WPScan will need a list of users and a password dictionary of commonly used passwords. Then it will try every combination of usernames and passwords for successful logins. You can download password dictionaries from github repositories but in this tutorial, we’re going to use “rockyou.txt” dictionary which is located by default in Kali Linux in “/usr/share/wordlists” directory.
To download dictionaries in your distro, type
ubuntu@ubuntu:~$ ls /usr/share/wordlists/
rockyou.txt.gz
ubuntu@ubuntu:~$ gzip -d rockyou.txt.gz
ubuntu@ubuntu:~$ ls -la /usr/share/wordlists/rockyou.txt
-rw-r--r-- 1 root root 139921507 Jul 17 02:59 rockyou.txt
To run a brute force scan on website, type
-U ‘Shani’,’InterSkill’
Conclusion
WPScan is a fantastic tool to add to your security toolbox. Its free, powerful and easy to use utility to discover security vulnerabilities and misconfigurations. Anyone having zero technical knowledge of security can easily install and use it for enhanced security of their website.
]]>Updating APT Package Repository Cache:
First, update the APT package repository cache with the following command:
![]()
The APT package repository cache should be updated.

Installing and Configuring MySQL/MariaDB:
Now, install MariaDB server and client packages from the official package repository of Debian 10 with the following command:
![]()
To confirm the installation, press Y and then press <Enter>.

The APT package manager will download and install all the required packages.

At this point, MariaDB server and client packages will be installed.

Now, check whether mariadb service is running with the following command:
![]()
As you can see, the mariadb service is running. It’s also enabled to automatically start on system boot.
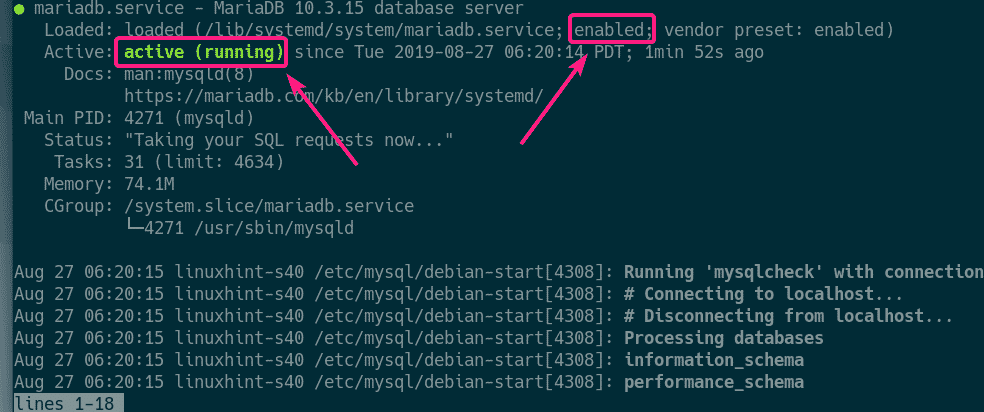
If in any case, mariadb service is not running, then start the service with the following command:
Now, run the following command to set a root password for MariaDB:
![]()
Press <Enter>.
![]()
Now, press Y and then press <Enter>.
![]()
Now, type in your root password and press <Enter>.

Type in your root password again and press <Enter>.

Press Y and then press <Enter> to remove anonymous users.
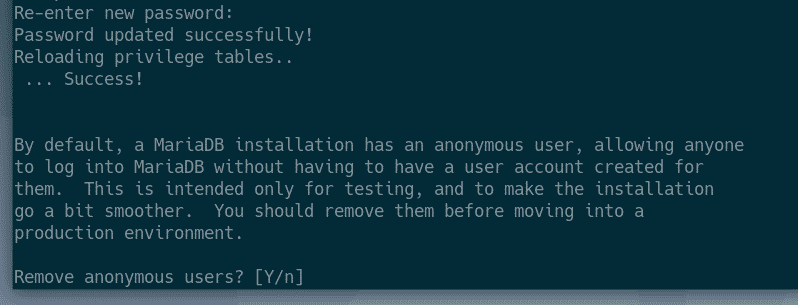
If you don’t want to allow root login remotely, press Y. Otherwise, press N. Then, press <Enter>.

Now, press Y and press <Enter> to remove test database.

Now, press Y and then press <Enter> to reload the privilege table.

MariaDB should be configured.

Creating MySQL/MariaDB Users and Databases for WordPress:
Now, you have to create a new user and database for WordPress development setup.
Login to MariDB shell with the following command:
![]()
Now, type in the MariaDB root password you’ve already set and press <Enter>.

You should be logged in.

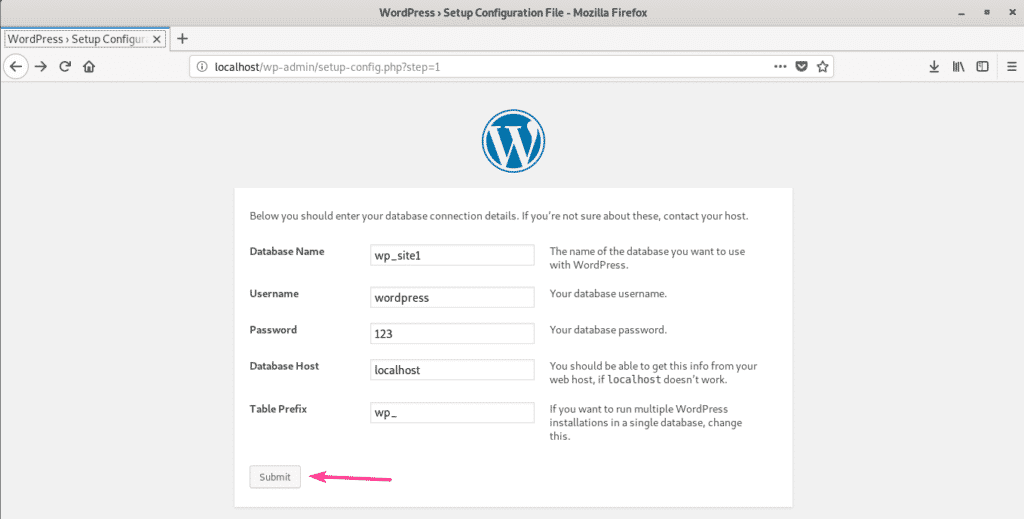
Now, create a new database wp_site1 with the following SQL statement:

Now, create a new user wordpress, set a password for the user (let’s say 123) and grant the user permission to use all available databases with the following SQL statement:

Now, flush the MariaDB privileges for the changes to take effect as follows:

Now, exit out of the MariaDB shell as follows:

Installing Apache Web Server, PHP and Required PHP Libraries:
Now, install Apache 2 web server, PHP and all the required PHP libraries with the following command:
php-zip php-json php-xml
![]()
Now, press Y and then press <Enter> to confirm the installation.

Apache 2 web server, PHP and required PHP libraries should be installed.

Configuring Apache Web Server for WordPress Development:
The default Apache run user on Debian 10 is www-data and the default web root directory is /var/www/html. So, as an ordinary user, you won’t be able to create, modify or remove any files/directories in the web root directory. As you’re setting up a WordPress development server, this is not what you want.
To solve this problem, you should change the Apache run user to your login user and change the owner and group of the webroot /var/www/html to your login user.
To change the Apache run user, edit /etc/apache2/envvars configuration file with the following command:
![]()
You have to modify the APACHE_RUN_USER and APACHE_RUN_GROUP environment variables.
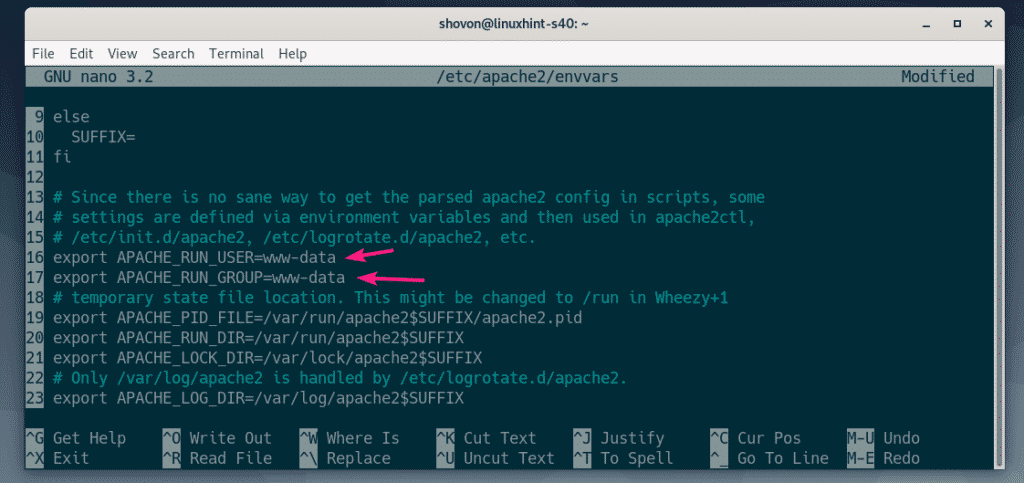
Now, set APACHE_RUN_USER and APACHE_RUN_GROUP environment variables to your login user’s username. If you don’t know what the username is, you can use the whoami command to find it out.
Once you’re done, save the file by pressing <Ctrl> + X followed by Y and <Enter>.

Now, change the owner and group of the /var/www/html directory to your login user with the following command:
![]()
To get the WordPress permalink feature to work, you need to enable Apache rewrite module. To do that, run the following command:

For the changes to take effect, restart Apache 2 web server with the following command:
![]()
Downloading WordPress:
You can download WordPress from the official website of WordPress. Once the page loads, click on the Download WordPress button as marked in the screenshot below.
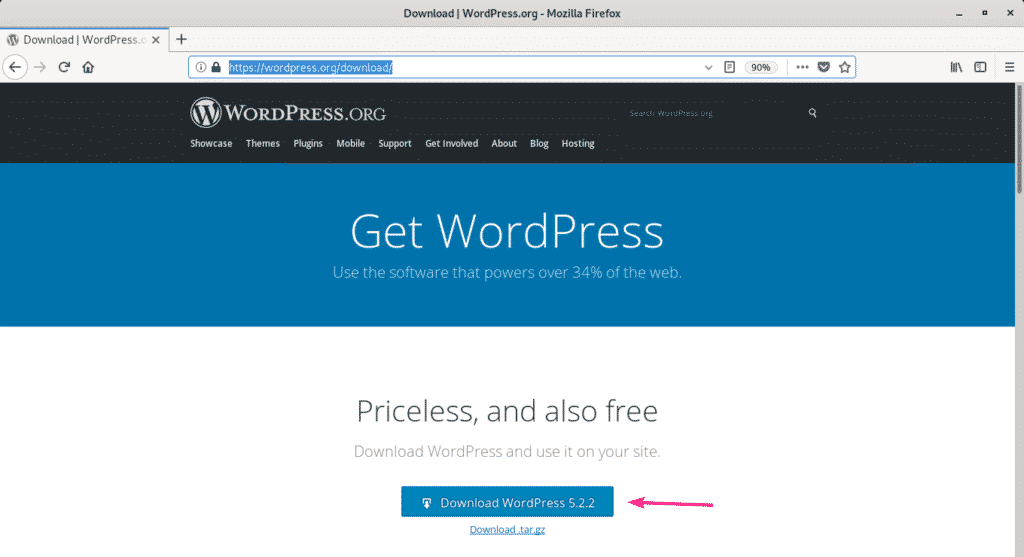
Your browser should prompt you to save the file. Select Save File and click on OK.
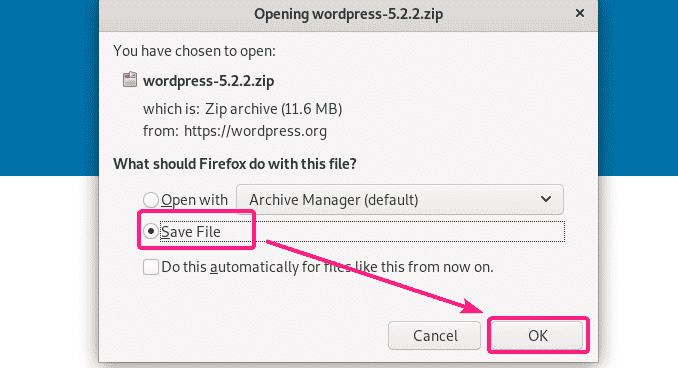
WordPress archive should be downloaded.

Installing and Configuring WordPress on the Development LAMP Server:
Now, double click on the WordPress archive file. The archive should be opened with Archive Manager. Now, navigate to the wordpress directory from the Archive Manager.
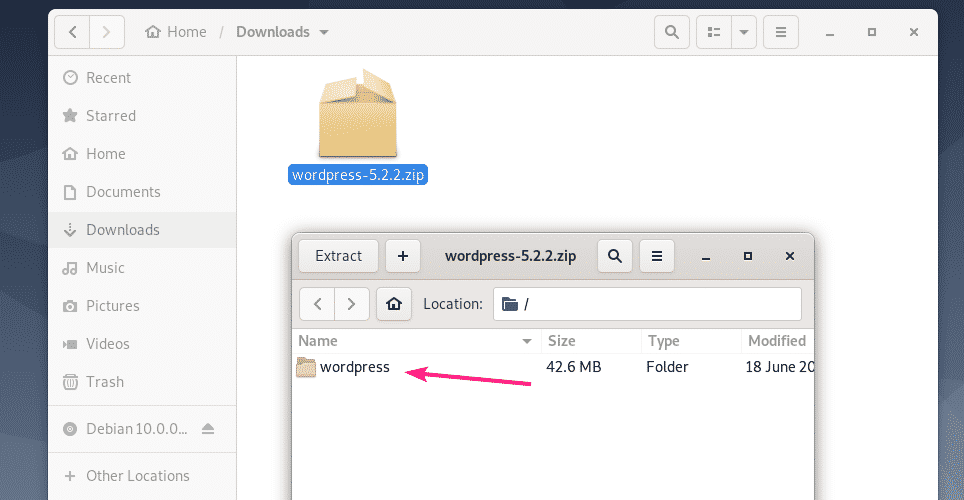
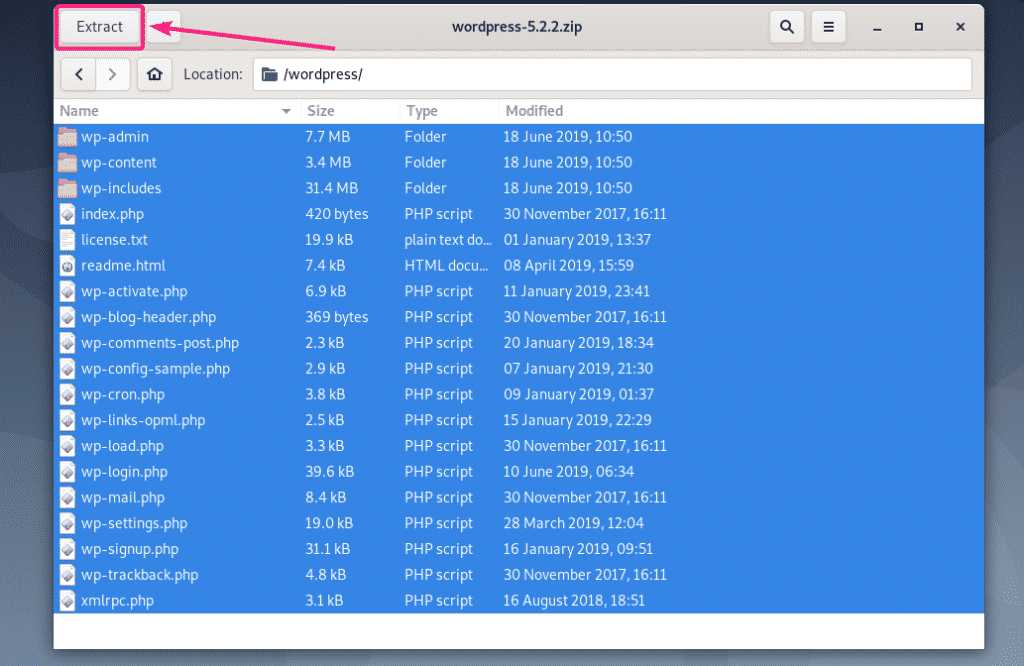
Select all the files and directories and click on Extract.
Now, navigate to the /var/www/html directory and click on Extract.
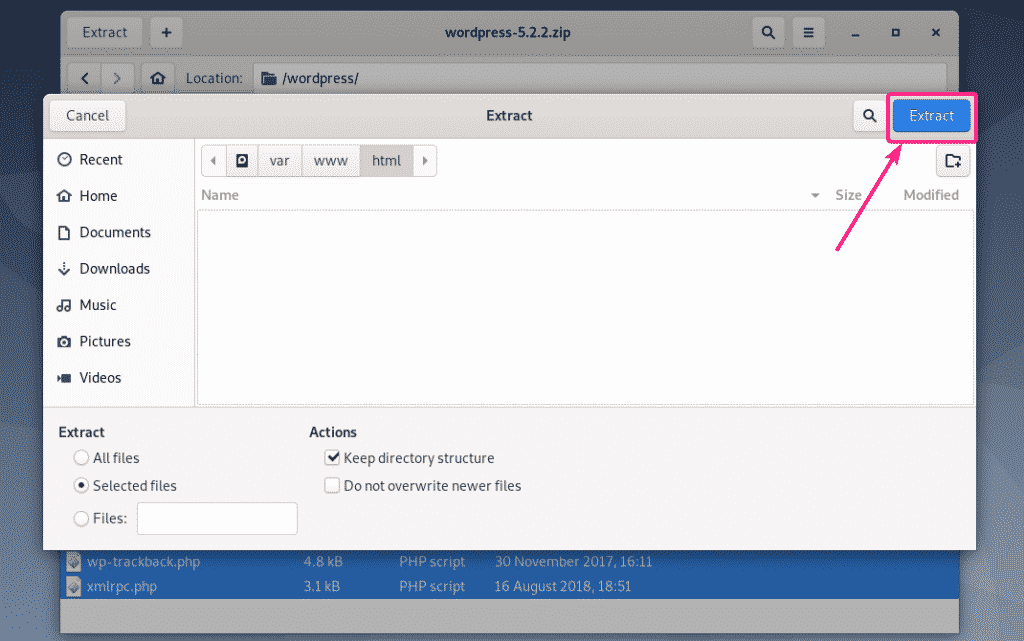
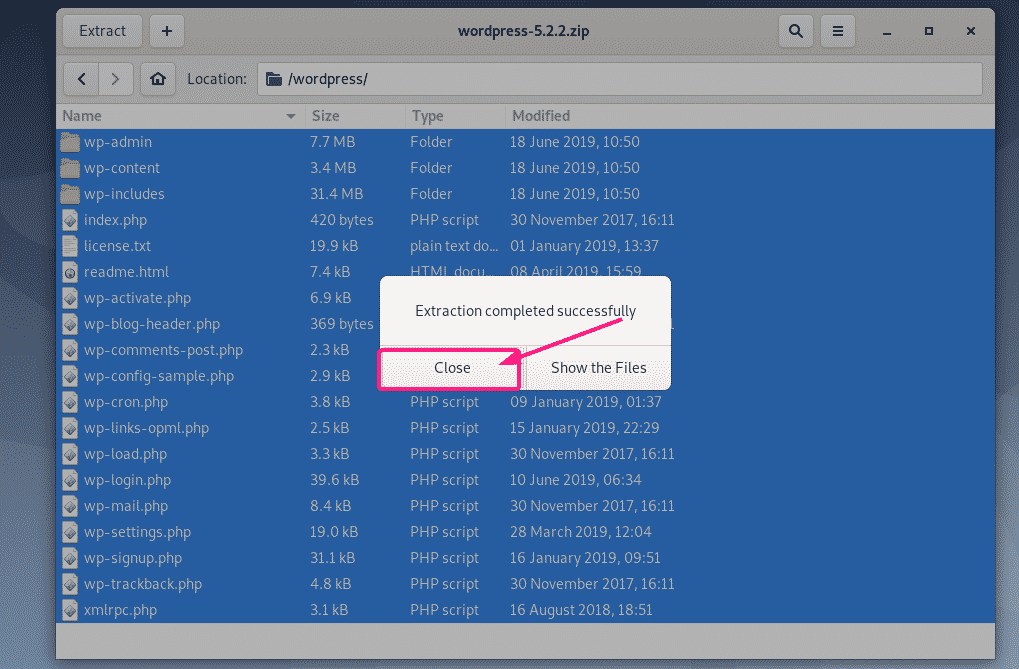
All the required files and directories should be extracted. Now, click on Close and close the Archive Manager.
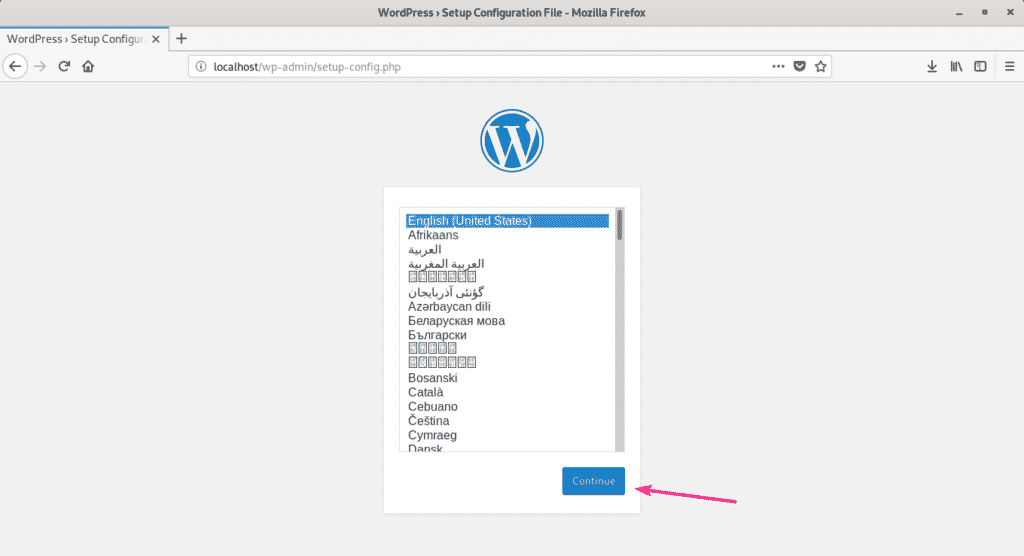
Now, visit http://localhost from your web browser. You should see the WordPress configuration page. Select your language and click on Continue.
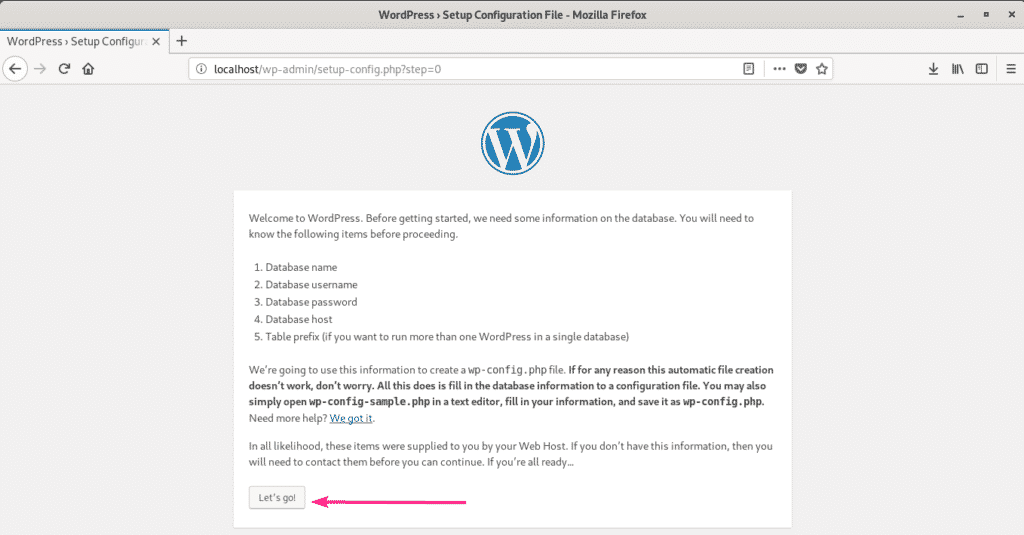
Now, click on Let’s go!.
Now, type in the MySQL/MariaDB database details and click on Submit.
If all goes well, then you should see the following page. Now, click on Run the installation.

Now, type in your website information and click on Install WordPress. Be sure to note the username and password as you will need them later to manage your WordPress website.
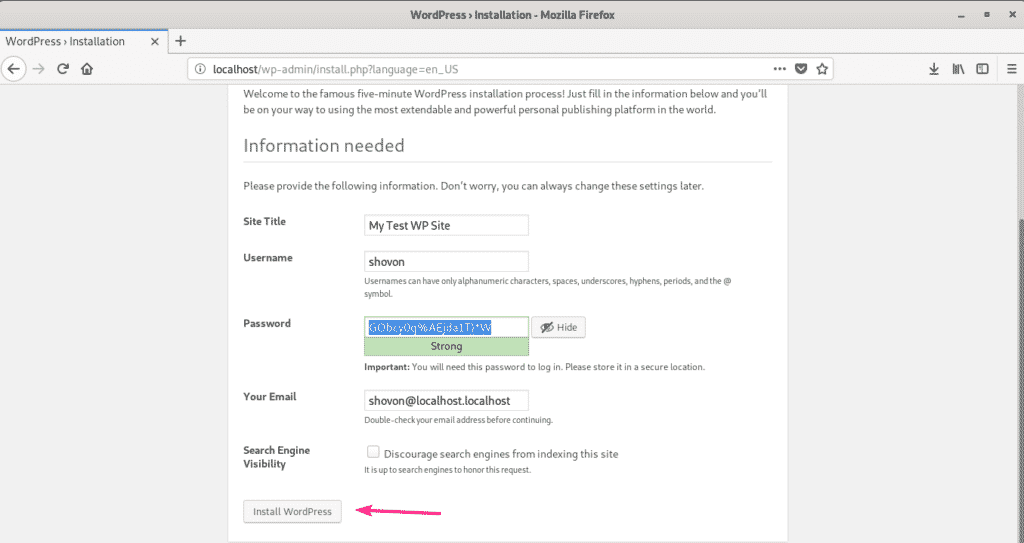
WordPress should be configured. Now, click on Log In.
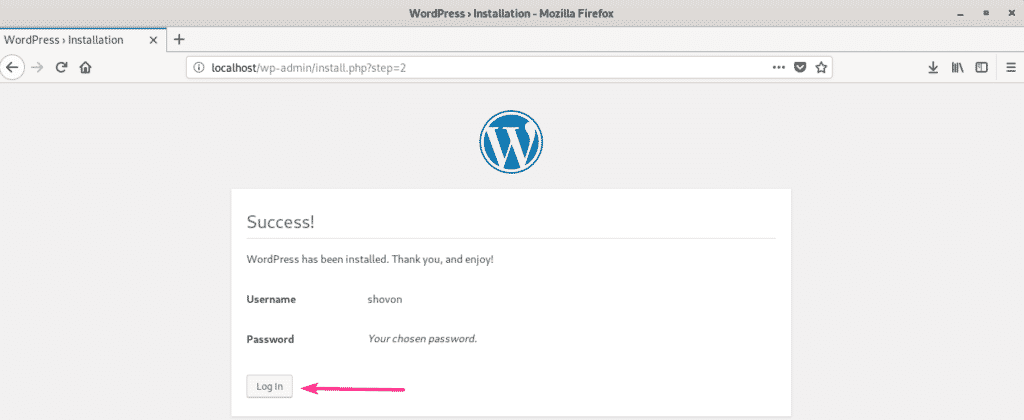
You should be taken to WordPress Admin login page (http://localhost/wp-login.php). Type in your username and password and click on Log In.
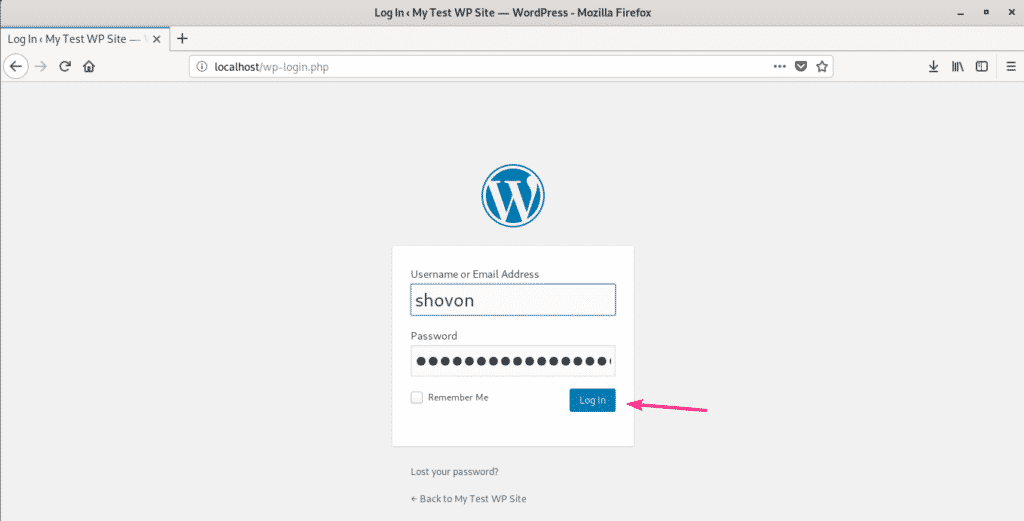
You should be logged in to WordPress Admin. Now, you should be able to set up your WordPress website the way you want.
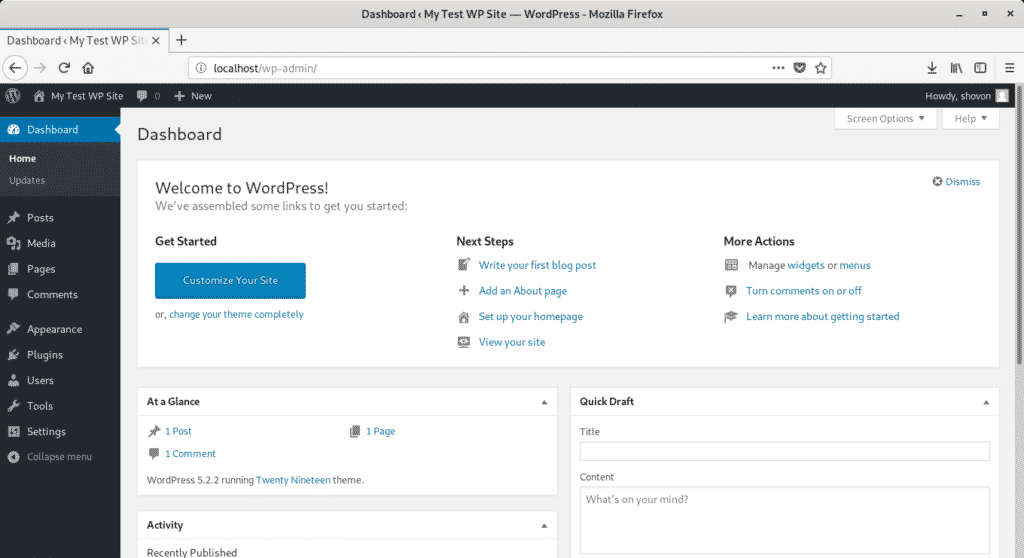
So, that’s how you install WordPress development environment on Debian 10. Thanks for reading this article.
]]>Introduction to WordPress
WordPress is an open-source content management system (CMS). It allows you to create and manage blogs. One more important feature being, it allows the users to host their own dynamic website without actually coding from scratch. It provides a user-friendly interface to update blog posts and websites. A wide plethora of templates are available for the users to choose from. Complete customization of the website is an added advantage of WordPress. Even though it has built in templates, the software developers can customize it by using the basic WordPress framework and then adding their own PHP code, styling statements and scripts. It also allows the developers to fire SQL queries to make substantial changes in the database linked to these websites.
A user-friendly WordPress dashboard helps the user to navigate through different themes, plugins and different features and extensions available through WordPress.

Figure 1: A Sample WordPress Website
Some of the key features of WordPress are:
- Plugins are supported by WordPress; thus it gives flexibility to add new modules.
- All the websites created under WordPress are indexed properly on the search engine. Thus, the websites are search engine optimization (SEO) friendly.
- The multimedia texts like images, videos are maintained properly.
- WordPress is multilingual, thus allowing dynamic translation of the websites.
- Users can create creative and innovative websites without programming at all.
- A lot of popular widgets are available to choose from along with the customizable themes.
- A variety of the templates have the social sharing features indicating the number of social media networks it supports. In this case, the more the merrier.
Thus, everything from a personal blog to a large corporate website can be created using WordPress. It has evolved as the best self-hosting services as well as a popular content management system.
Introduction to DigitalOcean Virtual Private Server (VPS)
DigitalOcean is a cloud platform to deploy virtual servers, manage storage and balance loads. Cloud is basically a model where users have a convenient, on-demand access to a shared pool of resources, such as servers, storage and applications, over the internet. Thus, the method of accessing these shared resources which are virtual in nature and when required is called as cloud access.
Resources like CPU and memory options are allocated to the cloud servers for the users to access. The operating system and other complementary software are based on the developer’s choice. Website hosting, distributed applications, sending and storing of information are some of the applications of cloud usage.
Two types of cloud hosting are possible:
- Shared hosting: It is the most common and simple way of getting a site up and running. In this type of hosting, the pool of resources is shared by millions of users. The location of the cloud and the allocation of resources depends on the cloud provider. Shared hosting can be divided into two types, para-virtualization and true-virtualization, which make uses of OpenVZ and KVM respectively.
- Dedicated hosting: Here, entire physical server is dedicated to a single client. The usage and allocation of resources is completely under the developer’s control. It is more flexible in nature. The cloud resides within the organisation it serves.
DigitalOcean is a shared hosting based on KVM virtualization and made available to millions of users to reap the benefits of the services provided by them.
Virtualization:
Virtualization supports running of multiple virtual server machines on a single physical machine. This enables an efficient use of resources, meaning that services can still function independently just as it’s on a different physical hardware. If a hardware failure occurs, the virtual servers are transferred to another healthy physical server. Virtualization also divides users without actually isolating them. Hypervisor basically manages these virtual servers. Individual VPSs have their own Operating System installed which the user can gain access to depending on the type of cloud.
The virtual servers created are called as droplets as in droplets in the ocean, in DigitalOcean terminology.

A fair share of CPU, memory, storage and load balancing resources are assigned to these droplets by default. If the resources fall short, dynamic allocation is possible in DigitalOcean.
The four type of cloud services usually available are:
- Public: This cloud is available for publicly for everyone to use with sharing of resources. Entire control lies with the cloud provider. DigitalOcean by default allows to create all the Droplets as public servers.
- Private: This cloud is limited to a particular organization. All the internal departments of the firm have access to the cloud, no one else does.
- Community: Type of a public cloud designed to meet specific needs of people with common concerns. Can be owned by one or multiple organizations falling under same community.
- Hybrid: This cloud is a mixture of public and private both, where only sensitive information is stored on the private cloud. Other information is available on the public cloud.
DigitalOcean provides Virtual Private Servers. The main difference between VPS and Private Cloud, that VPS is based on either a single physical server or a public cloud server, whereas, in private cloud only specific authorized users can access the resources which are deployed across various physical servers of the mainframe. Another difference being, users can gain more control over the resource allocation and utilisation of a VPC over the traditional VPS; hence VPC can be more expensive than VPS. Unfortunately, DigitalOcean only provides VPS, but it’s more than enough to host a public WordPress website.
DigitalOcean provides resource pooling of various computing resources like network bandwidth, storage and processing memory. Based on the demand, these virtual resources can be assigned or re-assigned to specific Droplets. DigitalOcean also allows automatic control and optimal use by leveraging a metering capability to monitor and report the usage.
Steps to Install and Configure WordPress On a Droplet
Step 1: Creating a droplet
-
- Select Create Droplet by navigating to this URL.
https://cloud.digitalocean.com/droplets

- The Droplet Hostname is the name provided to the droplet. Spaces should be avoided in the hostname if possible.
- Navigate to “one-click apps” section, and select “WordPress on 16.04” or whatever the latest version available at the moment.


- Under Select Size, select the $5/mo. plan is sufficient for starters. If you’re upgrading from a shared hosting environment, go for the suitable plan. Make sure to keep in mind the future use of the website while selecting the server size. DigitalOcean also allows dynamic reallocation of the resources. So, even if thousands of users are visiting the website, the server space should be sufficient.
- The region determines the physical location of your VPS. This basically means that location should be selected based on the location of the audience. This will enhance SEO techniques and speedy retrieval of the information.

- Next, click on Enable Backups option, to keep a copy of the data just in case, the information is lost, it can be retrieved easily if a proper and updated backup is maintained. However, it costs 20% of the Droplet price.
- Scroll to the bottom of the page and click the Create Droplet button. Once that is done, the virtual droplet is created and installed.
- After the droplet is created, copy the IP address.
An email is sent after the creation of the droplet containing public IP to the Droplet, username and password. The username is set as ‘root’ and a default password is a randomly generated one.
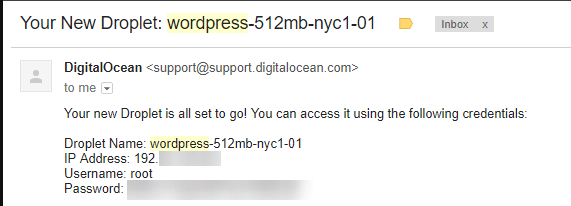
Step 2: Access WordPress in the Droplet
- Enter IP address to the Droplet in the browser. The WordPress site can be accessed from the given public IP address. Navigate to this address, find the admin account, change the default password to a safe one. http://<IP ADDRESS>/wp-login.php
- Type the given username, and the password to login to the admin area.
- Navigate to http://<IP ADDRESS>/wp-admin/users.php
Use a secure password to the admin account to avoid any sort of leaking of the information in the future. Choose the password that can be easily memorised. Use this website to check how secure the password is. https://howsecureismypassword.net/
Step 3: SSH Login
SSH is to get secure access of remote server. This is useful to install themes, plugins via the FTP protocol.
- After changing the default password, use PuTTY configuration to establish connection with the server through SSH. PuTTY is an open-source software.
- In the PuTTY window, enter domain name or the IP as host name and select connection type as SSH. Click on establish connection.
Buying A Customized Domain Name
A domain name is basically a memorable address on the internet to a web server. It is through the domain name that the users will find your website. Thus, it becomes essential to have a recognizable and a memorable domain name. A domain name carries brand reputation. It should be selected in such a way that it can roll of the tongue easily and can be embedded in the users’ memory immediately.
That is where, domain name registrars like namecheap and godaddy come into picture. Eclectic plans are available on these platforms for the user to choose from according to his/her preferences. All domain names are unique, so it becomes quintessential to register the name before someone else claims it.
Once, the term of validity is over, if renewal is not done, the domain becomes obsolete and can be assigned to different users if asked for it; hence make sure to renew it before the term expired.
Mapping the Domain Name to IP Using Namecheap
1. Register a domain by navigating to the following URL. This domain is going to be used to access the aforementioned WordPress website. Registering the domain creates a user profile too.
https://www.namecheap.com/domains/registration

2. Configure the domain name to use DigitalOcean’s name servers :
- Login to the Registrar’s Control Panel and go to Domain List https://ap.www.namecheap.com/Domains/DomainList

- Select the domain name that you want to configure and click “domain” tab
- After that, specify custom DNS servers as DigitalOcean name servers. Type ns1.digitalocean.com, ns2.digitalocean.com and ns3.digitalocean.com in the text boxes.

- Save. This completes the configuration of the name servers.
3. Create droplet if you do not already have one. For existing droplets, select the IP address of the droplet and then copy it in a new tab in your browser. This is done to check if the server is working or not.
Configuring Domain Name with The Droplet
- Now, to configure the domain name to the droplet, we need to login to the domain provider’s control panel and create an A Record. However, since DigitalOcean is used as the web server, its inbuilt DNS server is used to add the records. It’s much faster than using rest of the DNS servers.
- A-Record stands for address record and it is used to find the IP address of a computer connected to the network. In DigitalOcean’s control pane, navigate to “Networking”

- Add the domain name registered in Namecheap.
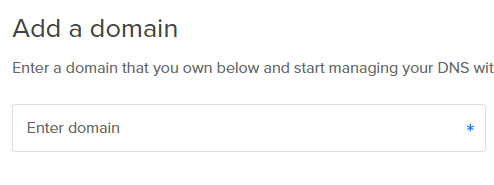
- Type @ as the hostname, and select the newly created Droplet where WordPress is installed as “Will redirect to”
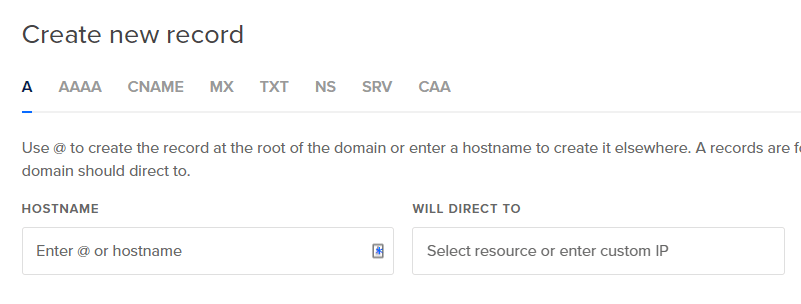
- Add rest of the records such as CNAME if a subdomain is used, MX records if a mail server is used in the same way as above records.
In order to check if things are in place, open the command prompt and type
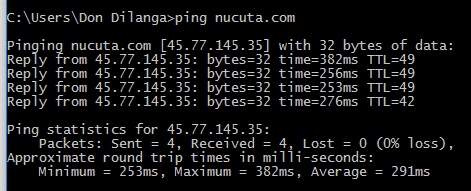
If this works without any error, it means you are all set and the domain name is correctly mapped to the IP address and thus, the domain name can be used directly to access it.
Thus, this gets us to the end of this article where we covered installation and configuration of WordPress on DigitalOcean and mapping of the domain name to an IP.
Good news! All the installation steps are successful and now you are ready to launch your own innovative and creative WordPress website on DigitalOcean Cloud Hosting. The WordPress site can further be customized using themes, plugins. Most of the themes can be downloaded for free of charge from here https://wordpress.org/themes/ , whereas the plugins can be downloaded from here https://wordpress.org/plugins/
]]>Are you tired of paying for what seems to be overpriced hosting for WordPress, or do you want to have full control of your WordPress environment. This article will get you started thinking about the possibility of self hosting.
How to Install WordPress on a Web Server?
WordPress comes in two flavors, available from two different websites.
WordPress.com is home to the fully hosted version of WordPress, and that’s the version you want to choose if you would like to create a website without any knowledge in a matter of minutes and working on producing compelling content instead of worrying about technicalities.
WordPress.org is home to the self-hosted version of WordPress, and it requires users to supply their own hosting and do their own backups and maintenance. This is the version you want to choose if you want to manage WordPress either for yourself or your clients.
How to Ensure Highly Available Site?
To ensure high availability of a self-hosted WordPress site, it’s necessary to harden the WordPress installation from attacks by always using the latest version of WordPress, avoiding vulnerable third-party themes and plugins, adhering to basic online security practices, and following the recommendations published by WordPress developers.
To protect against traffic overloads caused either by too many visitors trying to enter the site at the same time or malicious Distributed Denial of Service (DDoS) attacks, it’s highly advisable to employ the services of a content delivery network provider such as Cloudflare.
How to Scale When Your Site Gets Popular?
Another advantage of Cloudflare and other content delivery network providers is the fact that their global networks of powerful data centers spanning across all continents enable virtually unlimited scaling of self-hosted WordPress sites.
Of course, content delivery networks don’t replace the fundamental principles of scaling small WordPress sites with pageviews in the hundreds to millions of pageviews every month. Such principles include reverse proxy page caching, database distribution, search indexing, or building an elastic architecture, just to name a few.
WordPress may be the content management system of choice for many independent bloggers, but that doesn’t mean that it can’t scale to support enterprise-class applications. Sites such as TechCrunch, The New Yorker, BBC America, Sony Music, The White House, Dyn, or Toyota all use WordPress and benefit from its mature features and excellent versatility.
Where to Find More Information?
The WordPress Codex is the most comprehensive living repository for WordPress information and documentation on the web, and it’s maintained by core WordPress developers. It contains everything you need to know about WordPress as a content management system, teaches how to work with themes and create plugins, and lists links to developer documentation and WordPress APIs, among other things. ]]>
This article covers two such software programs: Ubuntu and WordPress. WordPress is a system that creates and edits content and is used to make websites and write blogs. Meanwhile, Ubuntu is an operating system software on which the whole system runs. This article shows you how to install the WordPress software in Ubuntu.
However, before moving on to install WordPress, you first need to set up some of the background software. To do so, you will need to install three things before installing WordPress. The first one is a dynamic content processor, the second is a webserver, and the last one is a database server. To get these things, you will download Apache, MySQL, and PHP before downloading WordPress.
Install Apache
WordPress is usually installed using the LAMP framework. In LAMP, L stands for Linux, A stands for Apache, M stands for MySQL, and P stands for PHP. First, you will install an SSH client on the system. You will be using the SSH username and password to log in. After you obtain access, you will be shown a welcome message. Enter the following two commands to install Apache:


Install MySQL
MySQL is an essential software for WordPress that comes with a lot of benefits. Before installing WordPress, you first need to install MySQL, just as the webserver. This section teaches you how to download a version of MySQL called MariaDB, a fully open-source software.
Use the following commands to install MariaDB in Ubuntu. Both MariaDB and its client version will be downloaded once you enter the first command. The second command allows for the initiation of the MySQL service, and the third command enables the service. The last commands ensure that the installation is stable. You will be prompted with some questions; be sure to give the database server a root password so that you can use the key for the questions later.


$ sudo service mysql start
$ sudo /etc/init.d/mysql start

$ sudo apt-cache policy mysql-server


Install PHP 8
PHP also needs to be downloaded with WordPress. PHP is the language used in WordPress to run and decipher the PHP scripts used in WordPress. This section explains how to install version 8 of PHP in Ubuntu.
The following commands are used to install PHP8. The first command installs the core module and supporting modules of PHP8, while the other commands enable the web module and restart the Apache server, respectively.


$ sudo apt install php8.0-fpm


Install WordPress
The final step in this process is to install WordPress. This requires a lot more time than the previous installations, but it will be easy if you just follow the instructions provided in this section.
First, open the SSH client and use the commands given below. The first command enters the MySQL interface. The second command creates the database and enables the UTF8 character format, thus enabling the Unicode texts without becoming corrupted. The third command creates a new username, along with its password. Finally, the fourth command saves the changes made, and the fifth command exits the MySQL interface.


At this stage, WordPress is installed. Use the following shell commands to do so. The first command sends the user to a folder that is made temporarily and whose job is to keep the WordPress download files. The second command installs the files. The third command extracts the installed version, and the fourth command replicates the config file. Finally, the fifth command adds a new folder.


At this point, you have installed the file server for WordPress. Now, you must configure and highlight the owner information. Use the following commands to do so. The first command gives the user an HTML folder for downloading gradients, backgrounds, and plugins directly. The second command sets the flag to the mini folders of the HTML folder.


Next, you will configure the settings. The commands you use here will tell you how to configure the wp-config.php. The first command generates salt values to secure the WordPress installation. The second command opens an actual wp-cnfig.php file.


Once you have issued the commands given above, you will install the WordPress website on the webserver. Use your domain (or your IP address) to do so. When you type the domain into the search bar, the following window will be displayed. Simply click “Continue” to proceed further with the installation.
Finally, you will use the Site Title. You will also need to provide an email address to verify the account, as well as for recovery purposes. After you have entered all the necessary information, click “Install WordPress,” and WordPress be installed onto your system.
Conclusion
This article showed you the step-by-step procedure for installing and configuring WordPress on Ubuntu, so you can do it yourself now from scratch.
]]>


