We will be using VirtualBox’s emulated environment to install Kali Linux 2020,.2. VirtualBox can be installed on and is compatible with Windows, macOS, Linux, OpenSolaris, etc. By running multiple operating systems at once through VirtualBox, you don’t need to reboot your machine as compared to when you have them both installed.
A quick introduction to Kali Linux
Kali Linux is a free Linux distribution tailored for pen-testing and network forensics developed and maintained by Offensive Security. Since its release in March of 2013, Kali Linux has become the defacto choice for network and systems security auditing. It was initially released with the still available GENOME interface but now has shifted to the more userfriendly Xfce.
It comes with over 600 built-in penetration testing programs dedicated to reverse engineering, network forensics, and security research such as port scanners, sniffers, packet analyzers, password crackers, host scanners, and so on. If you’ve ever heard of pen testing before, chances are you have also heard of some of its built-in utilities such as Nmap, Wireshark, crunch, jack the ripper, etc.
Despite being so popular, with its name being synonymous with pen testing, Kali Linux OS is completely free- there are absolutely zero purchases, updates, or license fees attached. Kali Linux is updated every now and then by the devs to renew compatibility with other updated software and hardware.
System requirements
The recommended system requirements for a basic setup are:
- HDD space of 30GB
- 2GB or more RAM for i386 and amd64 platforms
- CD-DVD Drive / USB boot support/ VirtualBox
Installation:
Here’s how to go bout installing Kali Linux on your machine.
1: Download VirtualBox and VirtualBox extension pack
Go to the virtualbox.com/wiki/downloads/. You will see that VirtualBox platform packages available for free and for different operating systems. Download it and its extension pack.
2: Install VirtualBox
Once downloaded, install it and the extension pack. Leave everything else that it recommends.
3: Download Kali Linux 2020.20 VirtualBox image.
Visit the Offensive Security homepage. Click on the ellipses on the top right and scroll down to the downloads section, hit “kali Linux with virtual machines”.
You will be redirected to a new page where there will be several tabs on display. Click on the tab below Kali Linux VMware images. Then download either 32bit version or 64-bit version, depending on your machine.
4: Install to VirtualBox’s directory
To Import Kali Linux 2020.2 to VirtualBox, go to VirtualBox > File > Import Appliance. Then:
- Copy the kali-Linux-2020.2-vbox-amd64.ova file from your Downloads Folder
- Find a suitable location with enough space to import this file to
- Import said file to this location
- Check the I agree on Terms and Conditions.
Once imported, you can make the following customizations.
- Right-click Kali VM and select settings
- Enable Bidirectional for both Shared Clipboard and Drag and drop.
- Give it a suitable name or leave it as is.
- Configure Base memory settings and processors somewhere in the green area
5: fire-up Kali Linux
Right-click your virtual machine.
Go to Start > Normal Start. Wait for Kali Linux to load. It’ll take more time than usual since it is the first time.
You’ll be displayed a login screen. Use the default user credentials (both username and password: kali) to log in.
6: Essential Customizations
Here are some of the things we recommend you check on once you’ve successfully installed Kali.
1) Change the default user credentials: Come up with a username and strong password. To change the default password, type $passwd, a write the new password of your choice.
You can also change your root user’s default password by typing:
2) Doublecheck whether the Shared Clipboard and Drag & Drop are enabled. If not, then make changes to enable them.
3) Make sure that the system is up to date.
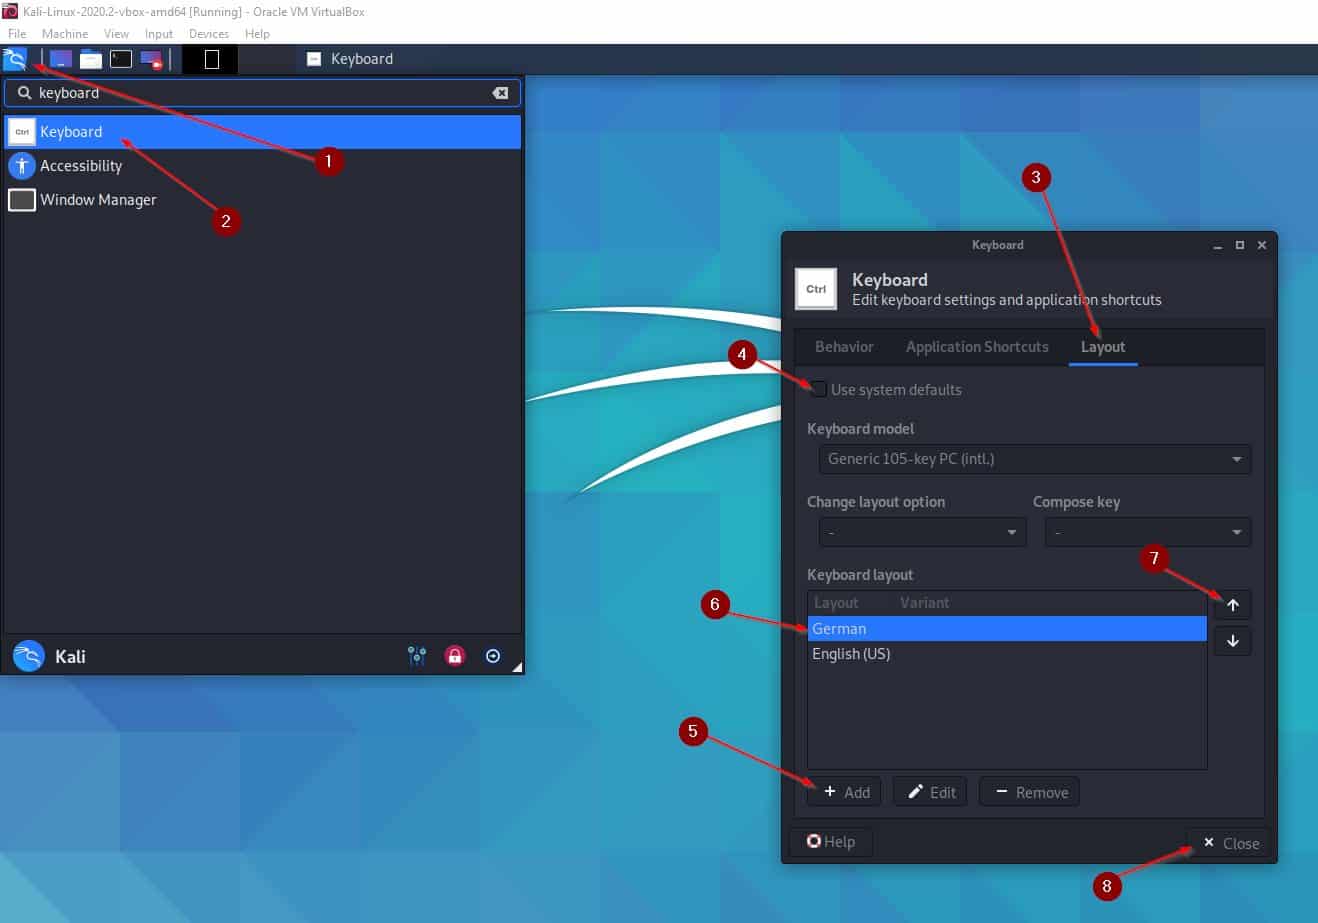
4) Change keyboard settings.
Go to Kali Menu and type “Keyboard” and select it. Then select the layout and untick the box. Next, click on the” Add” button and change to the layout of your choice and remove the default layout.
7: Getting used to the Kali UI:
There’s no better way to familiarize yourself with the UI than to play with it. As the “Xfce interface” is made user-friendly enough that anyone with basic experiences with similar software can learn intuitively learn to use it.
You can look up a comprehensive guide online, as Kali Linux is a popular tool and have many tutorials available on how to work with it.
Wrapping things up
Welcome to Kali Linux, your ultimate pen testing and cybersecurity auditing tool. You’ve sure made the right choice coming to kali Linux to begin your pen testing career. A suite of a great many tools awaits you and is available at your disposal. But the tools are only as good as the user, so we recommend getting familiarized yourself with Kali’s interface.
In this short guide, we’ve seen how to install Kali Linux with VirtualBox. We chose to install VirtualBox in particular as it is the quickest and easiest method to get Kali up and running. And unlike the more conventional methods, it poses the least security risks to your machine, as it is isolated from your host OS.
Whether you’re looking to become a security specialist or are simply an enthusiast, you’ll surely find a lot of things to be indulged with this Debian based Linux distribution.


