In Linux OS, you can easily mount an NFS shared directory on your local system using the mount command. The mount command mounts the file system temporarily. Once the system has been restarted, you will have to mount it again to access it. However, if you want to mount the file system permanently so that you do not have to mount it every time you boot the system, you will need to add an entry in the /etc/fstab file.
In this article, we will explain how to manually and automatically mount the NFS file system on the local system.
Pre-requisites
Before you move ahead, make sure the following pre-requisites are completed on the remote server.
- NFS server is installed on the remote machine
- NFS Service is running
- NFS shared directory is exported
- A firewall is not blocking access to client IP
We have performed the procedure mentioned in this article on the Ubuntu 20.04 system. Moreover, we have used the command line Terminal application for running the commands in Ubuntu. To open the Terminal, you can use the Ctrl+Alt+T keyboard shortcut.
Installing NFS Client Packages
To mount the NFS shared directory on your local client system, you will require the NFS client package. First, update the system repository index using the following command in Terminal:
Then install the NFS client package in your client machine using the following command in Terminal:
Mounting an NFS File System Manually
In the following method, we will mount the NFS directory manually using the mount command.
Step 1: Create a mount point for the NFS server’s shared directory
Our first step will be to create a mount point directory in the client’s system. This will be the directory where all the shared files from the NFS server can be accessed.
We have created a mount point directory with the name “client_sharedfolder” under the /mnt directory.
Step 2: Mount the NFS server shared directory on the client
The next step is to mount the shared directory on the NFS server to the client’s mount point directory. Use the following syntax to mount the NFS server shared directory to the mount point directory in the client:
Where
- NFS_IP is the NFS server’s IP address
- NFS_export is the shared directory on the NFS server
- Local_mountpoint is the mount point directory on the client’s system
In our example, the command would be:
Where 192.168.72.136 is our NFS server IP, /mnt/sharedfolder is the shared directory on the NFS server, and /mnt/sharedfolder is the mount point on the client system.
Once you have mounted the NFS share, you can confirm it using the following command:
Step 3: Test NFS share
After you have mounted the NFS shared directory on the client machine, test it by accessing some files from the NFS server. On the NFS server machine, create any test file or directory and try accessing it from the client machine.
Use the cd command to navigate to the NFS server’s shared directory:
Then using the touch or mkdir command, create a test file or directory. We have created some sample files named “testfile1” and “testfile2”.
Now on the client’s machine, verify if the same files exist.
The mount command mounts the NFS file system temporarily on the client system. Every time you reboot the system, you will have to manually mount it. In the next step, we will see how to make the NFS file system mount automatically at boot time.
Mounting an NFS File System automatically
In the following method, we will set up the NFS file system to automatically mount at boot time. Using this way, you will not have to mount the file system manually every time you boot your system.
Edit the /etc/fstab file using the following command:
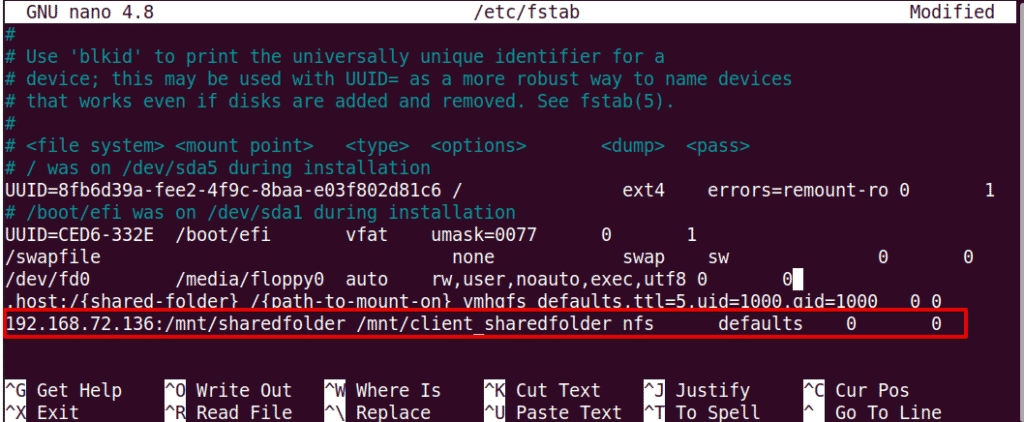
Then add an entry in /etc/fstab file using the following format.
NFS server:directory mountpoint nfs defaults 0 0
Where the NFS server: directory is the NFS server IP and its shared directory, the mount point is the mount point on the client’s machine where the NFS directory is mounted, and the nfs defines the file system type.
In our example, the entry would be:
Where 192.168.72.136 is our NFS server IP, /mnt/sharedfolder is the shared directory on the NFS server, and /mnt/client_sharedfolder is the mount point on the client system.
Once you have added the above entry in the /etc/fstab file, save, and close the file. Use the Ctrl+O and then Ctrl+X to do so.
Next time you start your machine the NFS share will be automatically mounted at the specified mount point.
Unmounting the NFS File Systems
You can unmount an NFS file system from your local system at any time. Type the umount command followed by the mount point name where it is mounted.
Note: The command is “umount” not unmount.
In our example, it would be:
However, remember that, if the NFS file system has been mounted using the /etc/fstab, it will be again mounted next time you boot your system. Also note that the file system will not be unmounted if it is busy like if there are some files opened on it, or you are working on some directory.
That is all there is to it! In this article, you have explained how to mount the NFS shared directory on the Ubuntu 20.04 system both manually and automatically. In the end, we have also explained how to unmount the NFS shared directory when you no longer need it.


