Synology NAS has official support for Docker. Docker can be an alternative to virtual machines. If you don’t have enough memory to run virtual machines on your Synology NAS, you can run Docker containers instead. Docker containers require a very little amount of memory and system resources to run.
In this article, I will show you how to install and use Docker on Synology NAS. So, let’s get started.
Installing Docker on Synology NAS:
Synology NAS products officially support Docker. To use Docker on your Synology NAS, you need to install the Docker app from the Synology Web GUI.
First, open the Package Center app from the Synology Web GUI.
Search for docker in Package Center. The Docker app should be listed, as you can see in the screenshot below.
Click on the Docker app.
Click on Install to install the Docker app on your Synology NAS.
Select the volume you want to install and keep Docker data using the dropdown menu and click on Next as marked in the screenshot below.
Click on Apply.
The Docker app is being installed. It may take a few seconds to complete.
At this point, the Docker app should be installed.
You can click on Open to open the Docker app from the Package Center app as marked in the screenshot below.
You can also open the Docker app from the Main Menu of Synology Web GUI, as marked in the screenshot below.
As you’re running the Docker app for the first time, you will see the following dialog window.
If you don’t want to see it every time you open the Docker app, check the Don’t show this again checkbox and close the dialog window as marked in the screenshot below.
The Docker app should be ready to use.
Downloading Docker Images:
You can download Docker images from the Registry tab of the Docker app. By default, the Docker images available in the Docker Hub registry are displayed. You can add other Docker registries and download Docker images from there as well. I will show you how to add your own Docker registry in a later section of this article.
To download a Docker image from the Docker Hub registry, type in your search keyword (httpd, let’s say) and click on Search as marked in the screenshot below.
The Docker images that matched the search keyword should be listed.
If you like a Docker image and would like to know more about it, click on the icon to visit that Docker image’s official web page.For example, to know more about the httpd Docker image, click on the
icon as marked in the screenshot below.
A new browser tab should open the Docker Hub page of the httpd Docker image, as you can see in the screenshot below. You can find all the information you need about the httpd Docker image on this page.
If you like a Docker image and you would like to download it, select it and click on Download as marked in the screenshot below.
Select the tag of your selected Docker image from the dropdown menu you want to download and click on Select as marked in the screenshot below.
As you can see, 1 new image is being downloaded.
Navigate to the Image section to see the download progress.
As you can see, the httpd: latest Docker image is being downloaded.
As long as the Docker image is downloaded, the Disk icon () will animate.
Once the download is complete, the disk icon () animation should stop.
I have downloaded another Docker image php: latest, as you can see in the screenshot below.
The size of the Docker images you’ve downloaded should be displayed in the Image section, as you can see in the screenshot below.
Managing Docker Images:
You can manage your downloaded Docker images from the Image section of the Docker app.
You can export a Docker image from the Docker app to your Synology NAS shares.
To export a Docker image (php: latest, let’s say), select the Docker image and click on Export as marked in the screenshot below.
Select a folder (docker-images/, let’s say) from one of your Synology NAS shares (share2, let’s say) where you would like to export the Docker image and click on Select marked in the screenshot below.
As you can see, the Docker image php: latest is being exported. It may take a few seconds to complete.
Once the Docker image is exported, you should find a new archive file (php(latest).syno.tar in my case) in the folder you’ve exported; the Docker image can see in the screenshot below.
Now, let’s remove the php: latest Docker image and import it back.
To remove a Docker image, select the Docker image you want to remove and click on Delete, as shown in the screenshot below.
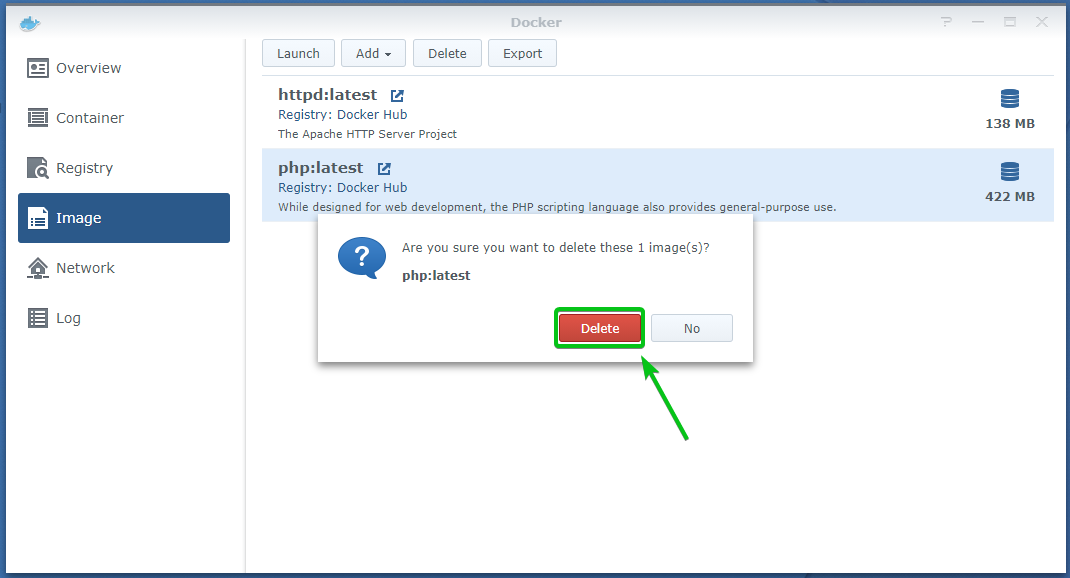
To confirm the removal operation, click on Delete as marked in the screenshot below.
The php: latest Docker image should be removed, as you can see in the screenshot below.
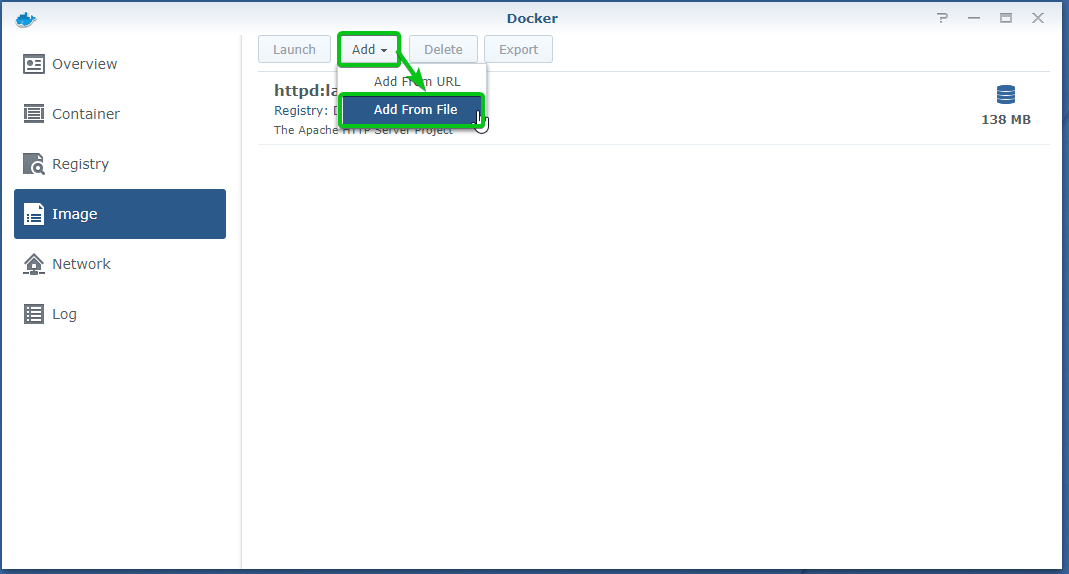
To import the php: latest Docker image from the exported Docker image file, click on Add > Add From File as marked in the screenshot below.
Select the Docker image file you’ve just exported and click on Select as marked in the screenshot below.
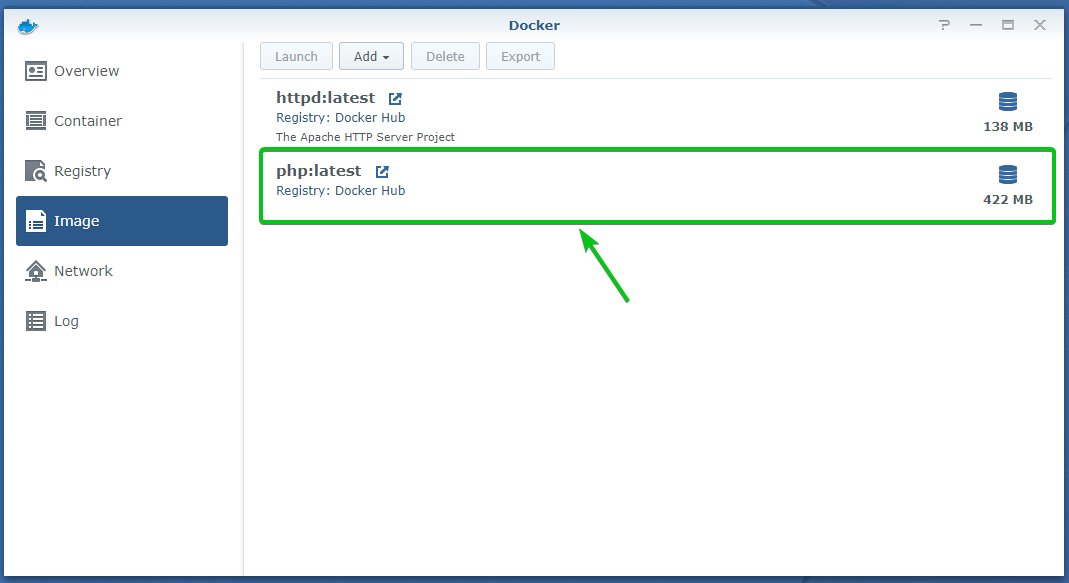
The php: latest Docker image should be imported, as you can see in the screenshot below.
Managing Docker Registries:
By default, the official Docker registry Docker Hub is used on the Docker app. So, you can search for and download all the Docker images available on Docker Hub. That is more than enough for most people. But, if you do need to add third-party Docker registries or your own Docker registries, you can do it as well.
To manage Docker registries, click on Settings from the Registry section as marked in the screenshot below.
By default, you will have the following Docker registries. The Docker Hub registry and the Aliyun Hub registry.
Use the Aliyun Hub registry instead of the Docker Hub registry, select it and click on Use as marked in the screenshot below.
The Aliyun Hub registry should be activated, as you can see in the screenshot below.
To add a new Docker registry, click on Add as marked in the screenshot below.
Type in the information of the Docker registry you want to add and click on Confirm.
A new Docker registry should be added, as you can see in the screenshot below.
You can edit a Docker registry you’ve added recently as well.
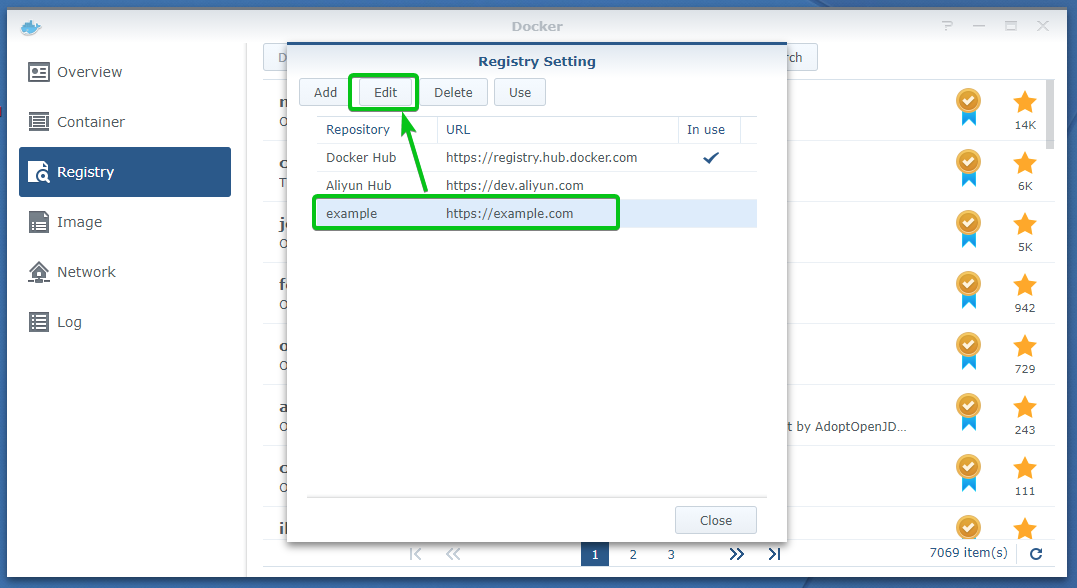
To edit a Docker registry, select it and click on Edit as marked in the screenshot below.
Now, make the necessary changes and click on Confirm to save the changes.
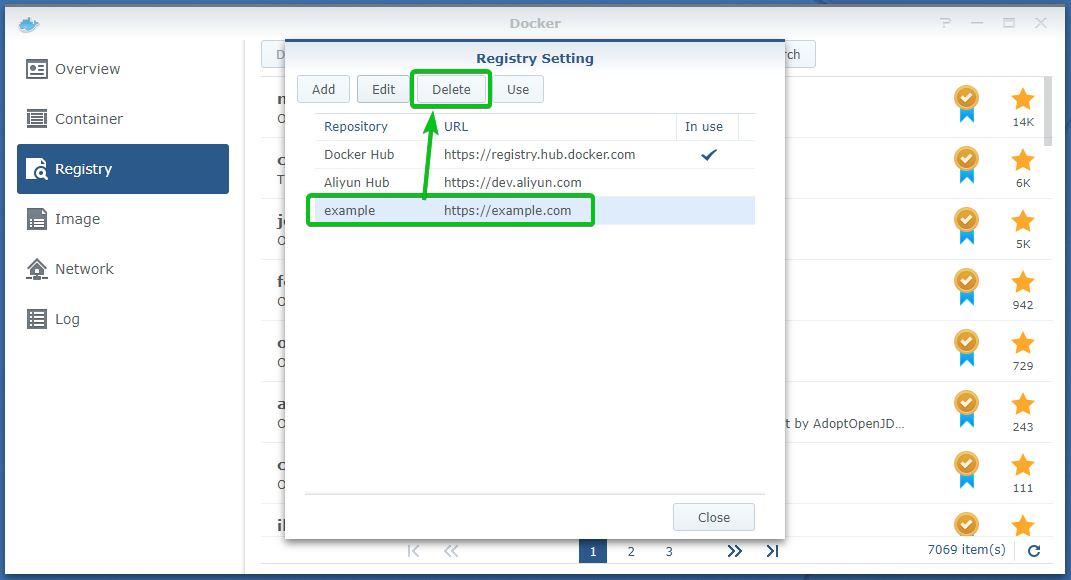
To remove a Docker registry, select it and click on Delete as marked in the screenshot below.
The selected Docker registry should be removed.
Creating Docker Containers:
To create a Docker container, navigate to the Image section of the Docker app. Then, select the Docker image you want to use to create the container and click on Launch as marked in the screenshot below.
Type in a name for the container in the Container Name section as marked in the screenshot below.
I will call it http-server-1.
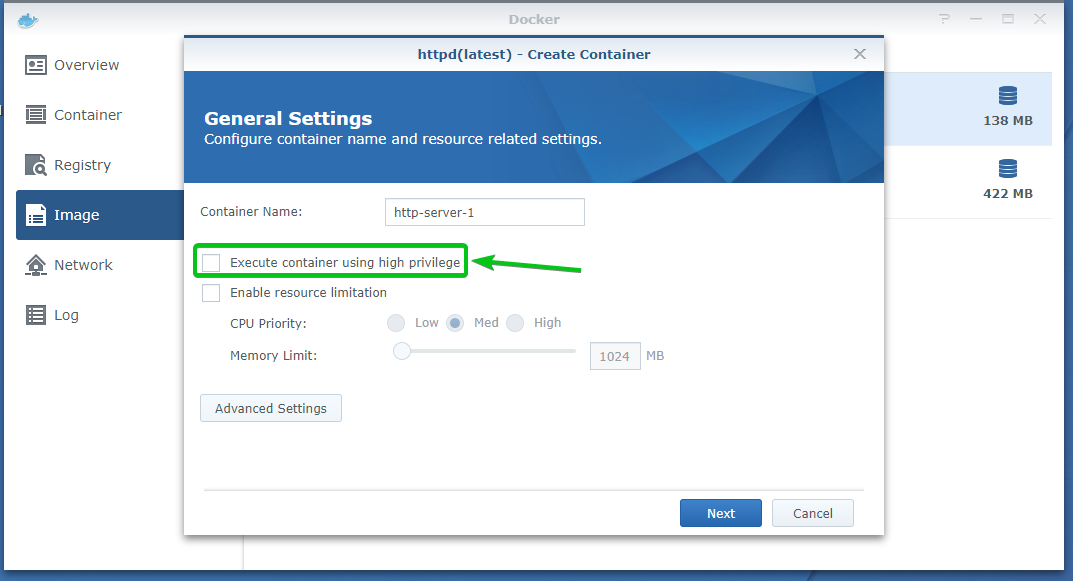
If you want to run the container as root (with superuser privileges), check the Execute container using the high privilege checkbox as marked in the screenshot below.
You can limit the CPU and memory usage of the container as well.
To limit resources, check the Enable resource limitation checkbox and set the CPU Priority and Memory Limit as you need.
To configure some advanced settings for the container, click on Advanced Settings as marked in the screenshot below.
If you want to start the container automatically when your Synology NAS boots, check the Enable auto-restart checkbox as marked in the screenshot below.
To create a shortcut of this container on the Synology Web GUI desktop, check the Create shortcut on desktop checkbox and configure it as needed.
To add volumes to the container, click on the Volume tab of the Advanced Settings window, as shown in the screenshot below.
If you visit the Docker Hub page of the Docker image you’re using, you should know the volumes you need to create for your container.
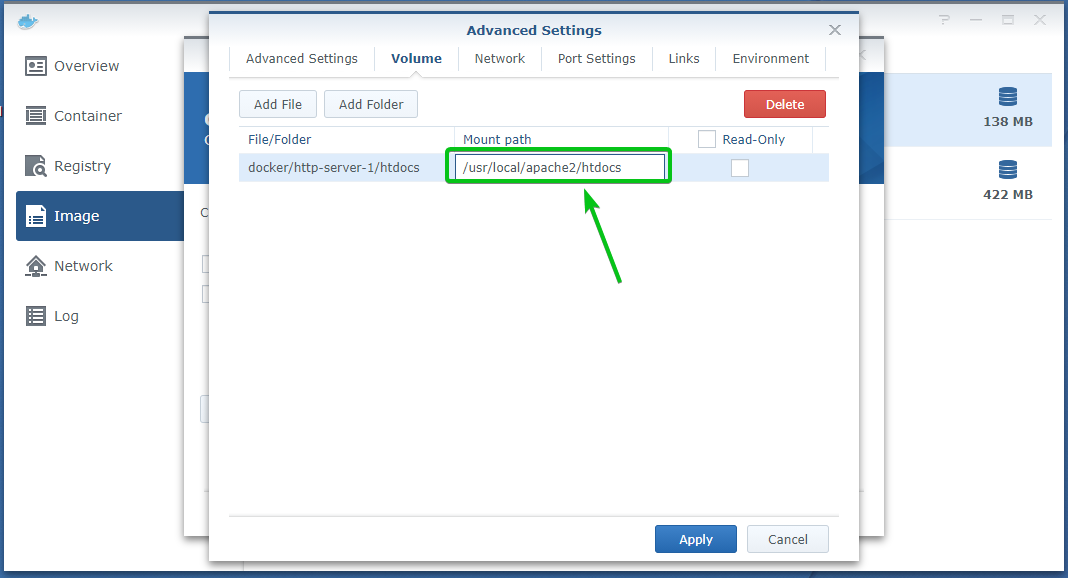
For example, I am using the httpd Docker image to create a container. In the Docker Hub page of the httpd Docker image, you can see that I need to create a volume for the container that binds to the folder /usr/local/apache2/htdocs of the container.
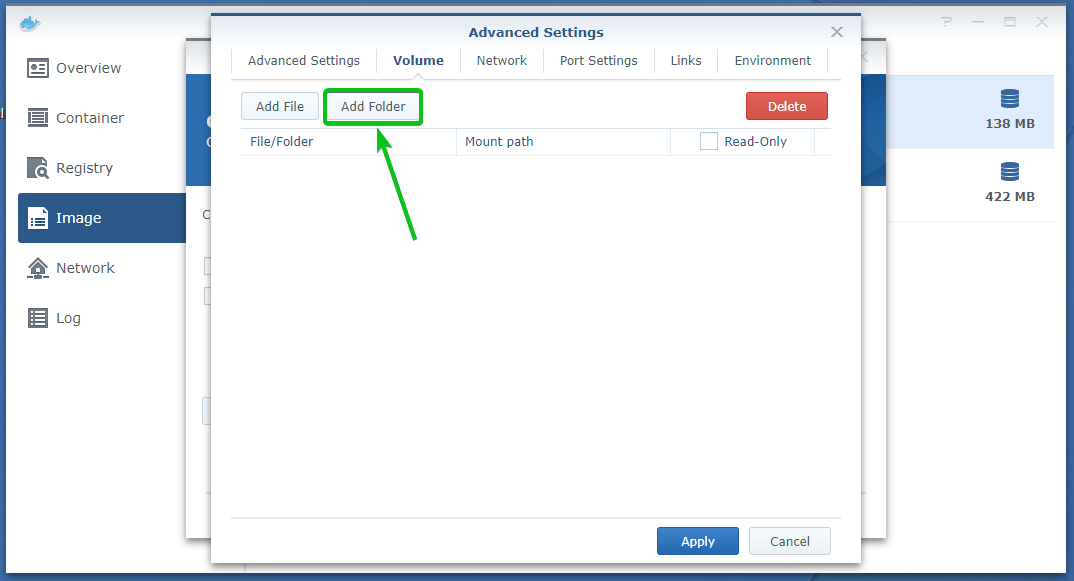
To add a new volume to the container, click on Add Folder as marked in the screenshot below.
You will be asked to select a folder that you want to bind to your container.
When you install the Docker app on your Synology NAS, it will create a new share docker on the volume where you have installed the Docker app. My advice would be to keep your volumes and other files related to your container in their separate folder in the docker share.
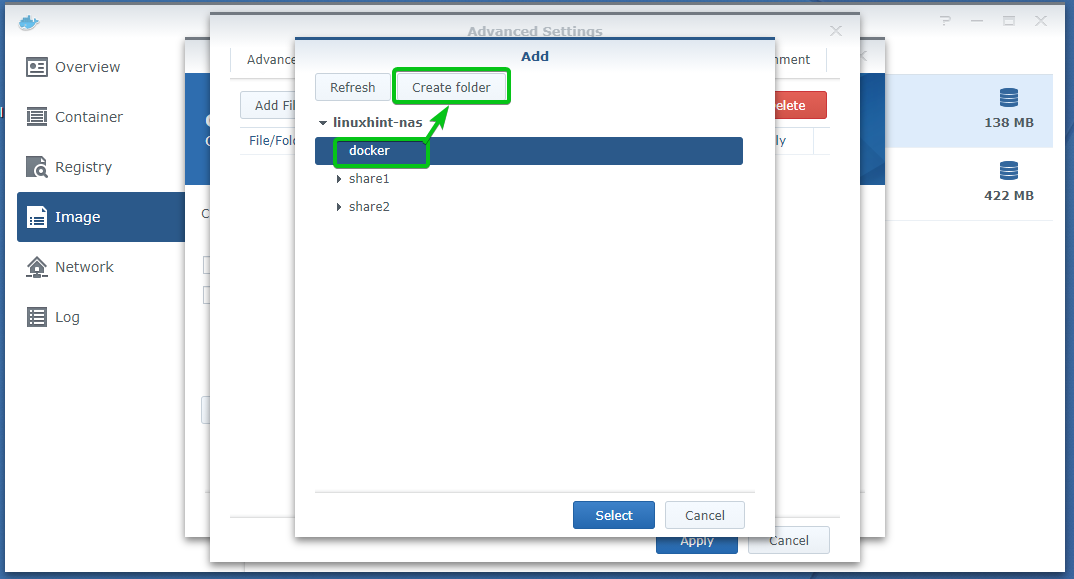
Create a new folder in the docker share, select the docker share and click on Create folder as marked in the screenshot below.
Type in the name of your container (http-server-1 in my case) and click on OK.
To create a new folder inside the http-server-1/ folder, select it and click on Create folder.
Type in a folder name and click on OK. The folder name should resemble the path where you want to mount the folder in your container.
In my case, it’s htdocs as I want to mount it in the /usr/local/apache2/htdocs directory of the container.
Once the folder is created, select it and click on Select as marked in the screenshot below.
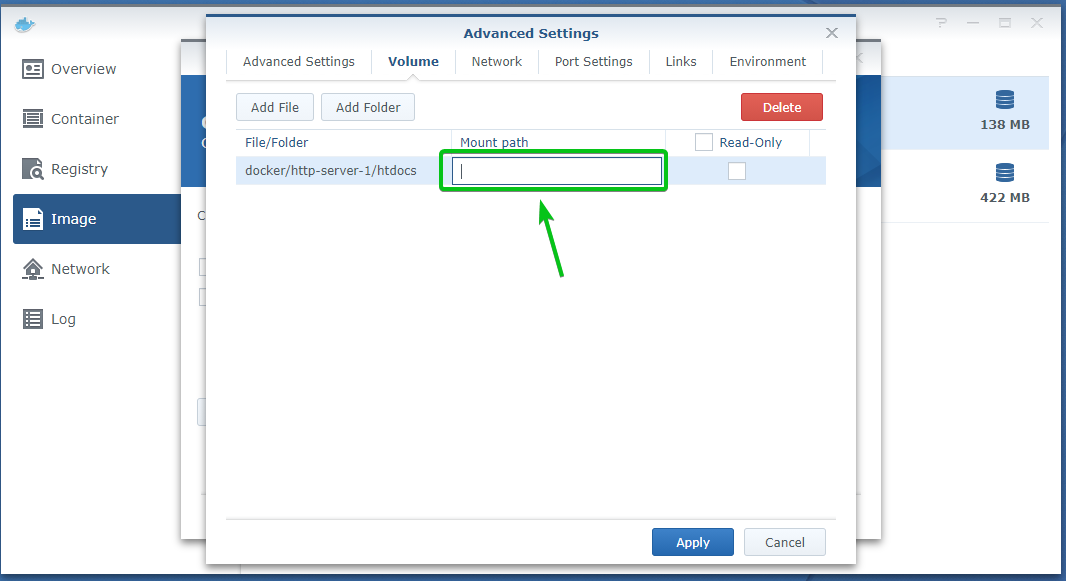
Now, you have to type in the path where you want to mount the folder you’ve selected.
In this case, it is the /usr/local/apache2/htdocs directory. Just type in the mount path, and you’re good to go.
You can configure the network of the container from the Network tab of the Advanced Settings window.
By default, the Docker containers will use a private IP address range that is not accessible from your home network. So, you will have to use port forwarding to access the services running on your Docker containers.
But, if you want to access the Docker containers from your home network directory without port forwarding, check the Use the same network as Docker host checkbox as marked in the screenshot below.
In the Port Settings tab of the Advanced Settings window, you can configure port forwarding for the Docker container.
Depending on the Docker image you’re using the create the container, you may already have some default port forwarding rules.
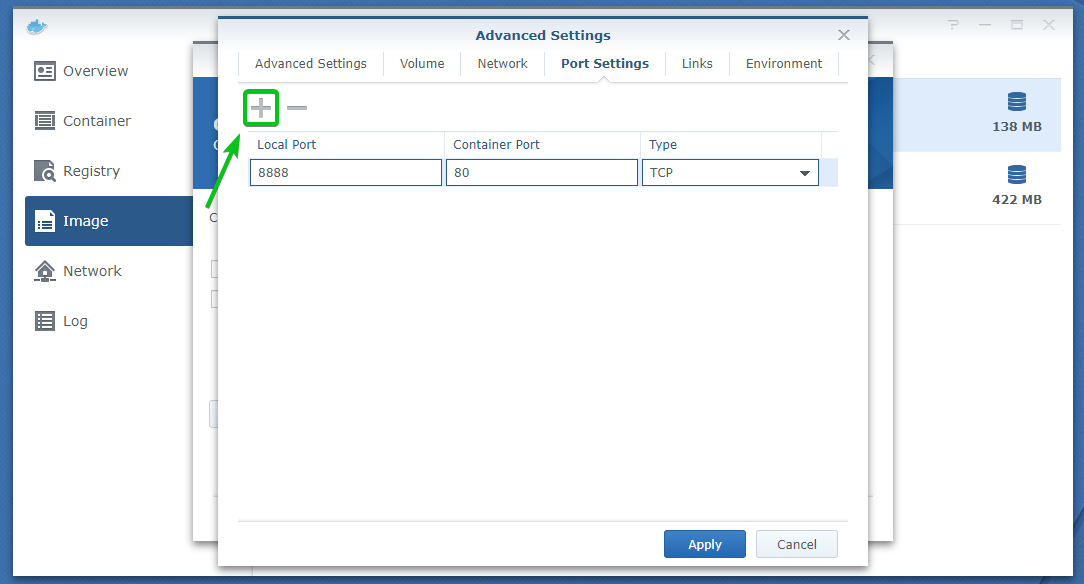
I have a default port forwarding rule that forwards the container TCP port 80 to the Synology NAS.
I will forward the container TCP port 80 to the TCP port 8888 on my Synology NAS. So, the Local Port number will be 8888, and the Container Port number will be 80, and the Type will be TCP.
If you want to add a new port forwarding rule, click on the + icon as marked in the screenshot below.
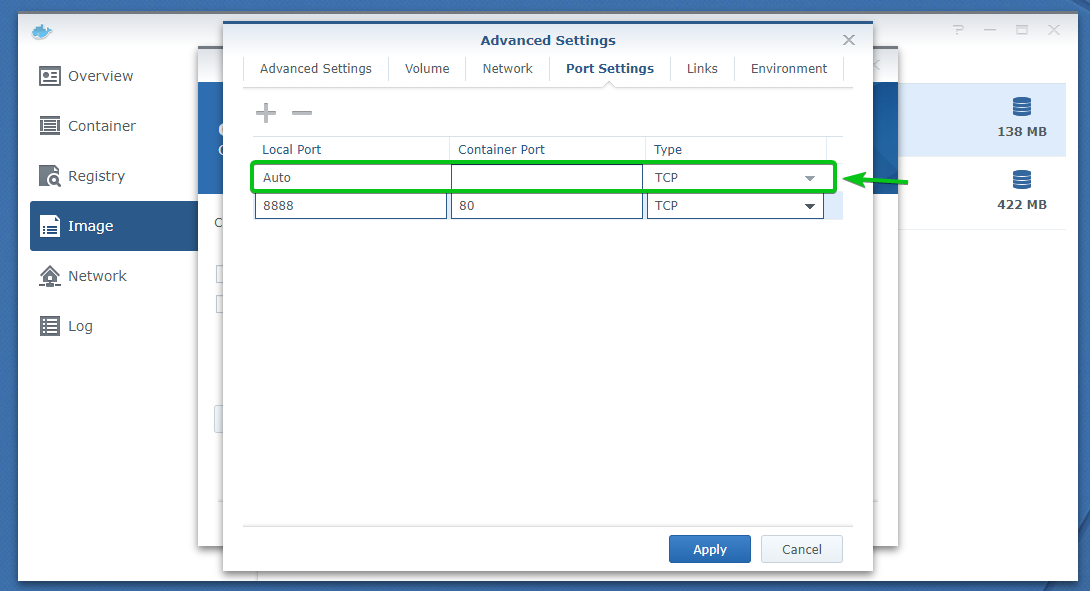
An empty port forwarding rule should be added, as you can see in the screenshot below.
Type in the Local Port, the Container Port, and select the Type from the dropdown menu as needed. Once you’re done, the port forwarding rule should be added.
If you want to remove a port forwarding rule, select it and click on the – icon as marked in the screenshot below.
The port forwarding rule should be removed.
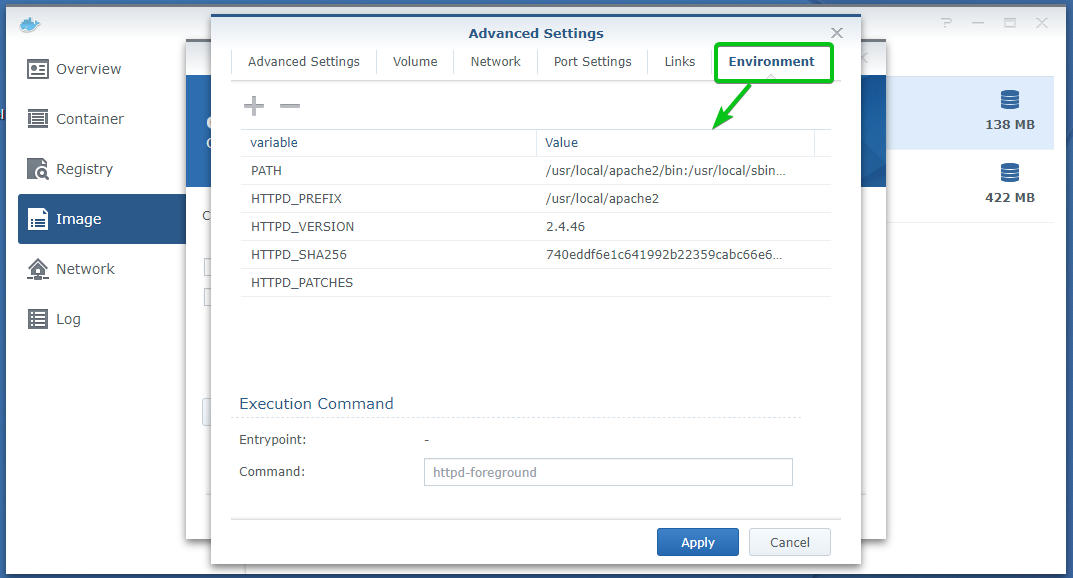
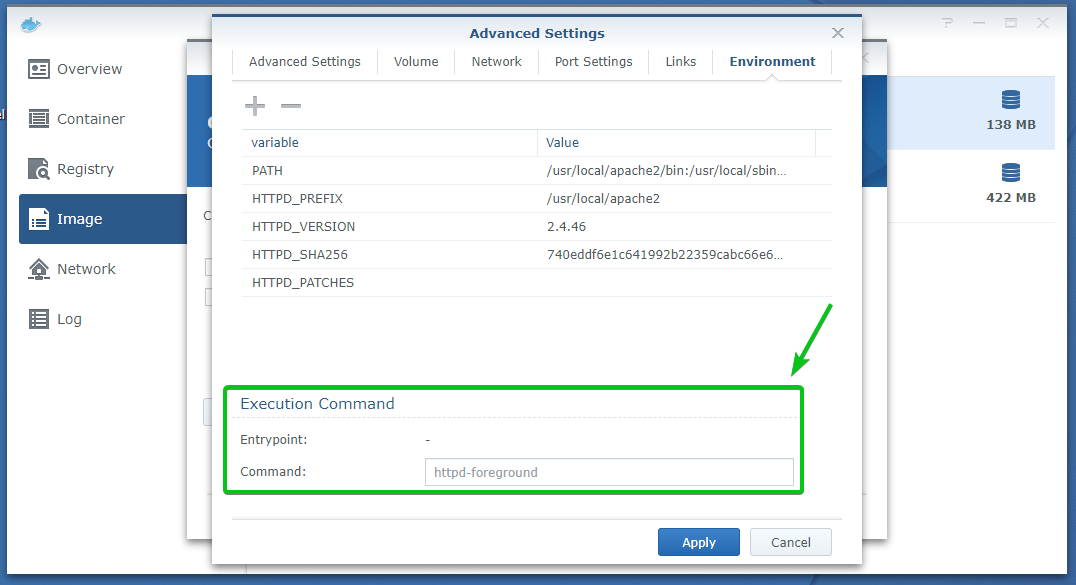
In the Environment tab of the Advanced Settings window, you can configure the environment variables of the container and the command that the container will run when it starts.
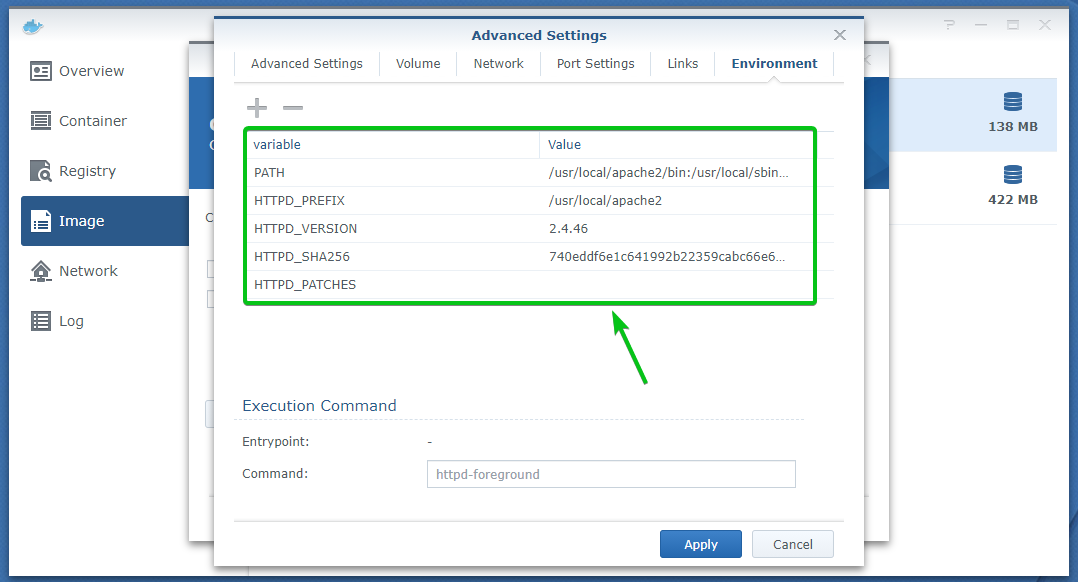
Depending on the Docker image you’re using to create the container, you may already have some environment variables, as shown in the screenshot below.
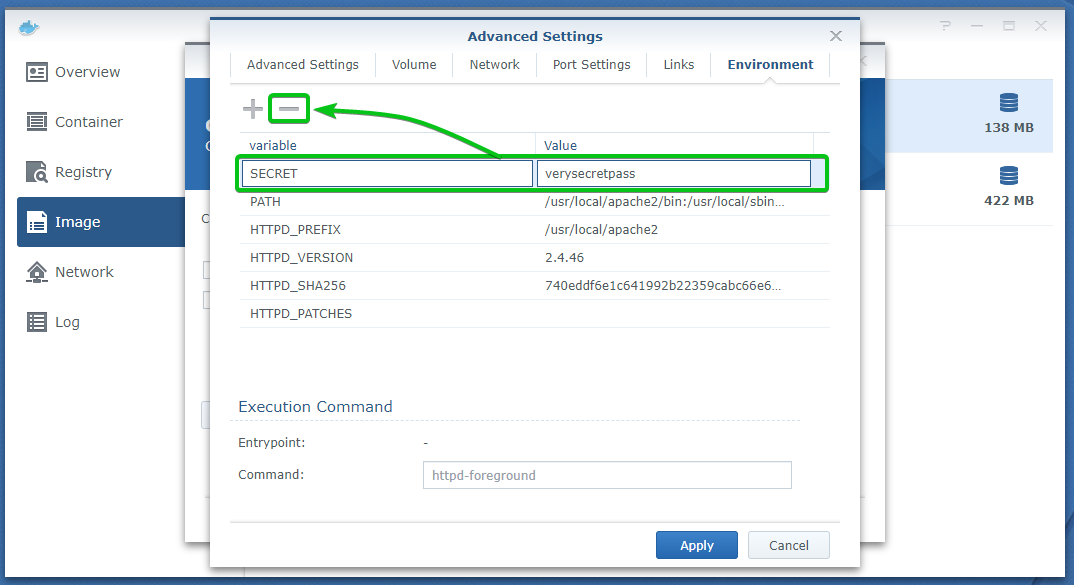
If you need to add a new environment variable, click on the + icon as marked in the screenshot below.
An empty environment variable entry should be added, as you can see in the screenshot below.
Type in the environment variable name and the value. Once you’re done, it should be added.
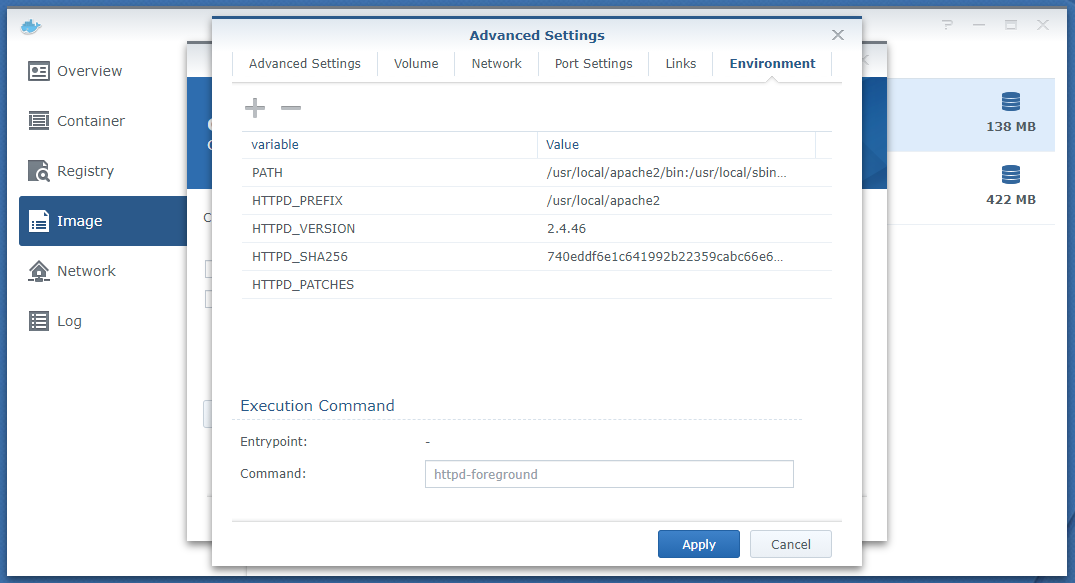
If you want to remove an environment variable, select it and click on the – icon as marked in the screenshot below.
Your selected environment variable should be removed.
To set the command that you want to run when your Docker container starts, type in the command section’s command as marked in the screenshot below.
Once you’re done configuring some advanced settings for the container, click on Apply.
Click on Next.
The settings that will be used to create the container http-server-1 should be displayed. To create a container with these settings, click on Apply.
A new container http-server-1 should be created.
You can find all the Docker containers you’ve created in the Container tab of the Docker app. You can manage your containers from here.
The running containers should also be displayed in the Overview tab of the Docker app, as you can see in the screenshot below.
Using Docker Containers:
You can see the CPU and memory/RAM usage information and the container runtime of all the Docker containers you’ve created from the Container section of the Docker app.
As you can see, the http-server-1 container that I’ve created earlier is Running for 12 minutes. It’s using 11 MB of memory/RAM and barely uses any CPU resource.
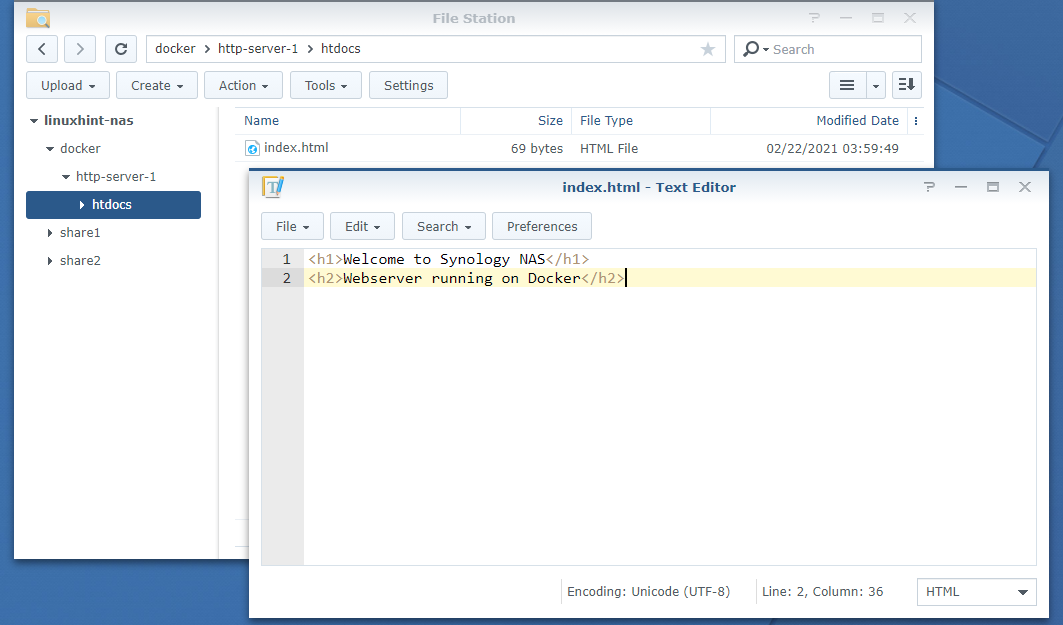
Let’s create an index.html file in the htdocs/ volume of the container.
Once the index.html file is created in the volume of the container, you should be able to access it from the HTTP server that is running in the container.
I have forwarded the container TCP port 80 on my Synology NAS port 8888. So, I can access the HTTP server running in the Docker container http-server-1 from a web browser using the URL http://192.168.0.110:8888 as you can see in the screenshot below.
Here, 192.168.0.110 is the IP address of my Synology NAS. It will be different for you. So, make sure to replace it with yours.
To find more information about a Docker container, select it and click on Details as marked in the screenshot below.
A new window should be opened.
In the Overview tab, you can see the container’s CPU and RAM usage information, the environment variables added to the container, the configured port forwarding rules of the container, and some container runtime information.
You can Start, Stop, Restart and Force stop a container from the Overview tab as well.
In the Process tab, you can find the following information about all the running processes of the container:
Process Identifier: The process ID of the running process.
Execution Command: The command that is used to start the process.
CPU Usage: The percentage of CPU the process is using.
Memory Size: The amount of RAM/memory the process is using.
In the Log tab, you can find the logs of the running processes on your container. The logs are grouped by date nicely, as you can see in the screenshot below.
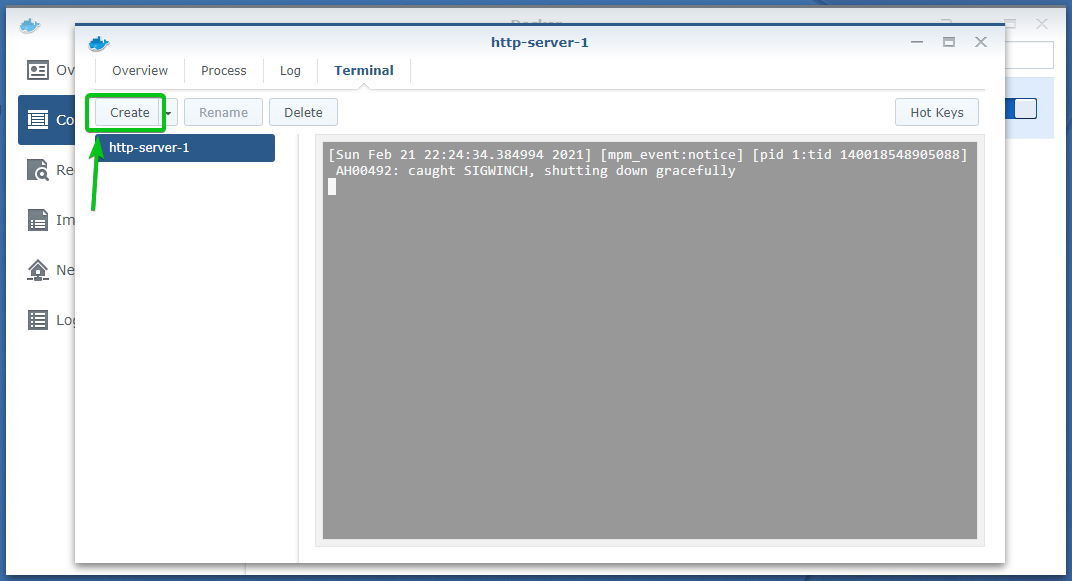
You can start a shell and do administration on your container from the command-line from the Terminal tab. You can also run any command and see its output.
To access the shell of the container, click on Create as marked in the screenshot below.
A new shell terminal should be created, as you can see in the screenshot below. You can run any command you want in this shell terminal and administer your container from the command-line.
You can create as many shell terminals as you need.
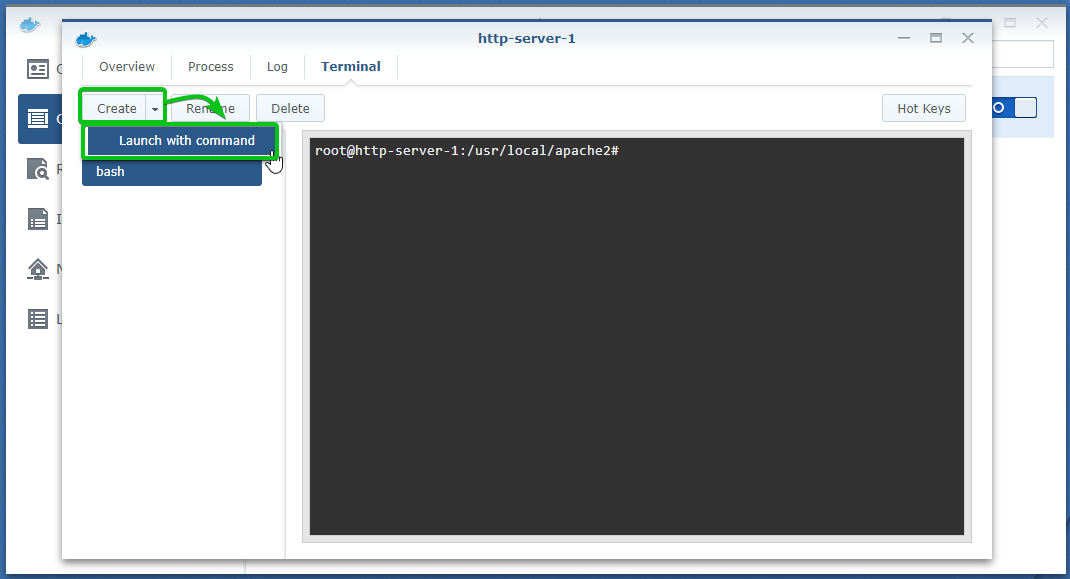
You can also run other commands from here.
To do that, click on the Create > Launch with command as marked in the screenshot below.
Now, type in a command that you want to run and click on OK.
The command should run on the container, and the output should be displayed, as you can see in the screenshot below.
You can rename or delete a terminal from the Terminal tab as well.
To rename a terminal, select it and click on Rename.
Type in a new terminal name and click on OK.
The terminal should be renamed.
To remove a terminal, select it and click on Delete.
The terminal should be removed.
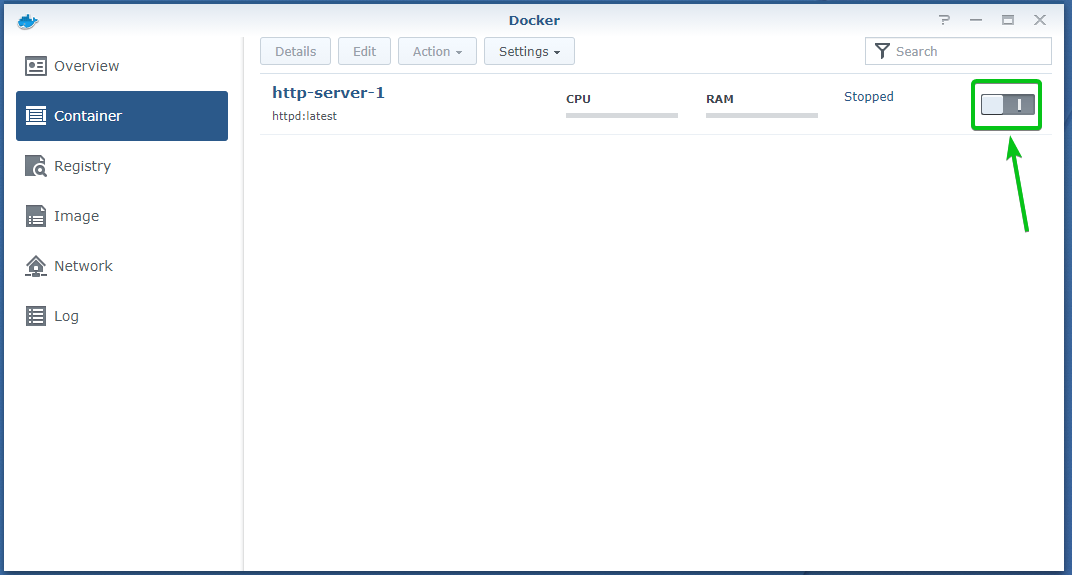
You can start and stop a container using the toggle button as marked in the screenshot below.
When a container is Running, the toggle button will be blue.
To stop a running container, click on the toggle button.
The container should be Stopped, as you can see in the screenshot below.
When the container is Stopped, the toggle button should be gray.
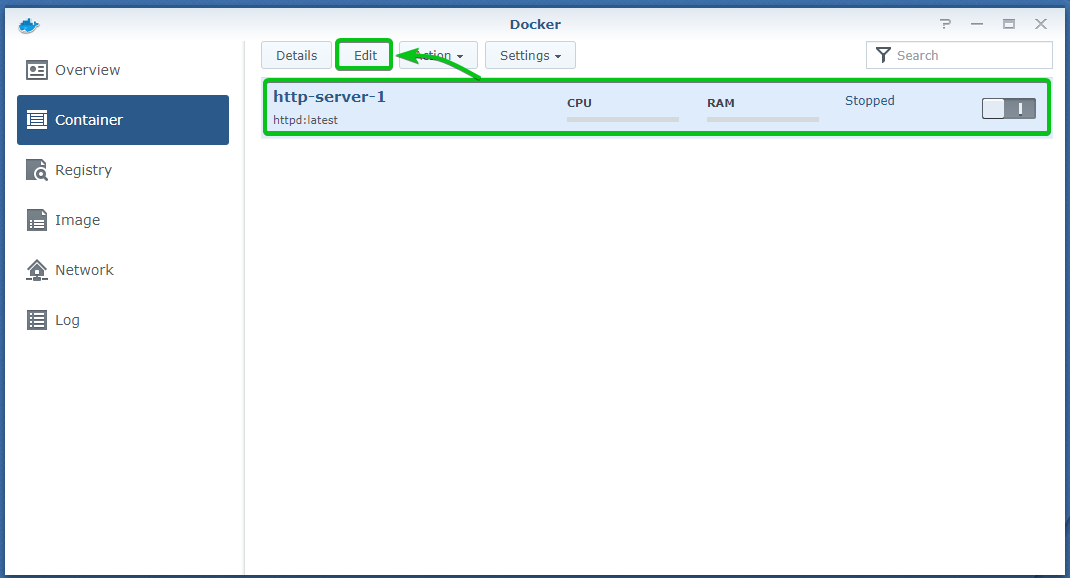
When a container is Stopped, you can edit the configuration of the container.
To edit the container configuration, select the container and click on Edit.
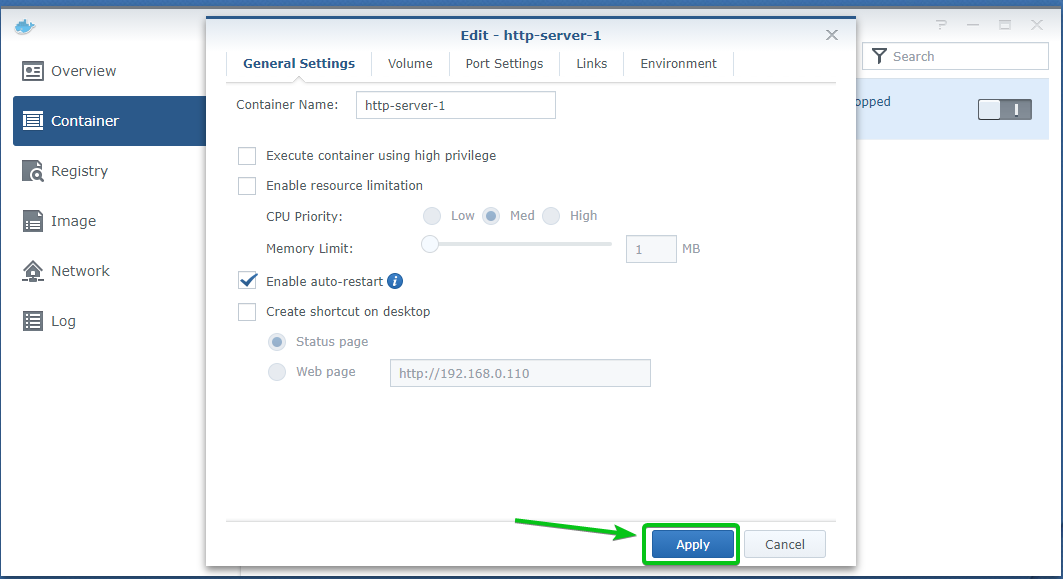
You should see the same configuration window as you have seen while creating the container. You should be familiar with all the options as I have explained them earlier in this article.
From the General Settings tab, you can change the container name, configure container privileges, configure resource limits, configure container startup settings, and create a desktop shortcut.
From the Volume tab, you can manage the container volumes.
From the Port Settings tab, you can manage the port forwarding rules of your container.
From the Environment tab, you can manage the container environment variables.
Once you’re done with configuring the container, click on Apply as marked in the screenshot below.
Once you’ve configured the container, click on the toggle button to start the container.
The container should be running, as you can see in the screenshot below.
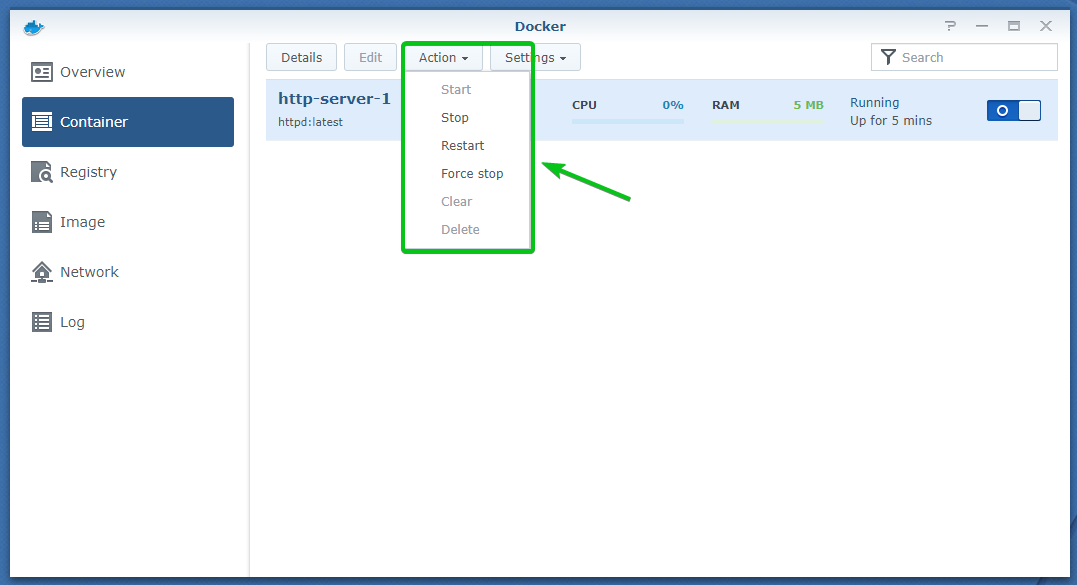
You can select a container and click on Action to Start, Stop, Restart, and Force Stop your container, as you can see in the screenshot below.
Cloning Docker Containers:
You can clone the configuration of an existing Docker container to create a new Docker container.
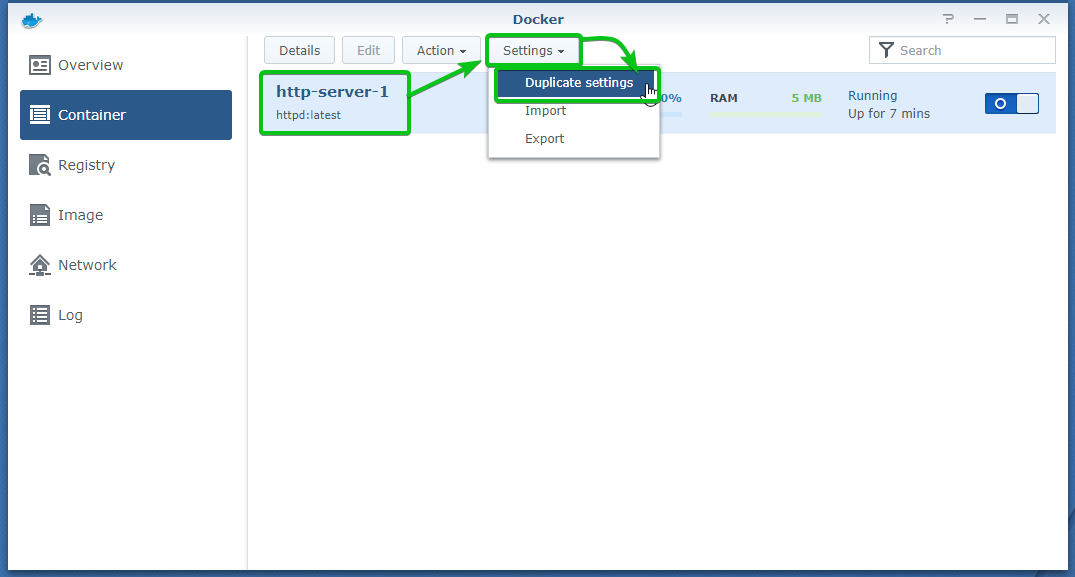
To clone a Docker container, select it and click on Settings > Duplicate settings as marked in the screenshot below.
Type in a name for the cloned container and click on Apply.
I will call it http-server-2.
A new container http-server-2 should be created, as you can see in the screenshot below.
While the http-server-2 container is Stopped, select it and click on Edit.
Change the local port to 8889 from the Port Settings tab and click on Apply as marked in the screenshot below. The http-server-2 container configuration should be updated.
Click on the toggle button of the http-server-2 container as marked in the screenshot below to start the container.
The http-server-2 container should be running, as you can see in the screenshot below.
As you can see, I can access the HTTP server running on both the http-server-1 and http-server-2 containers.
Exporting Docker Containers:
You can export Docker containers on your Synology NAS shares and import them later using the Docker app.
To export a Docker container, select it and click on Settings > Export as marked in the screenshot below.
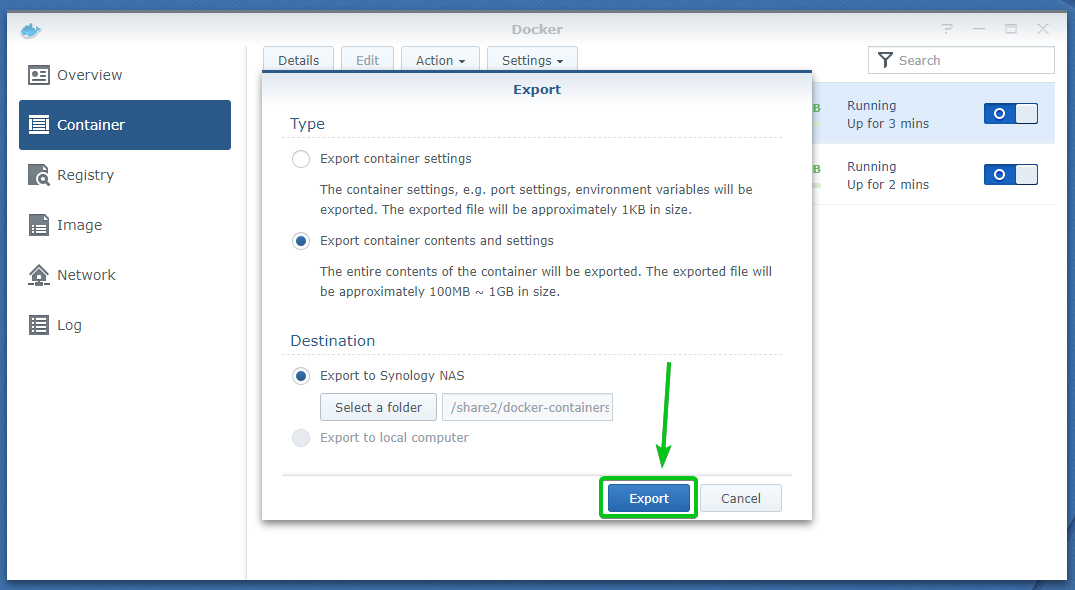
Select the export type from the Type section.
Export container settings: This option will only export the configuration options of the container in a plain text file. The configuration file can be later used to rebuild the container. This option will not save any filesystem changes you’ve made in the container. So, all of your container data will be lost when you import the container back.
Export container contents and settings: This option will export the container configuration and contents on your Synology NAS share. The filesystem changes of the container will be kept. The exported file will be a lot bigger than the first option.
Once you’ve selected an export type, select Export to Synology NAS and click on Select a folder from the Destination section as marked in the screenshot below.
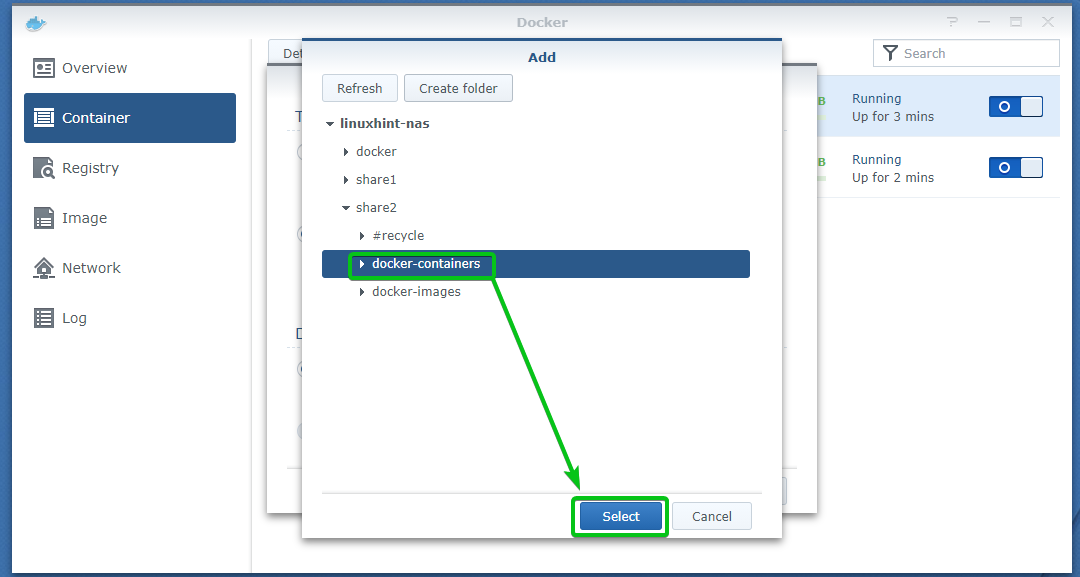
Select a folder where you want to export the container and click on Select.
Click on Export.
As you can see, the container is being exported. It may take a while to complete.
Once the container is exported, a new archive file should be generated in the folder where you’ve exported the container, as shown in the screenshot below.
Importing Docker Containers:
In this section, I will remove the Docker container I’ve exported earlier and import it back.
Before you can remove a Docker container, you have to stop the container if it’s running.
To stop the http-server-1 container, click on the toggle button of the container from the Container section of the Docker app, as marked in the screenshot below.
The container should be stopped. Now, select the container and click on Action > Delete as marked in the screenshot below.
Click on Delete.
The http-server-1 container should be removed.
To import the container using the exported container file, click on Settings > Import as marked in the screenshot below.
Select the exported container file and click on Select as marked in the screenshot below.
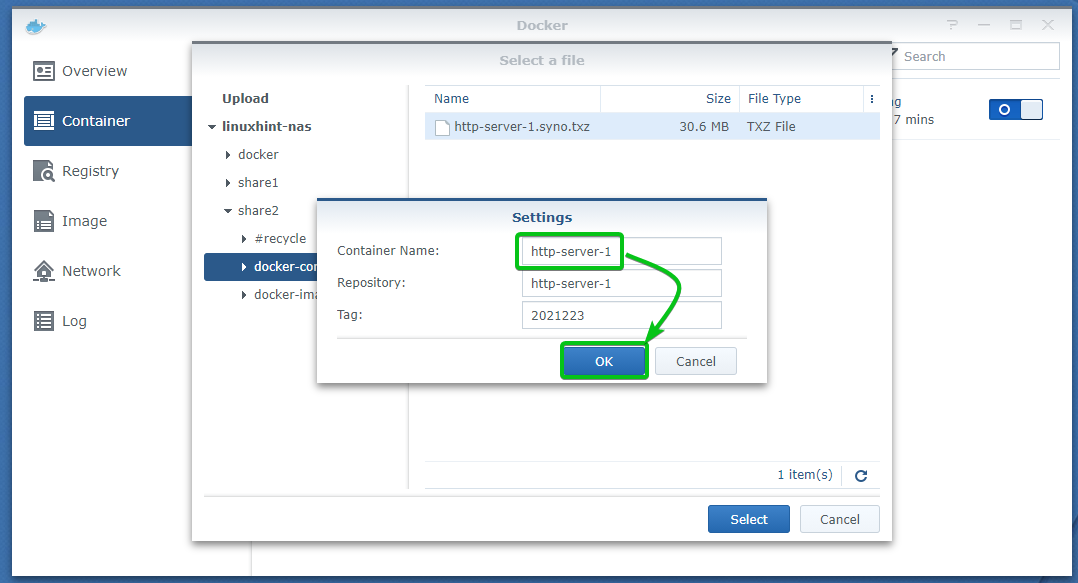
Type in a Container Name and click on OK.
NOTE: Importing a container this way will also create a new container image. If you want to use that image to create a container later, it’s good to give the image a meaningful name and tag name.
You can set the new image name in the Repository textbox and image tag in the Tag textbox of the import Settings window.
As you can see, the container http-server-1 is imported successfully.
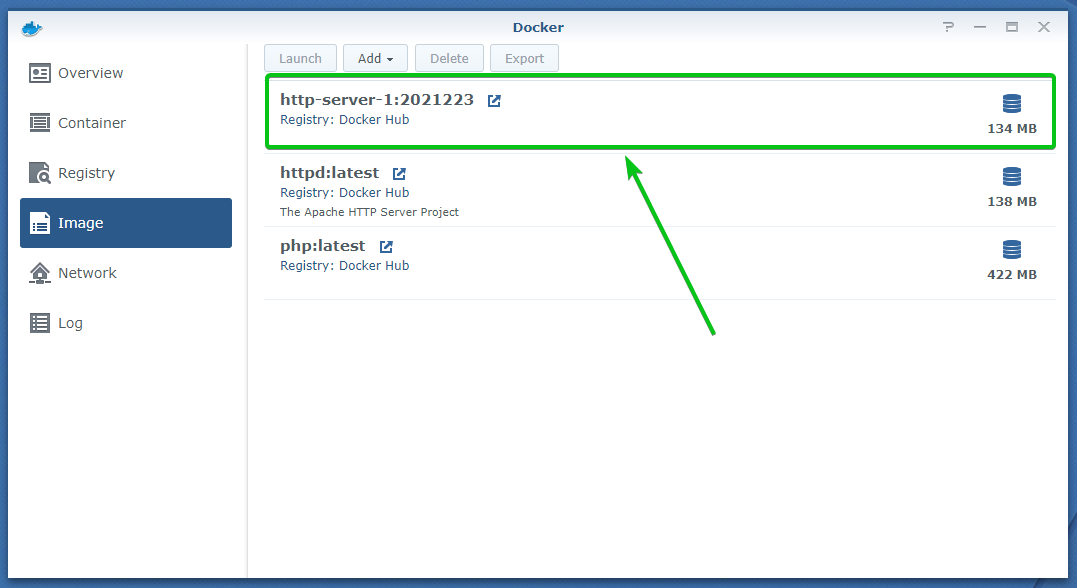
A new container image is also created, as you can see in the screenshot below.
Docker Networks:
You can manage Docker networks from the Network tab of the Docker app.
By default, Docker creates a bridge network interface and a host network interface that you can use to get network connectivity in your Docker containers.
To know more about a network interface, click on the down-arrow icon as marked in the screenshot below.
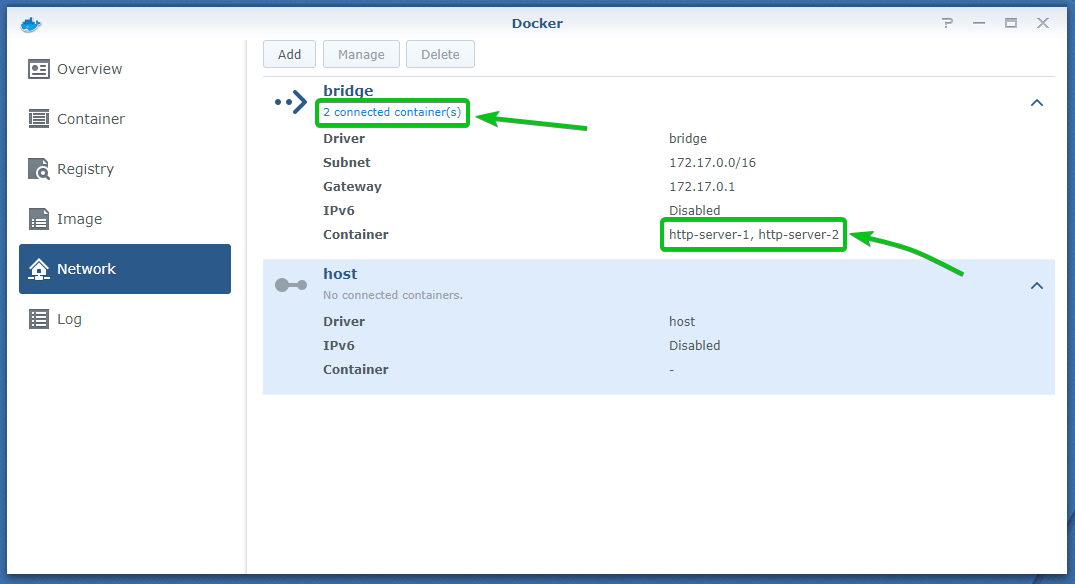
As you can see in the screenshot below, information about the bridge and the host network is displayed.
As you can see, the bridge network interface uses the bridge driver, and the host network interface is using the host driver.
The bridge network interface configures a random IP subnet (172.17.0.0/16 in my case) that is not accessible from your home/office network. You can only access the services running inside the containers connected to the bridge network using port forwarding.
The host network interface will use your home/office network’s DHCP server to assign IP addresses to the containers. So, the containers using the host network will be accessible from your home/office network directly. You won’t need to configure port forwarding.
Currently, 2 containers (http-server-1 and http-server-2) are using the bridge network interface, as shown in the screenshot below.
Checking Docker Logs:
You can find the logs of your Docker app from the Log section, as you can see in the screenshot below. The log information will help you find problems with the Docker instance running on your Synology NAS.
Conclusion:
In this article, I have shown you how to install the Docker app and use Docker on Synology NAS. I have also shown you how to download Docker images from the Docker Hub registry, manage Docker images, manage Docker registries, create and use Docker containers, clone Docker containers, export Docker containers, import Docker containers, check the Docker network interfaces, and check Docker logs using the Docker app on your Synology NAS. This article should help you get started with Docker on your Synology NAS.


