Synology specializes in Network Attached Storage (NAS) devices and software. Synology NAS devices are easy to use and configure. Its built-in DSM (DiskStation Manager) web app allows you to access and configure the NAS from a web browser. Synology’s management web interface, the DSM web app, is one of the best NAS management tools out there. The DSM web app differentiates the Synology NAS from its competitors.
Synology NAS devices have a lot of useful features like:
- File Storage and Sharing
You can store important files on your Synology NAS. It supports different file-sharing services like SMB, AFP, NFS, FTP, WebDAV, etc., so you can access your files from Windows, Mac, Linux, iPhone, and Android smartphones.
- Multi-User and Quota Support
The Synology NAS supports multiple users and user-based disk quotas. This allows multiple users to access the NAS and use a specific amount of its disk space.
- Mobile App Support
You can manage the Synology NAS and access all the files, photos, audio, videos, etc. from your mobile devices. It also has many official apps in the Apple and Google Play store. For example, DS file, DS photo, DS audio, Synology Moments, Synology Photos, Synology Drive, etc.
- File Syncing
You can use Synology Drive to sync your files to the Synology NAS, or you may also use tools like Rsync.You can use Cloud Sync to sync the files from the NAS to public cloud providers like Amazon Drive, Microsoft Azure, DropBox, OpenStack, etc.
- Data Backup
Synology has Active Backup for Business to help you backup your PCs, servers, virtual machines, and so on. It also has Active Backup for Microsoft 365 and Active Backup for G Suite that lets you backup your Microsoft Office 365 data and Google apps (Drive, Mail, Contacts, Calendar) data, respectively.
- NAS Protection
- Synology NAS supports the Btrfs filesystem. So, you can take snapshots of your filesystem very easily and recover from disaster with a few clicks using the Synology Snapshot Replication Synology High Availability app allows you to connect two Synology NAS devices in a high-availability cluster. In this setup, one Synology NAS will be Active, which serves files, and the other one will be Passive, which will act as the Active NAS and keep serving files in case the Active NAS fails. This ensures data safety and service uptime.
- Synology Hyper Backup can back up critical files on a public cloud service like Google Drive, Amazon Drive, Dropbox, Microsoft Azure, etc., and recover them if needed from these public cloud services.
- Virtualization and Docker Support
The Virtual Machine Manager app will let you create virtual machines on your Synology NAS.
- Productivity Apps
Synology DSM also has a lot of web apps like Synology Drive, Synology MailPlus, Synology Contacts, Synology Chat, Synology Calendar, Synology Office, and Note Station to help you be productive.- Synology Drive allows you to manage and synchronize files.
- Synology MailPlus allows you to build an efficient and secured business mail server.
- Synology Contacts allows you to keep all your phonebook contacts centralized on the Synology NAS.
- Synology Chat allows you to communicate with the Synology NAS users and share files. It is a great collaboration tool for the Synology NAS.
- Synology Calendar allows Synology users to create, manage, and synchronize events. It also schedules meetings with other Synology users. You can sync calendar events with CalDAV clients like Google Calendar, Apple Calendar, Thunderbird, etc. as well.
- Synology Office is a complete office suite for Synology NAS. It contains Document (alternative for Microsoft Word), Spreadsheet (alternative for Microsoft Excel), and Slides (alternative for Microsoft PowerPoint) web apps. You can use the Synology Office web app from DSM for free.
- Note Station is a note-taking app. You can use it to take notes and sync them on your Synology NAS.
- Multimedia Apps
Synology DSM has the following web apps for entertainment:- Audio Station is an audio player that lets you play audio files stored on the Synology NAS.
- Video Station is a video player that lets you play video files stored on the Synology NAS.
- Photo Station is a photo manager built for professional photographers.
- Synology Moments is a photo and video organizer app for the Synology NAS. You can organize your photos and videos with this app very easily.
- Cloud Services
- Synology QuickConnect allows you to connect to your Synology NAS from the internet. You don’t need any public IP or configure port forwarding on your router to access it.
If your public IP address changes frequently, you can use Synology DDNS to access your Synology NAS using a domain name. - Synology Cloud is a paid service from Synology that lets you sync important files from your Synology NAS to Synology’s cloud storage service.
- Synology QuickConnect allows you to connect to your Synology NAS from the internet. You don’t need any public IP or configure port forwarding on your router to access it.
- Data Security
Synology NAS has a lot of security features like AES 256-bit encryption for files, secure key management, account protection, firewall, HTTP 2.0 support, IP auto-block, multiple SSL certificates support, encrypt integration, and many more.
- Easy Management
Synology NAS can be easily managed from a web browser using the Web Assistant web UI of the DSM (DiskStation Manager) operating system.
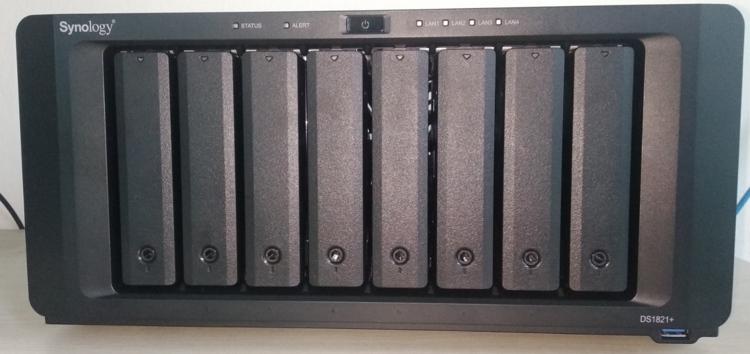
Synology has provided us with the DS1821+ model of the NAS for review. In this article, I am going to show you how to set up the Synology DS1821+ NAS. So, let’s get started!
What’s in the Box?
The Synology DS1821+ NAS model comes with a simple box. Nothing fancy.
In the box, you will get the following components:
- The Synology NAS
- 2 X RJ-45 patch cables
- 2 X drive tray keys
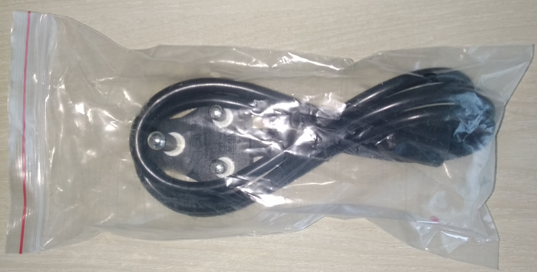
- A power cable
- Some screws for installing 2.5-inch HDDs/SSDs
You may have some other things in the box depending on the Synology NAS model you’ve bought.
Pulling Out Drive Trays from the Synology NAS
You must install at least 1 HDD/SSD to get the Synology NAS working. So, installing an HDD/SSD on your Synology NAS is the first thing you should do after unboxing it.
In this section, I am going to show you how to pull out the drive tray from the Synology NAS.
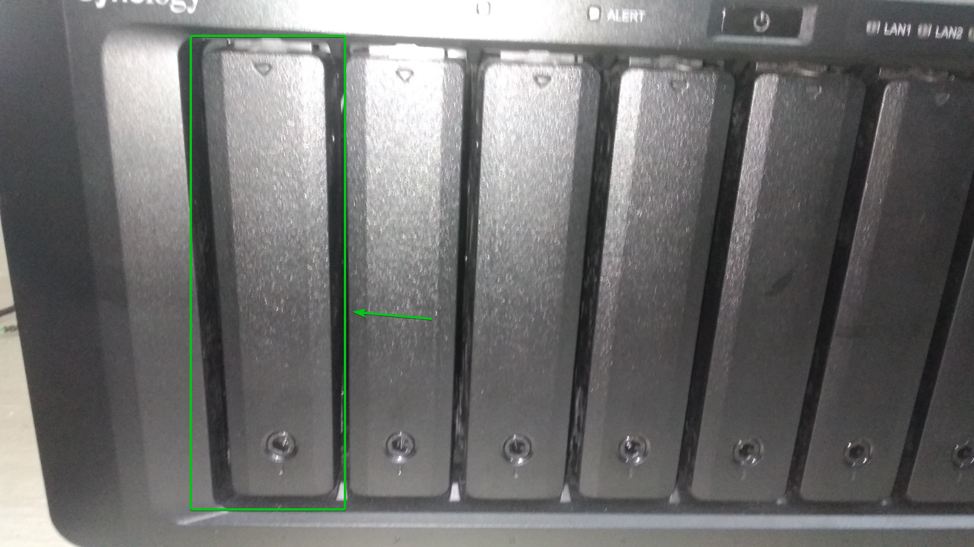
Let’s say, you want to install an HDD/SSD into the 1st drive bay.
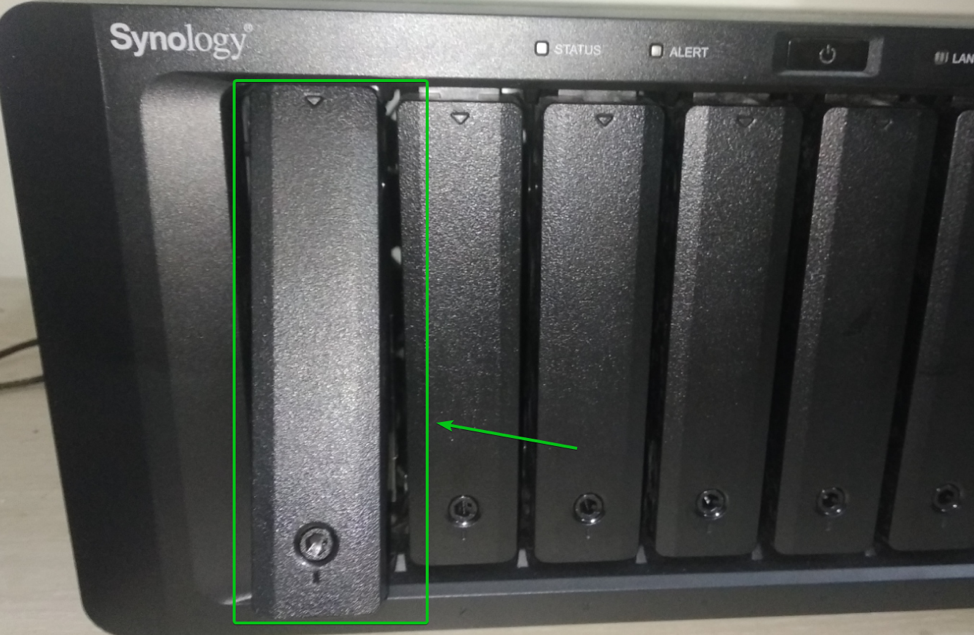
First, you should see whether the drive tray is locked or not.
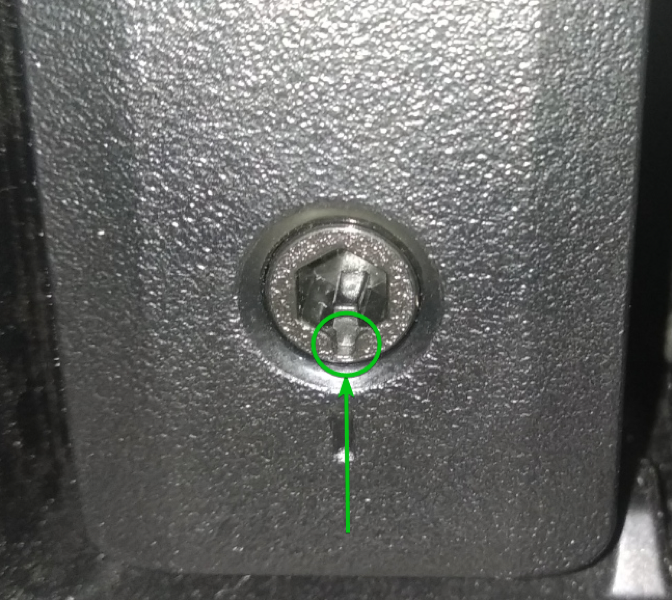
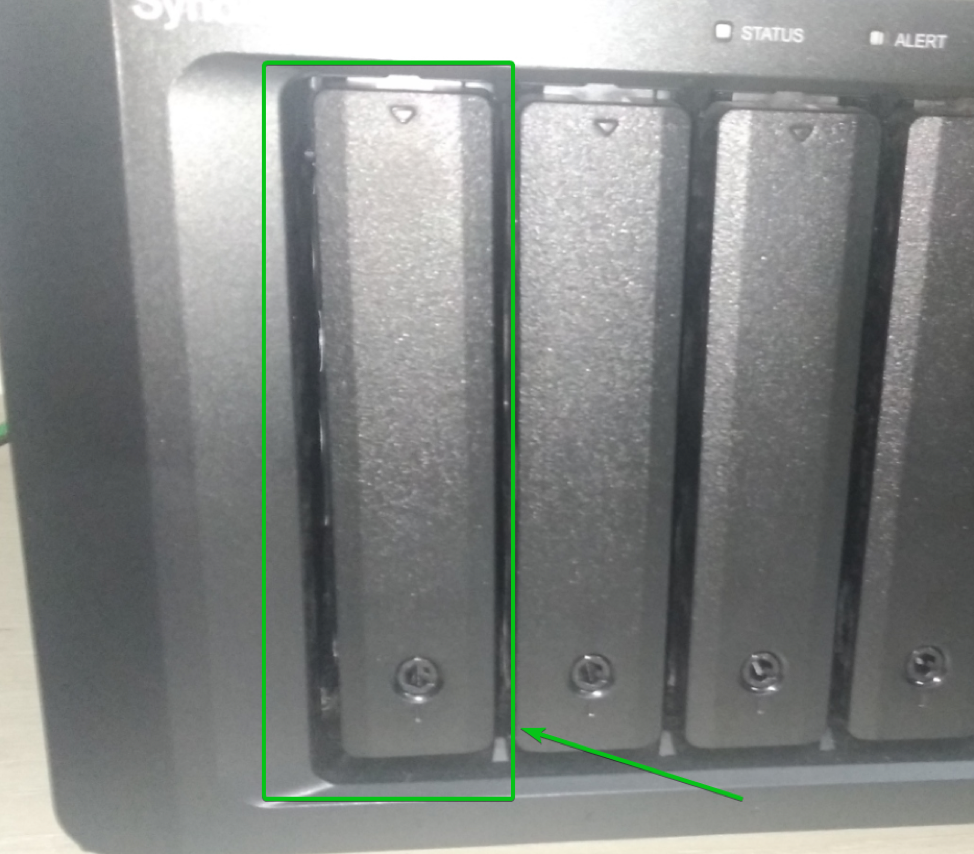
If the drive tray lock points 45 degrees to the right, it means the drive tray is unlocked.
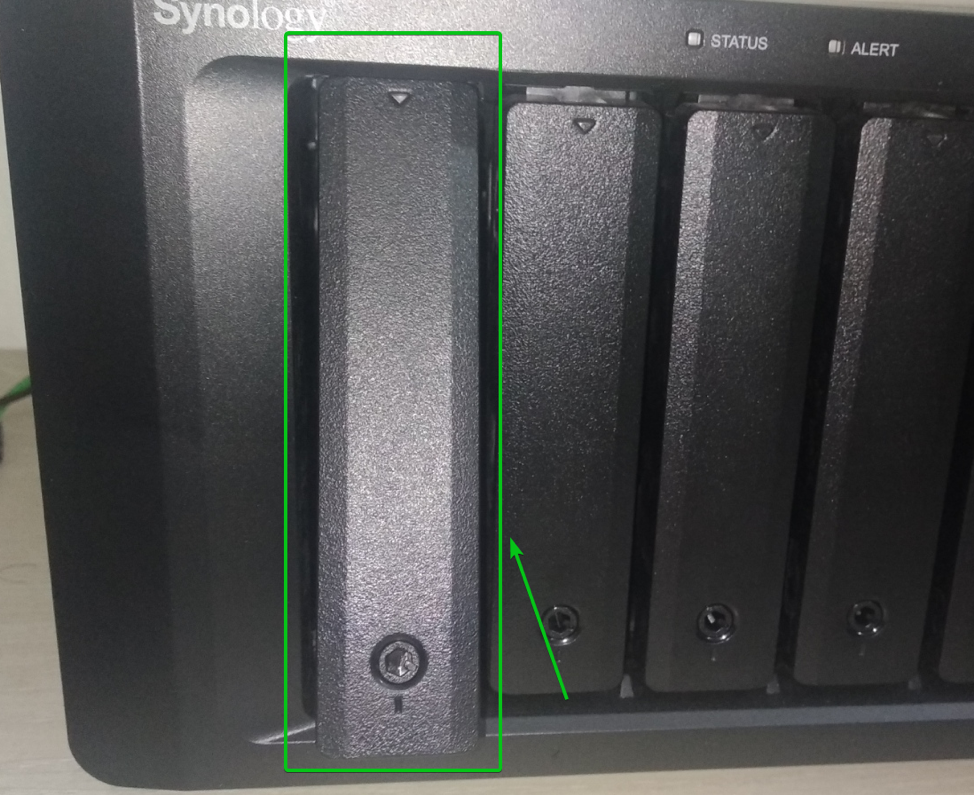
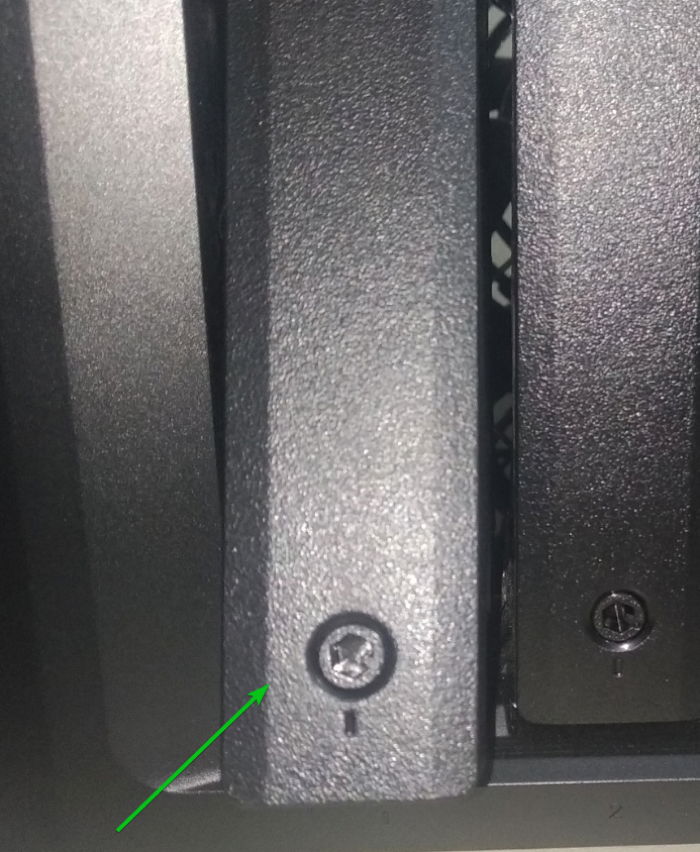
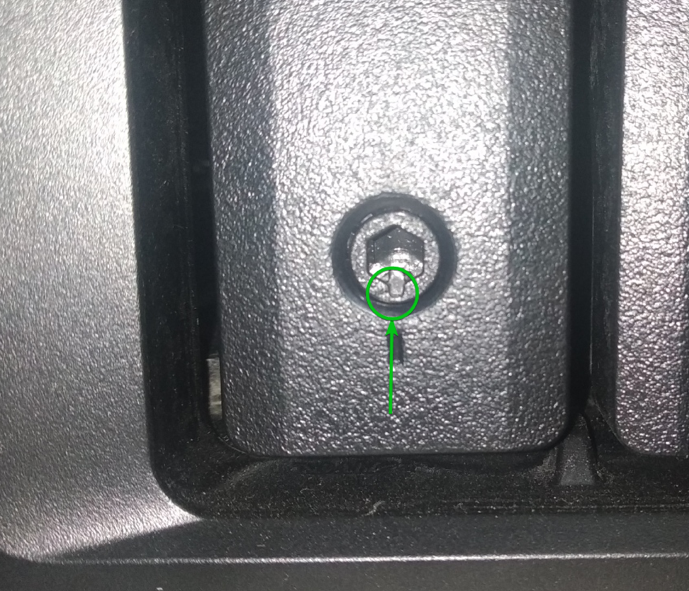
If the drive tray lock points down, as shown in the image below, then the drive tray is locked.
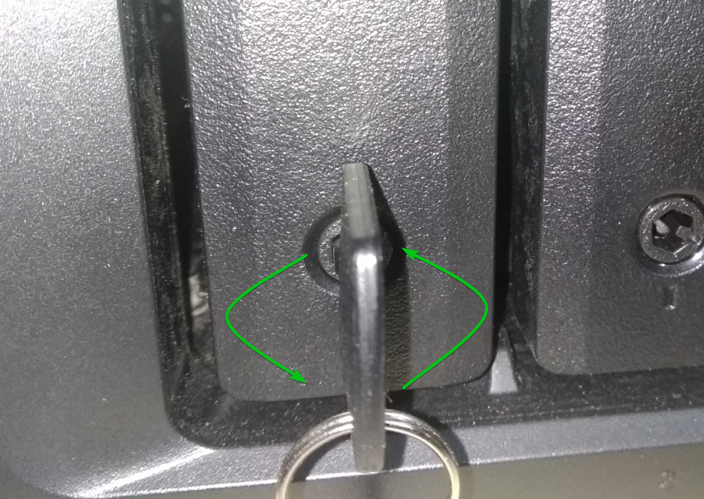
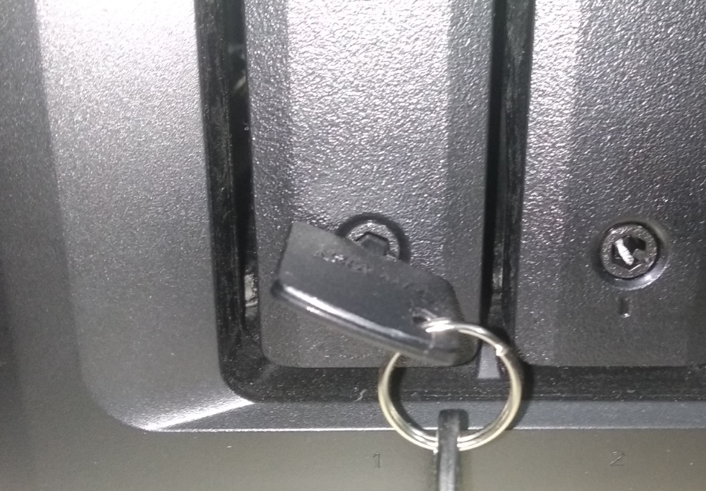
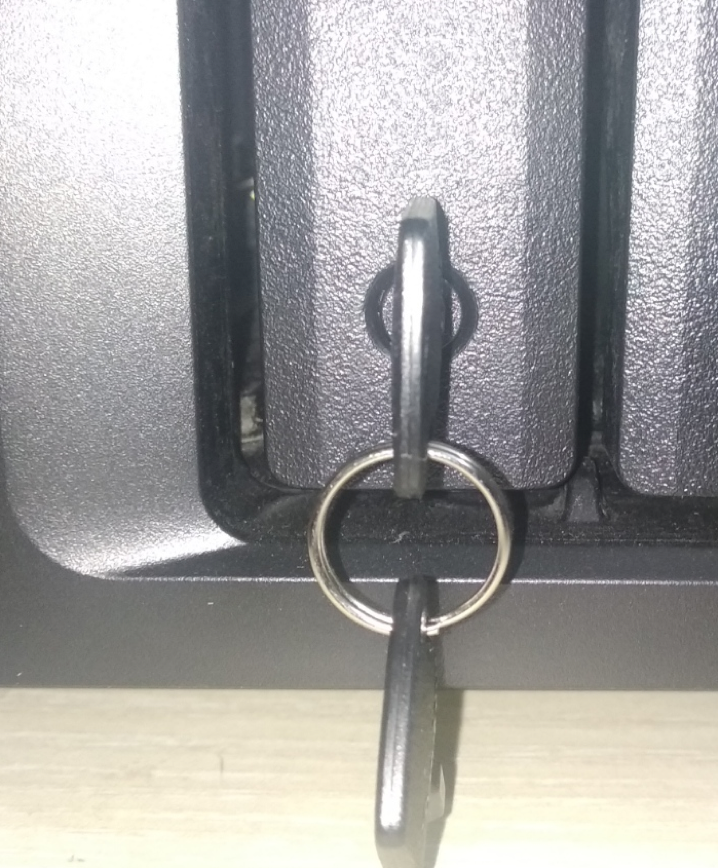
If the drive tray is locked, you need to unlock it using the key that is provided with the Synology NAS. Simply insert the key on the drive tray and turn it counter-clockwise, as shown in the image below:
The drive should be unlocked.
Now, remove the key from the drive tray.
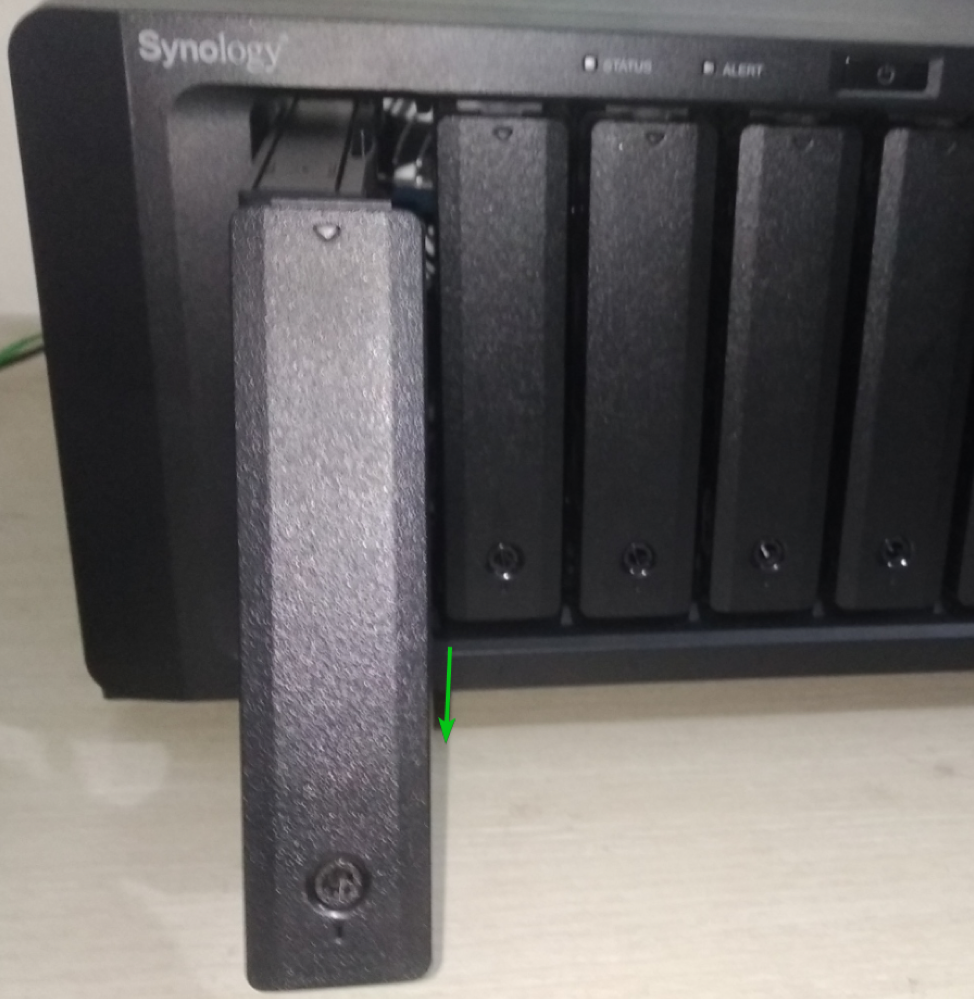
Once the drive tray is unlocked, push the bottom of the drive tray until you hear a clicking sound, and then release your finger.
The drive tray handle should be unlocked.
Hold the drive tray handle and pull the drive tray out of the drive bay.
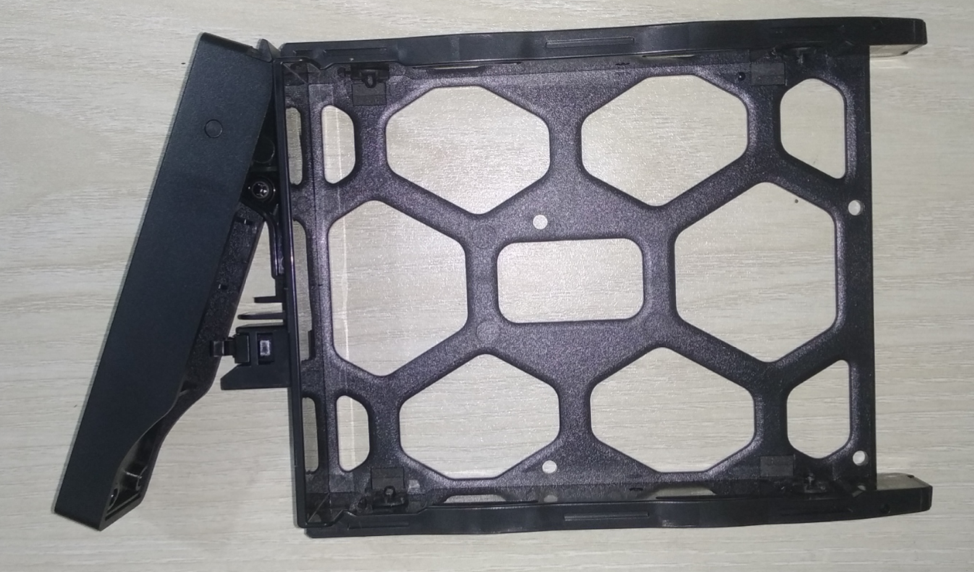
The drive tray should be removed. Now, you can install a 2.5/3.5-inch HDD/SSD on the drive tray.
Installing a 3.5-inch HDD on the Drive Tray
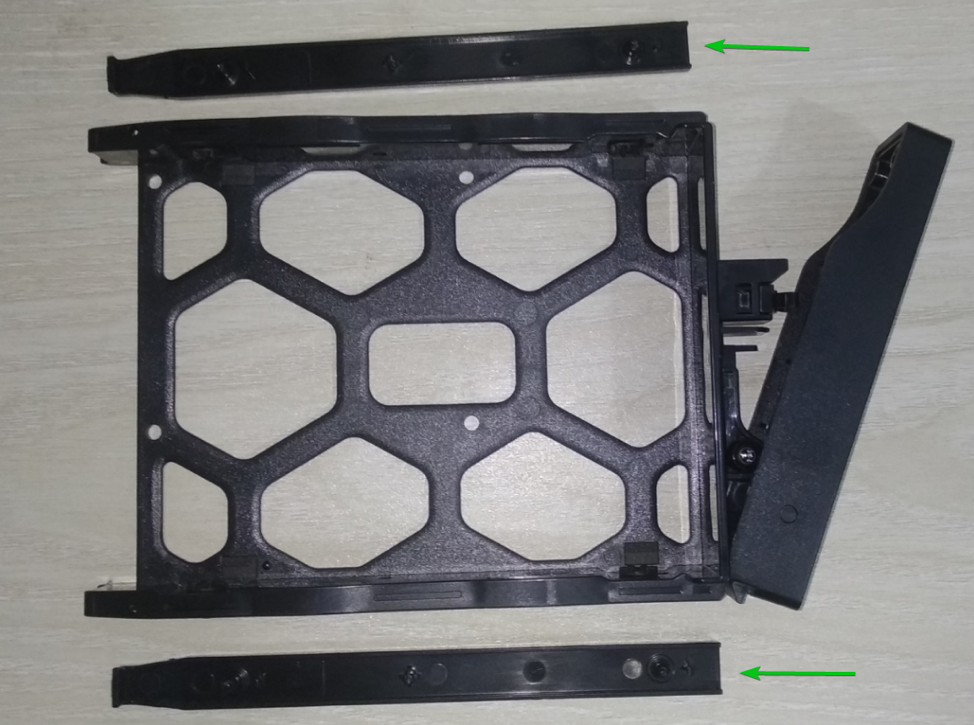
To install a 3.5-inch HDD on the drive tray, you need to remove the fastening panels from the sides of the drive tray by gently pushing the fastening panels outward, as marked in the image below:
The fastening panels should be removed from the drive tray.
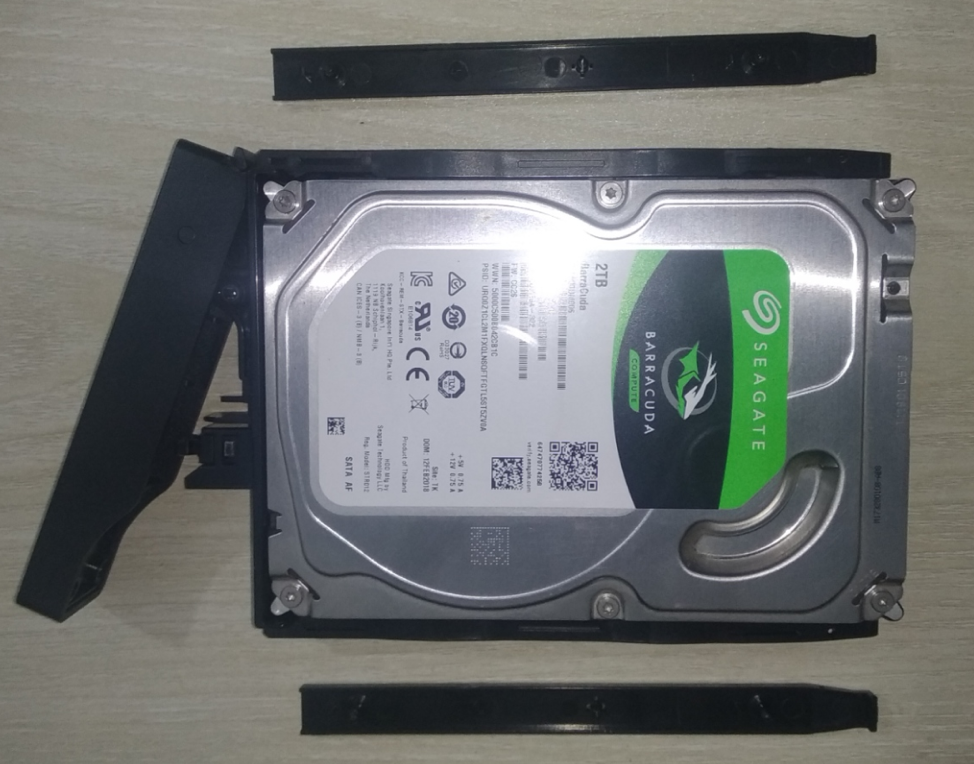
Insert the 3.5-inch HDD into the drive tray, as shown in the image below:
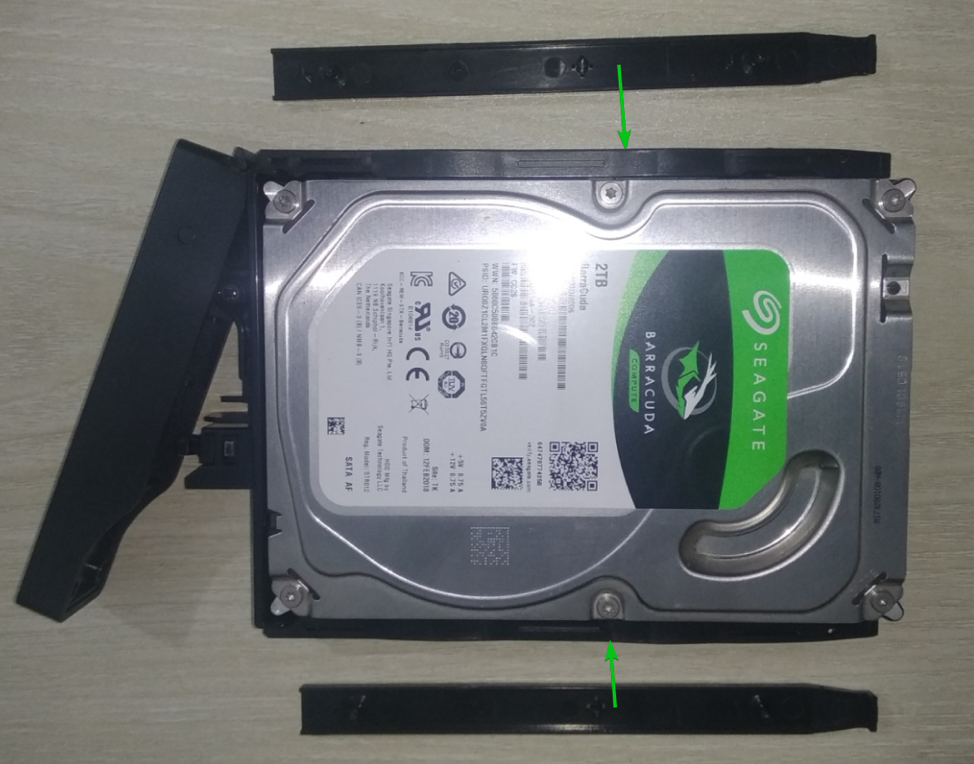
Insert the fastening panels into the drive tray to secure the HDD.
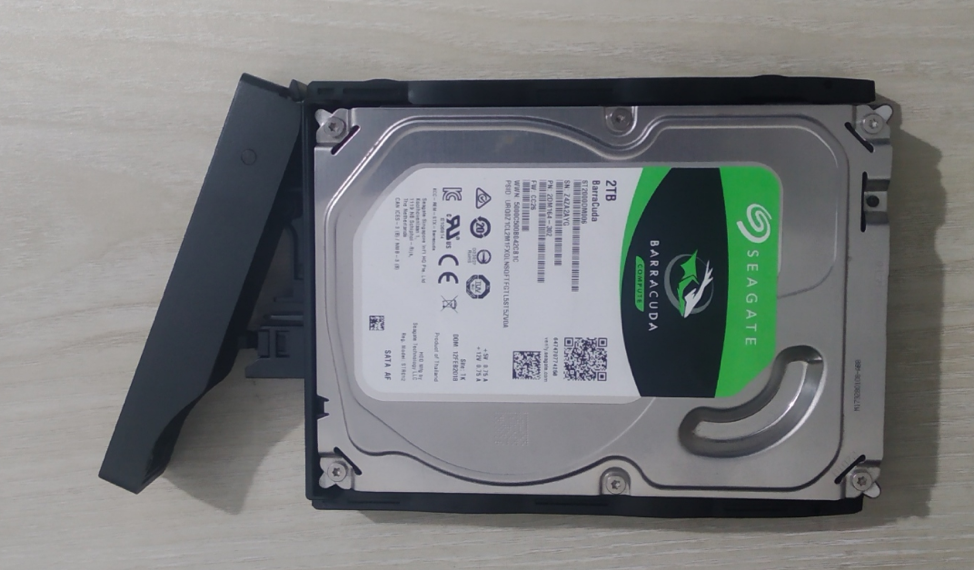
The 3.5-inch HDD should be installed on the drive tray.
Installing a 2.5-inch HDD/SSD on the Drive Tray
To install a 2.5-inch HDD/SSD on the drive tray, you need a PH-2 screwdriver and 4 screws. You can use the screws that came with your Synology NAS.
An image of a PH-2 screwdriver is shown below:
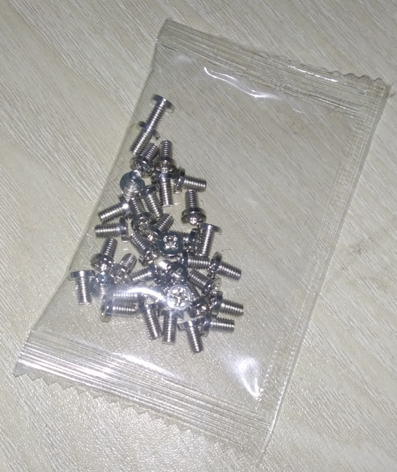
An image of 4 screws that came with my Synology NAS model DS1821+ is shown below:
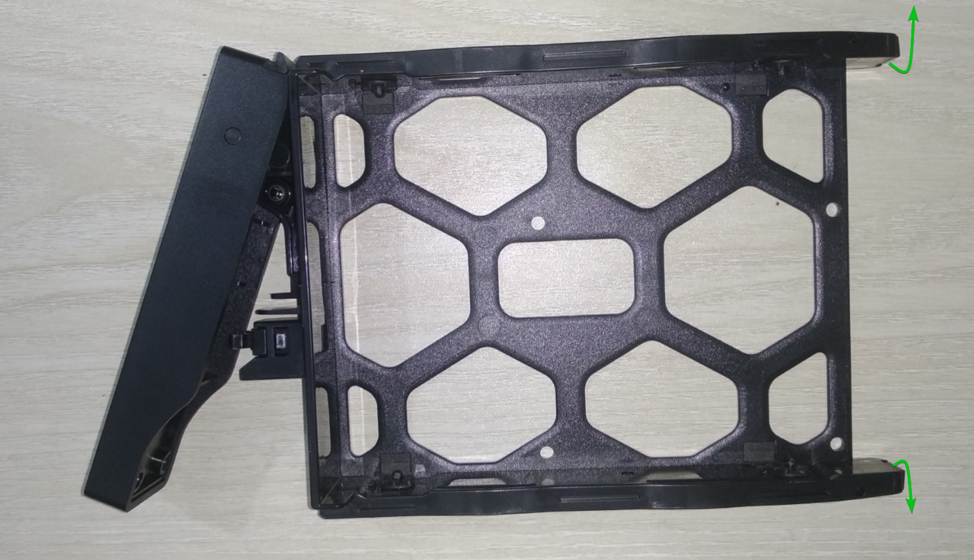
To install a 2.5-inch HDD/SSD on the drive tray, you need to remove the fastening panels from the sides of the drive tray by gently pushing the fastening panels outward, as marked in the image below:
The fastening panels should be removed from the drive tray. As you don’t need them to install a 2.5-inch HDD/SSD on the drive tray; keep them somewhere safe.
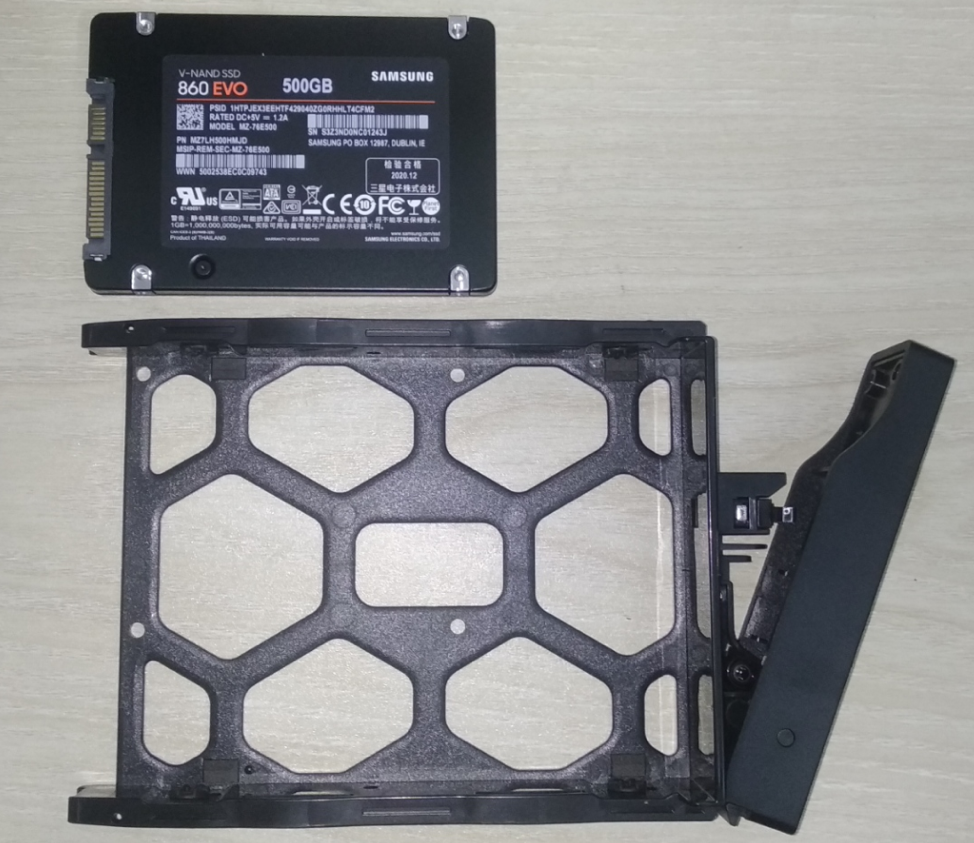
In this article, I will install a Samsung 860 EVO 500GB 2.5-inch SATA SSD on the drive tray. You can use any 2.5-inch HDD/SSD as you like.
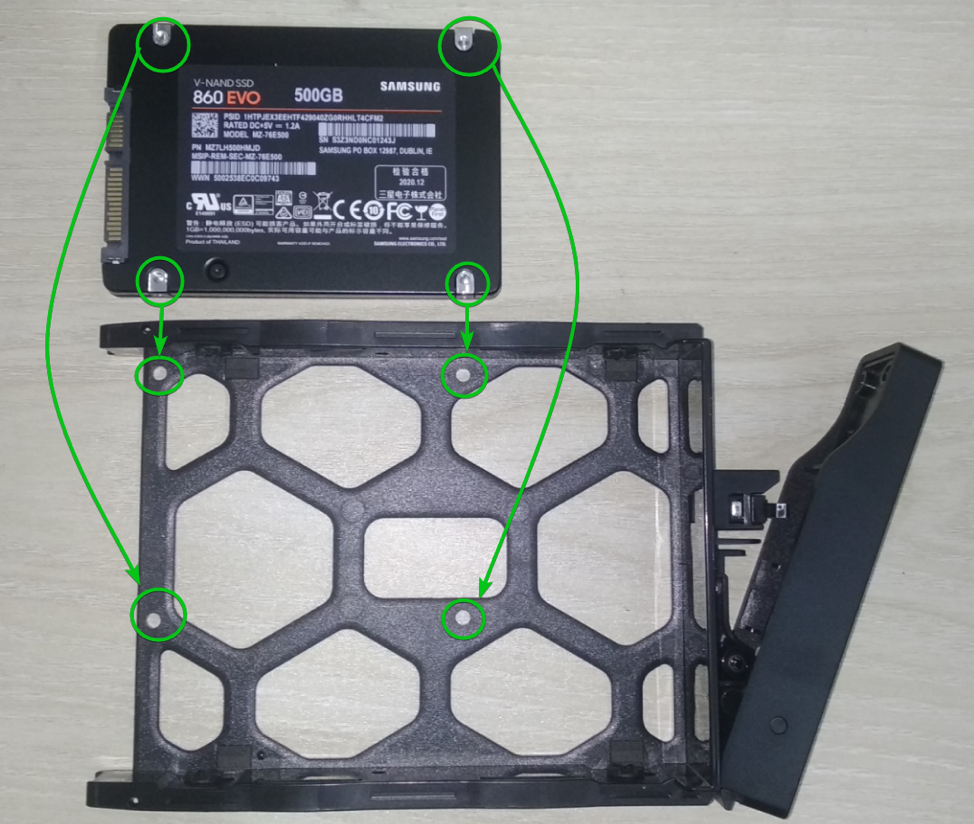
To install a 2.5-inch HDD/SSD on the drive tray, place the HDD/SSD in it in a way that matches the screw holes of the HDD/SSD with the drive tray, as marked in the screenshot below:
Once the 2.5-inch HDD/SSD is placed on the drive tray, it should look as shown in the image below:
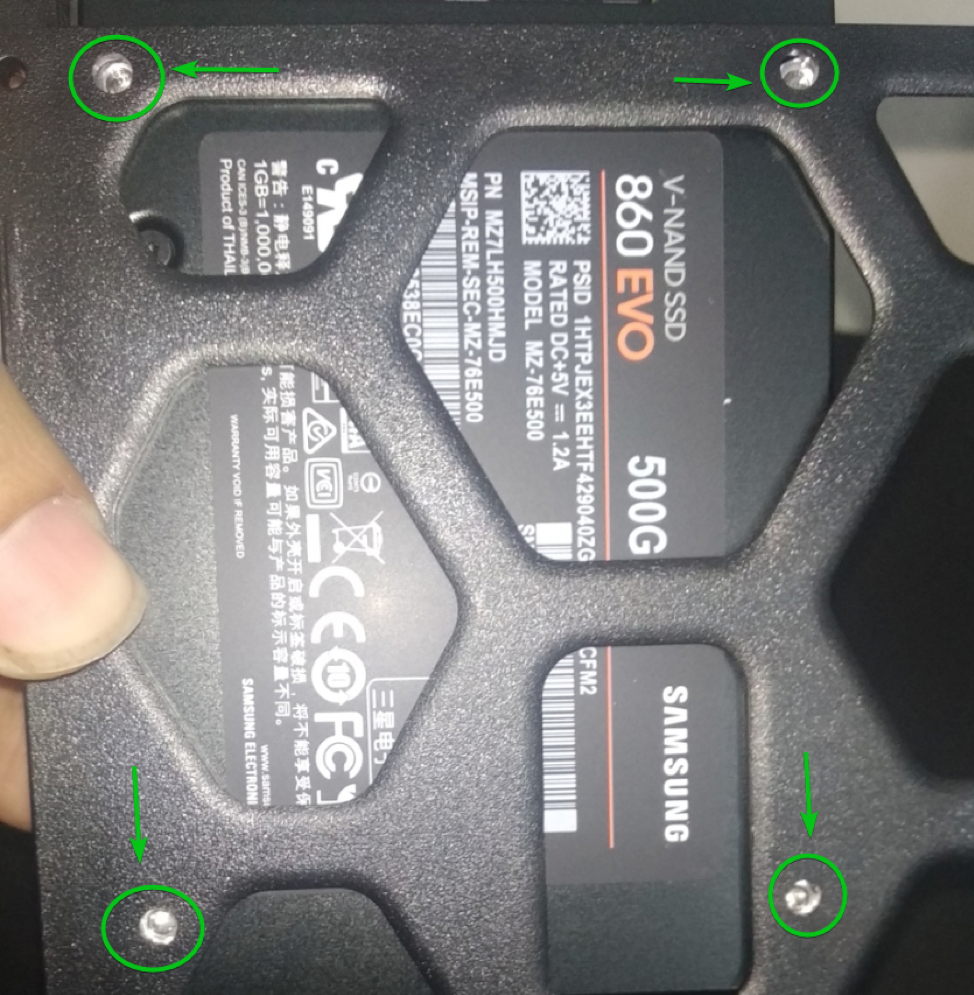
Now, hold the 2.5-inch HDD/SSD firmly and flip the drive tray. Make sure that the screw holes of the HDD/SSD match with the screw holes of the drive tray.
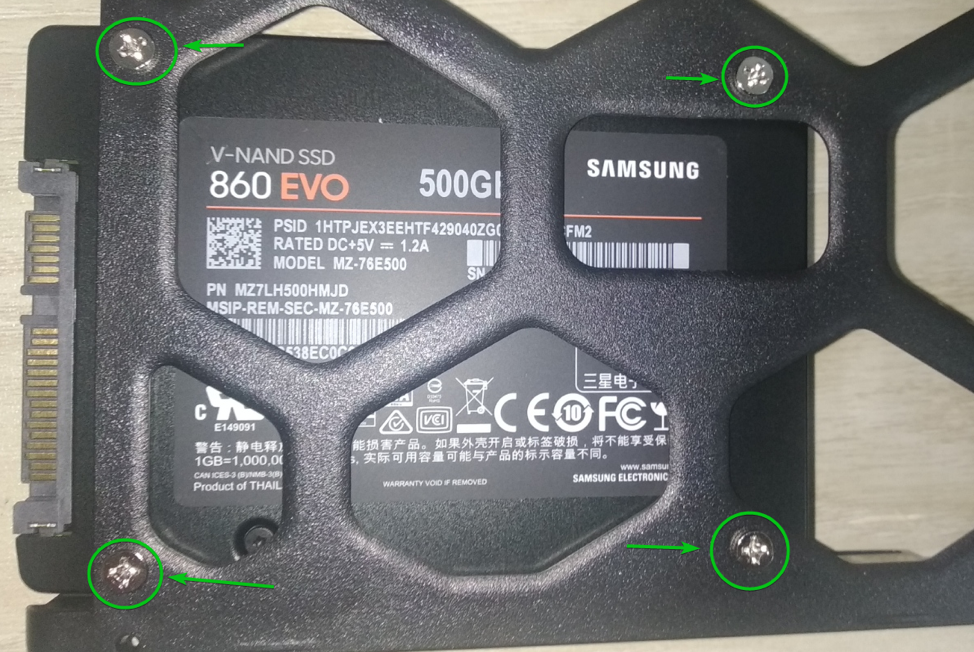
Put 4 screws in the 4 aligned screw holes of the drive tray, as marked in the image below:
Once you tighten the screws with a PH2 screwdriver, the 2.5-inch HDD/SSD should be installed on the drive tray.
Inserting Drive Trays on the Synology NAS
Once you have installed a 2.5/3.5-inch HDD/SSD on the drive tray, put it back into the drive bay.
Gently push the drive tray all the way into the drive bay.
Then, push the bottom of the locking handle of the drive tray till you hear a clicking sound.
Once you hear a clicking sound, release your finger from the drive tray lock.
The drive tray handle should be locked.
You can lock the drive tray using the key provided with your Synology NAS if you want by inserting the key into it and turning it clockwise, as shown in the image below:
Now, remove the key from the drive tray.
The drive tray should be locked.
You may have some extra screws left and the drive tray fastening panels that you have removed from the drive trays. Make sure to keep them in a safe place so you can still use them when needed.
Powering on the Synology NAS
Once you have installed one or more HDDs/SSDs in your NAS, you have to connect the power cable(1) into the power socket and an ethernet cable into the RJ-45 port(2) of your NAS. These ports are located in the rear (or backside).
Connect the ethernet cable into the first RJ-45 port of your NAS, as shown in the image below:
Connect the power cable into the power socket of your NAS, as shown in the image below:
To power on the NAS, press the power button on the front side of your NAS, as shown in the image below:
The power button should start blinking.
Once your NAS is ready, you should hear a beep, and the STATUS LED, the LAN1 LED, and the power button LED should stop blinking.
Accessing Synology NAS for the First Time
Once the NAS is power on, up and running, you need to install the DSM operating system on the NAS before you can configure it by navigating to http://find.synology.com from your favorite web browser.
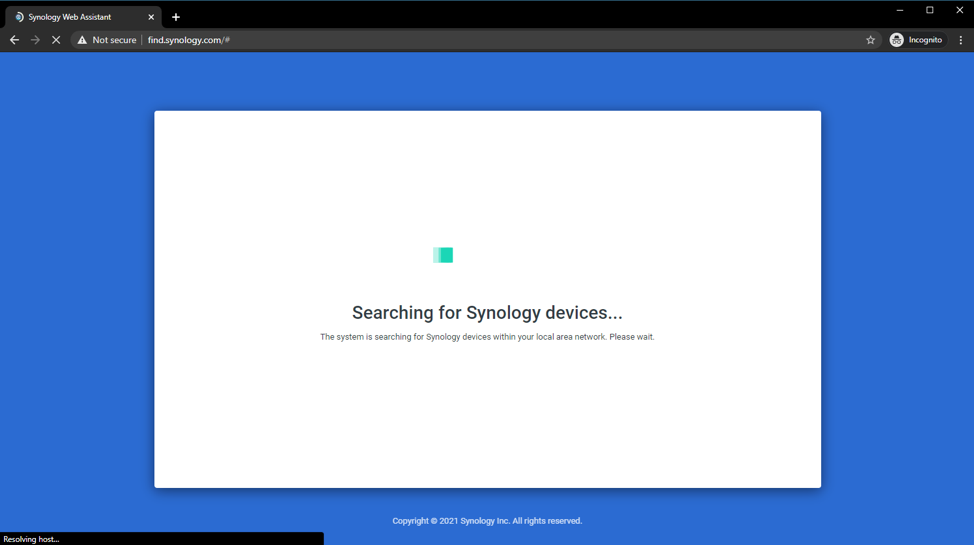
Once the page loads, it should search your network (LAN) to find the NAS.
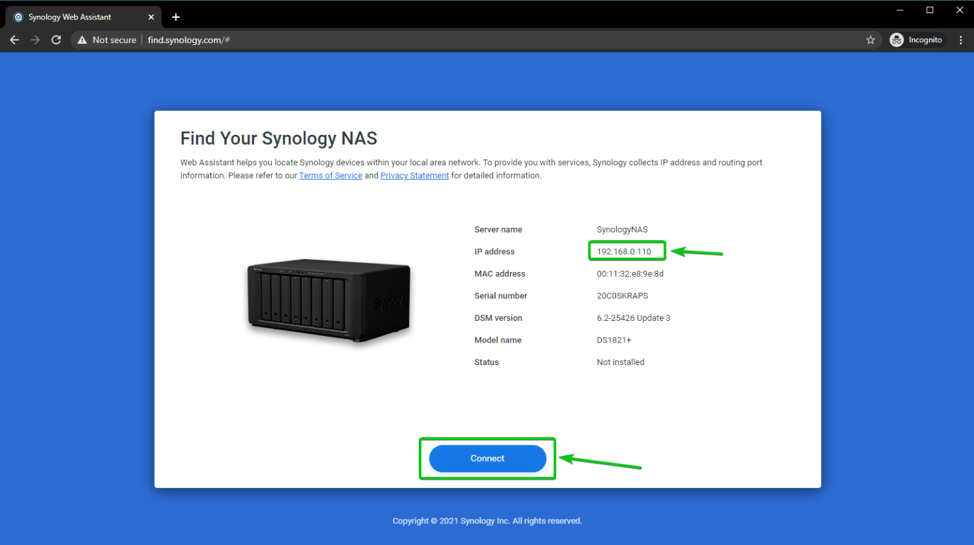
Once the webpage finds the NAS, it will display it like the screenshot below.
My NAS model is DS1821+ and the IP address of the NAS is 192.168.0.110. The IP address of your NAS will be different. So make sure to adjust it from now on.
To connect to your NAS, click on Connect.
Check I have read and agreed to the terms of the EULA checkbox and click on Next, as shown in the screenshot below:
Click on Continue.
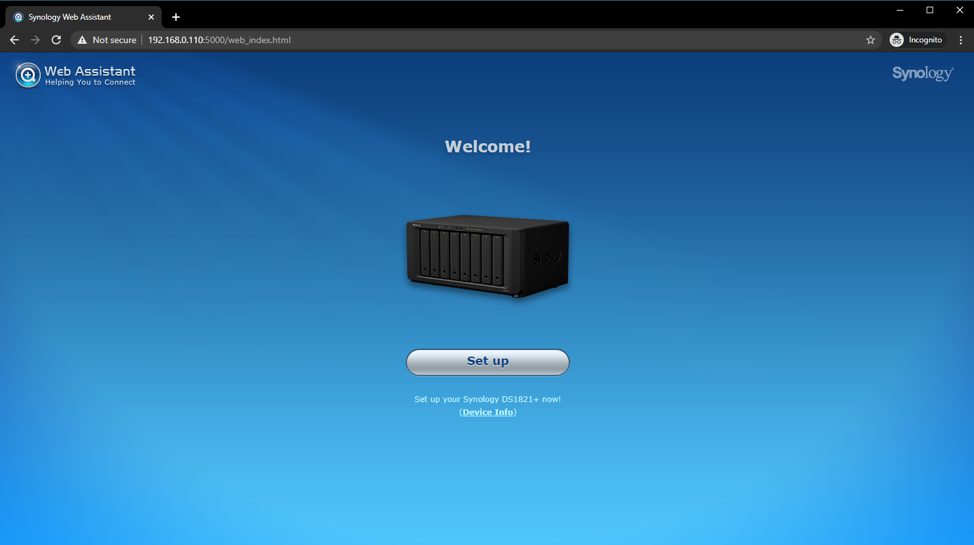
You should see the Web Assistant setup page. You can install the DSM operating system on your NAS from here.
Setting Up Synology NAS using Web Assistant
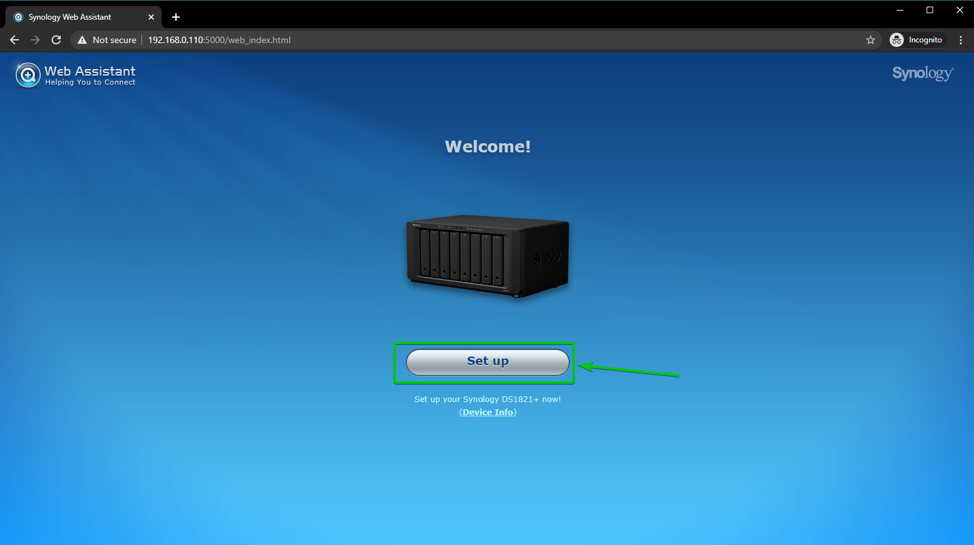
To set up your NAS, click on Set Up.
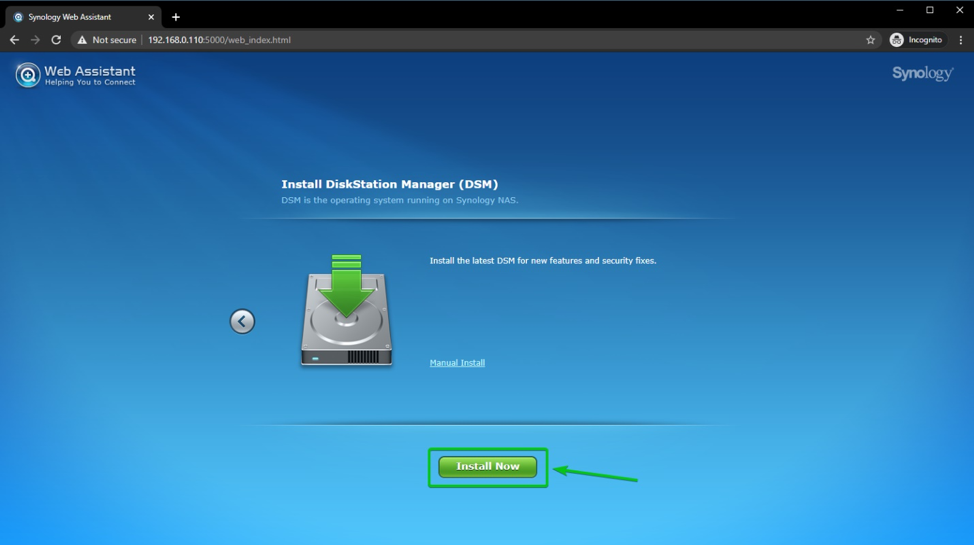
You will be asked to install the DSM operating system on your NAS. To do that, click on Install Now.
To install the DSM operating system on your Synology NAS, you need to format all the HDDs/SSDs that you have installed. Formatting the drives will remove all the existing data from the drive.
To format all the drives, check I understand that all data on these hard disks will be removed checkbox and click on OK.
Synology Web Assistant should start formatting the HDDs/SSDs installed on your NAS. It may take a while to complete.
Once the HDDs/SSDs are formatted, Synology Web Assistant should start downloading the DSM operating system from the internet. It may take a while to complete depending on the speed of your internet connection.
Once the DSM operating system is downloaded, Synology Web Assistant will install it on a small partition of each of the HDDs/SSDs on your NAS.
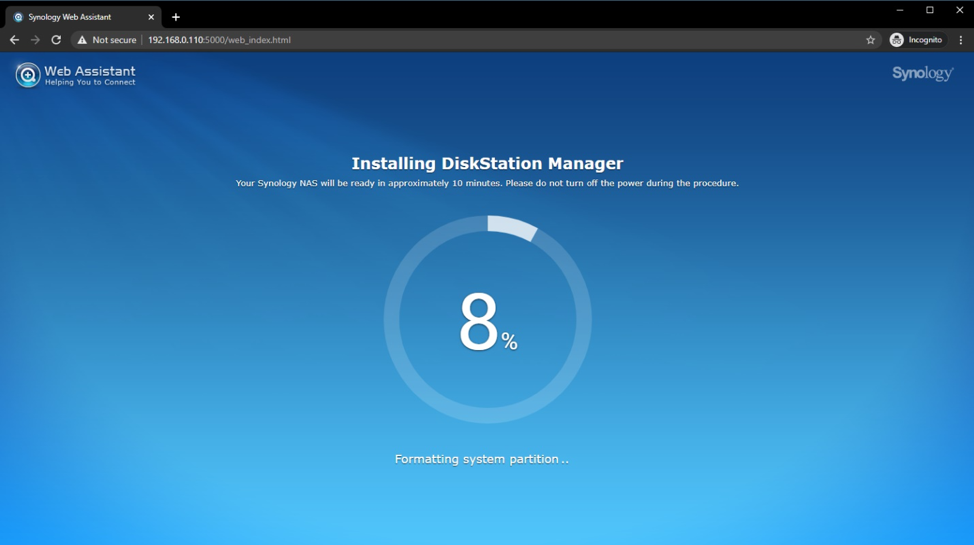
The DSM operating system is being installed on the NAS.
Once the installation is complete, Synology Web Assistant will show you a 10-minute timer. It will restart the NAS and automatically connect to it again. Don’t close the web browser.
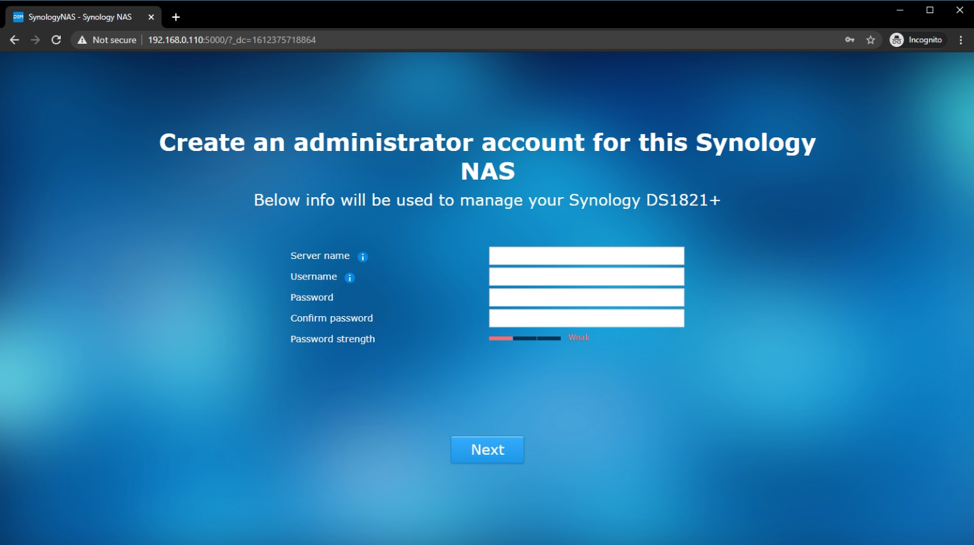
Once your NAS is ready, you should see the following page.
You need to create a new admin user from here. Type in a server name, username, and password for your NAS and click on Next.
NOTE: Remember the username and password you’ve set here as you will need them to log in to the NAS.
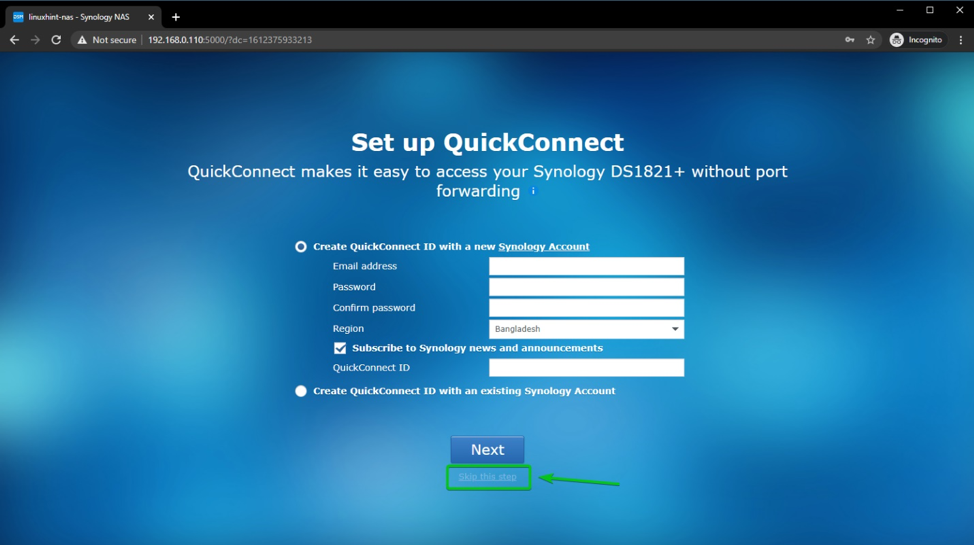
We will talk about QuickConnect in another article. For now, click on Skip this step, as shown in the screenshot below:
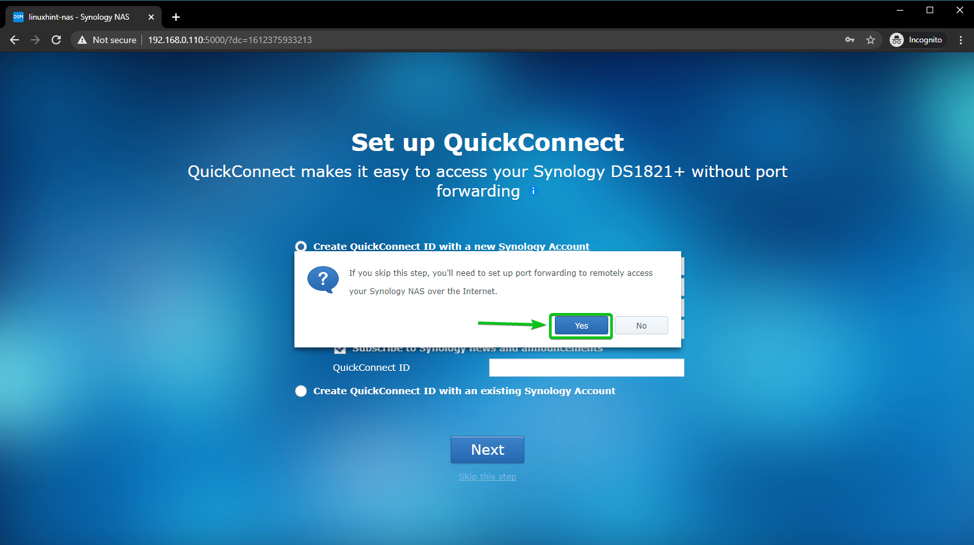
Click on Yes to confirm skipping QuickConnect configuration.
Click on Go.
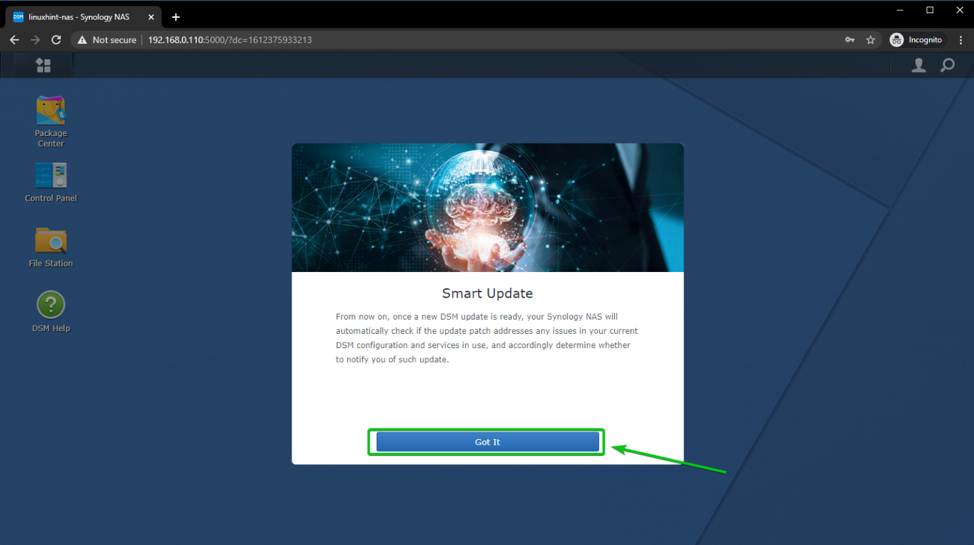
You should be taken to the Synology Web GUI (Graphical User Interface). Click on Got It.
If you want to send device analytics data to Synology, click on Yes. Click on No thanks! if otherwise.
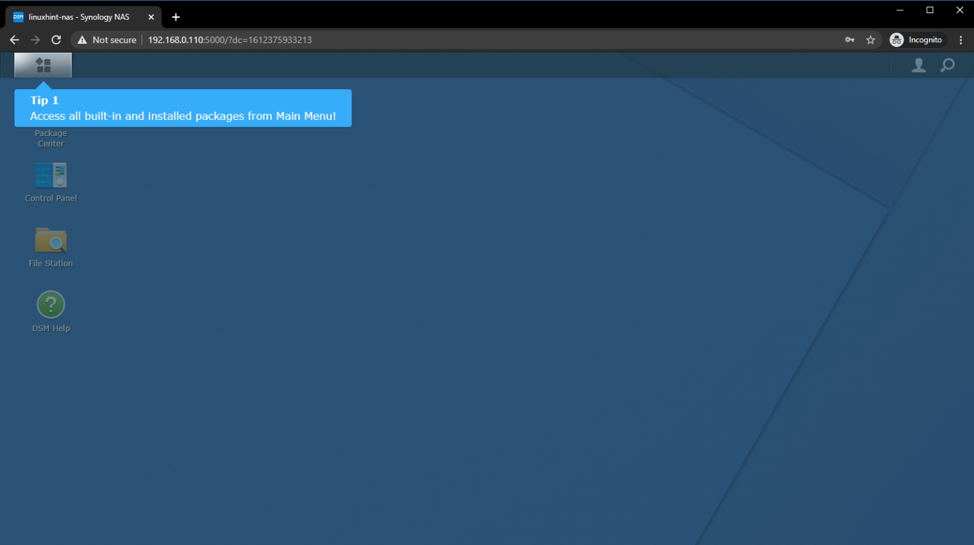
Click on the highlighted section (Tip 1) where it shows you the location of the Main Menu.
Click on the highlighted section (Tip 2) where it shows you the Package Center app.
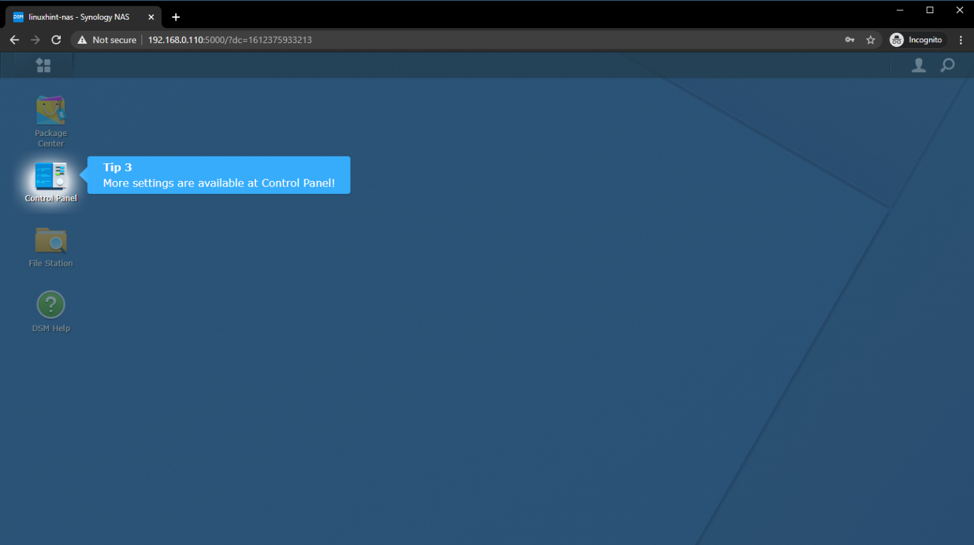
Click on the highlighted section (Tip 3) where it shows you the Control Panel app.
The Synology Web GUI should be ready. You can configure your NAS from here.
Synology Supported RAIDs
Synology supports different RAID configurations. In this section, I am going to explain all its supported RAID configurations. This will help you create Synology storage pools and volumes later in this article.
You can use the Synology RAID Calculator to get an overview of the RAID you want to set up, estimate the useable disk space, or compare different RAID configurations. I will use screenshots from the Synology RAID Calculator while explaining different RAID configurations so that you can understand how much disk space you can use in a certain RAID configuration.
The Synology supported RAID configurations are:
- SHR
Synology Hybrid RAID or SHR is developed by Synology to make RAID configuration easier for less technical users. You can start an SHR RAID with only a single HDD/SSD and add more HDDs/SSDs later. This is a big advantage of the SHR RAID.If you use 1 HDD/SSD in an SHR RAID, then you can use the full HDD/SSD capacity for storing data.If you add 2 or more HDDs/SSDs to an SHR RAID, then it can provide 1 drive fault tolerance. For fault tolerance, it will use 1 drive worth of disk space. So, you can use the disk space of all the HDDs/SSDs but one.As you can see, if you use 1 X 1 TB HDD in SHR RAID, you can use the full capacity of the HDD.
And if you use 3 X 1 TB HDD in SHR RAID, you can use only 2 TB (2 x 1 TB HDD) for data and 1 TB (1 x 1 TB HDD) for protection. So that the RAID can survive 1 drive failure.
- SHR-2
The SHR-2 RAID is the same as the SHR RAID. The only difference is that it provides 2 drive fault tolerance, while the latter only provides 1 drive fault tolerance. You need at least 4 HDDs/SSDs to create an SHR-2 RAID.The SHR-2 RAID can survive 2 drive failures at the same time. But you can use 2 drive capacity less disk space for data.For example, if you use 5 X 1 TB HDDs in an SHR-2 RAID, you can use only 3 TB (3 X 1 TB HDD) of disk space for storing data. The other 2 TB (2 X 1 TB HDD) will be used for protection. So that the SHR-2 RAID can survive 2 drive failures at the same time.Compare that to the SHR RAID where you can use 4 TB (4 X 1 TB HDD) of disk space for storing data. 1 TB (1 X 1 TB HDD) will be used for protection. But it can survive only 1 drive failure at the same time.So, in SHR-2 RAID, you get more fail-safety, but less disk space than SHR RAID.
- Basic
If you want to use traditional style disk partitioning instead of RAID configuration on your Synology NAS, then the Basic configuration is for you. You can use only a single HDD/SSD to create a Basic storage pool and create as many volumes (you can use volumes as partitions as well) as you want in that storage pool.In Basic mode, you can’t use more than 1 HDD/SSD, and you won’t have any fail-safety. However, you can use the full capacity of your HDD/SSD for storing data. - JBOD
In the JBOD array, you can add one or more HDDs/SSDs. You can also use the capacity of all the HDDs/SSDs.JBOD array won’t provide you with any fail-safety. So, if one of the HDDs/SSDs of the JBOD array fails, the entire JBOD array will fail as well, hence losing all your important data. - RAID-0
In a RAID-0 configuration, you can add two or more HDDs/SSDs. You can also use the full capacity of all the HDDs/SSDs in it. The data you write to a RAID-0 array will be divided into blocks and these will be spread across the HDDs/SSDs in a RAID-0 array. RAID-0 will increase the read/write performance of the filesystem as well. However, it comes with no safety measures. So if any of the HDDs/SSDs in a RAID-0 array fails, the entire array will fail and leave your data inaccessible.An example of a RAID-0 array is shown in the screenshot below. I have added 3 X 1 TB HDDs in the RAID-0 configuration. As you can see, 3 TB (3 x 1 TB HDD) of disk space is available for storing data. - RAID-1
In the RAID-1 configuration, the data you have on one HDD/SSD will be written to all the other HDDs/SSDs added to the RAID-1 array.You need at least 2 HDDs/SSDs to create a RAID in the RAID-1 configuration. RAID-1 configuration provides the best fail-safety. A RAID in RAID-1 configuration can survive (number of HDDs/SSDs – 1) disk failures. So as long as 1 HDD/SSD is okay, you won’t lose your data and the RAID-1 array can be rebuilt.If all the HDDs/SSDs in the RAID-1 array are of the same size, then you can use the disk space of 1 of those HDDs/SSDs.If the disks are of different sizes, then you can use the disk space of the smallest of the HDDs/SSDs. The rest of the disk space will be wasted.For example, if you add 4 X 1 TB HDD in the RAID-1 configuration, you can only use 1 TB (1 X 1 TB HDD) of disk space for storing data. 3 TB (3 X 1 TB HDD) will be used for protection. So, even if 3 drives fail at the same time, you will still have all your data.
If you add 1 smaller capacity HDD (1 X 500 GB HDD), then you can only use 500 GB (1 x 500 GB) from the RAID-1 array for storing your precious data. 500 GB from the rest of the 1 TB HDDs will be used for protection, the other 500 GB will be unused or wasted.
- RAID-10
RAID-10 is a hybrid of RAID-0 and RAID-1. To configure a RAID-10 array, you need at least 4 or more even numbers (4, 6, 8, etc.) of HDDs/SSDs. RAID-10 has the read/write performance of RAID-0 and the data protection level of RAID 1.In RAID-10, 2 HDDs/SSDs will form a RAID-1 group. Then, all the RAID-1 groups will be combined to form a RAID-0 array.In Raid-10, 1 HDD/SSD from each of the RAID-1 groups can fail. So, 1 drive from each pair of drives (in the RAID-1 group) can fail, and the RAID will still function. But, if 2 of the HDDs/SSDs from the same RAID-1 group fail, the RAID will be inaccessible, hence you will lose all your precious files.You can use half the storage capacity of all the HDDs/SSDs added to the RAID in the RAID-10 configuration.For example, if you add 6 X 1 TB HDD in the RAID-10 configuration, 3 X RAID-1 groups will be created. Each of the RAID-1 groups will have 2 X 1 TB HDD. Then, the 3 X RAID-1 groups will be used to create a RAID-0 array. So you can use 1 TB (1 X 1 TB HDD) of disk space from each of the RAID-1 groups for storing data, and the other 1 TB (1 X 1 TB HDD) for data protection.
- RAID-5
To create a RAID in the RAID-5 configuration, you need at least 3 HDDs/SSDs.RAID-5 provides 1 drive fail-safety. In it, parity data is calculated and stored on each of the HDDs/SSDs in such a way that if any one of the HDDs/SSDs fails, the data of that failed HDD/SSD can still be recovered using the existing data and the remaining parity data.RAID-5 uses 1 HDD/SSD worth of disk space for storing the parity data. So you can use the disk space of all the HDDs/SSDs added to the RAID-5 array but one.For example, if 6 X 1 TB HDD is configured in RAID-5, you can use 5 TB of disk space to store your important files. 1 TB will be used to store the parity data.
- RAID-6
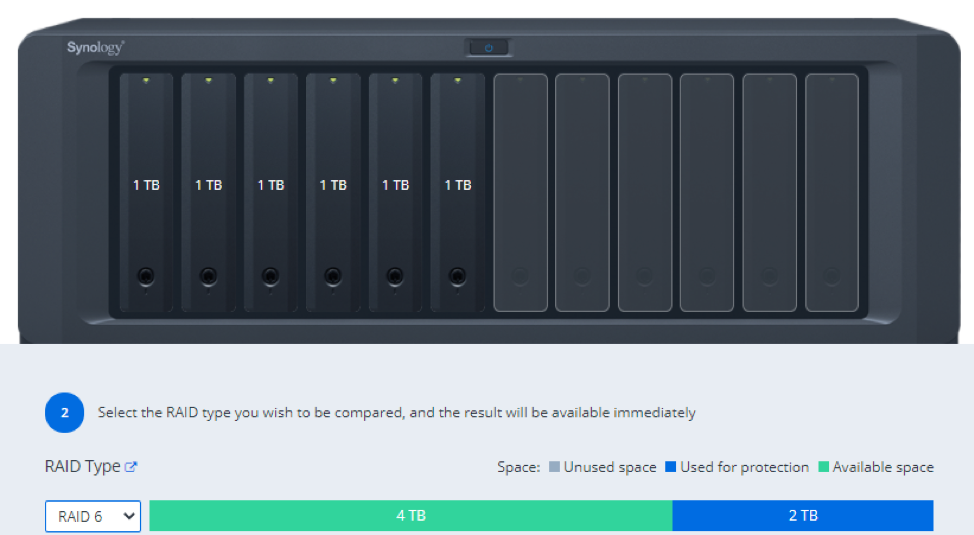
To create a RAID in the RAID-6 configuration, you need at least 4 HDDs/SSDs.RAID-6 provides 2 drive fail-safety. Its two different parity data is calculated and stored on each of the HDDs/SSDs in such a way that if any two of the HDDs/SSDs fail, the data of those failed HDDs/SSDs can still be recovered using the existing data and the remaining parity data.RAID-6 uses 2 HDDs/SSDs worth of disk space to store the parity data. So, you can use the disk space of all the HDDs/SSDs added to the RAID-6 array but two.For example, if 6 X 1 TB HDD is configured in RAID-6, you can use 4 TB of disk space to store your important files. 2 TB will be used to store the parity data.
Creating a Storage Pool
The first thing you want to do to set up your NAS is to create a storage pool. You can create it using the Storage Manager app.
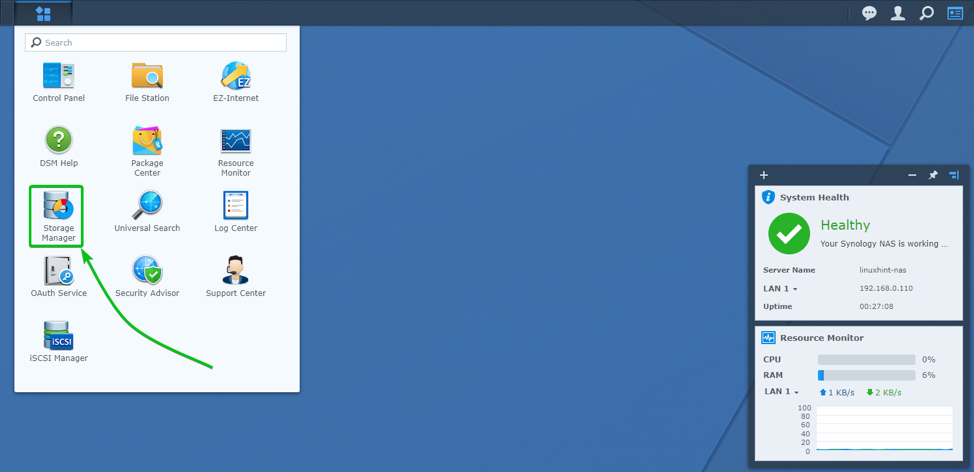
First, open the Storage Manager app from the Main Menu of Synology Web GUI, as shown in the screenshot below:
Storage Manager app should be opened.
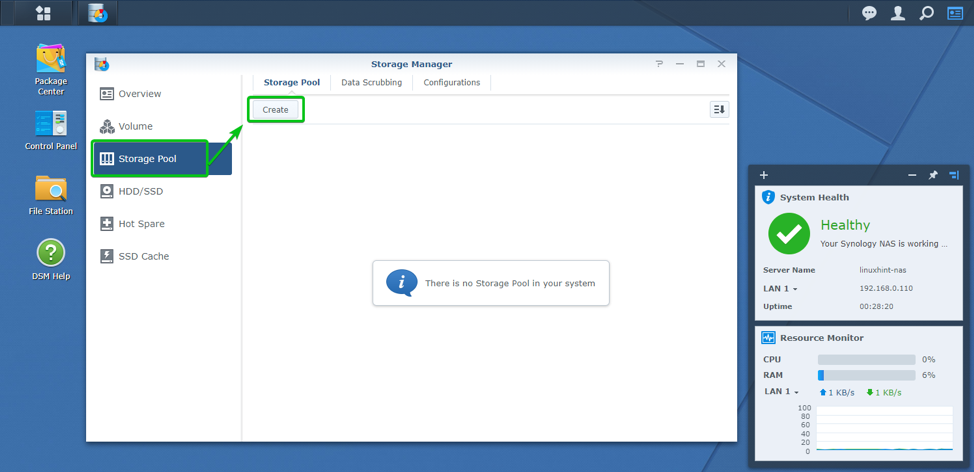
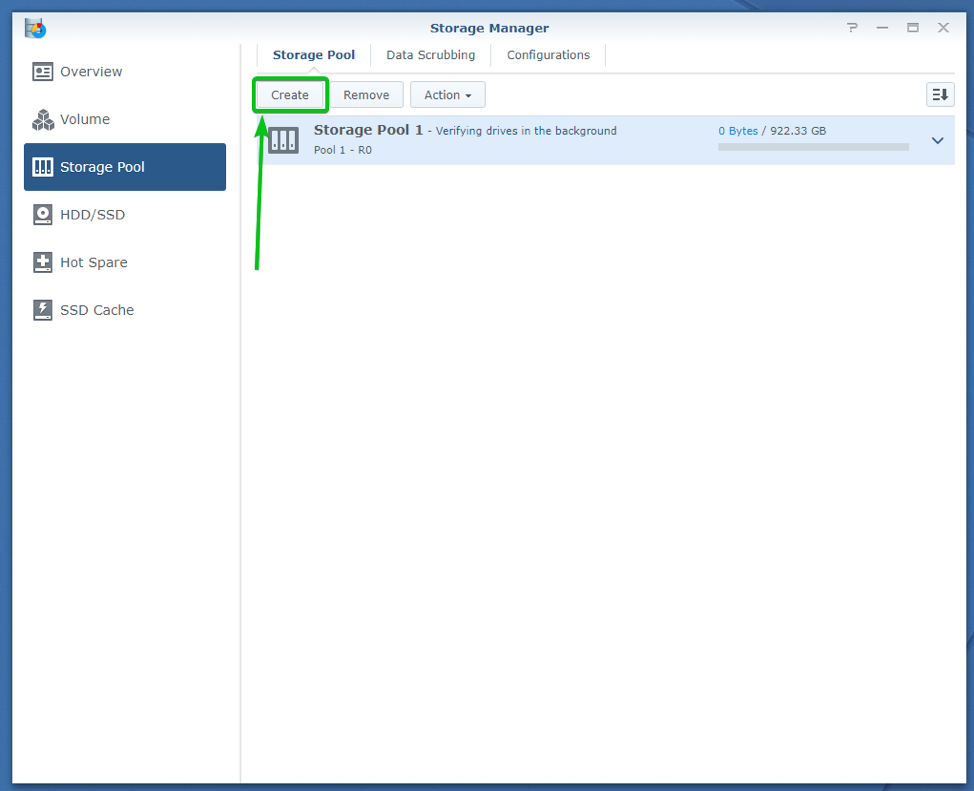
Navigate to the Storage Pool section and click on Create, as shown in the screenshot below:
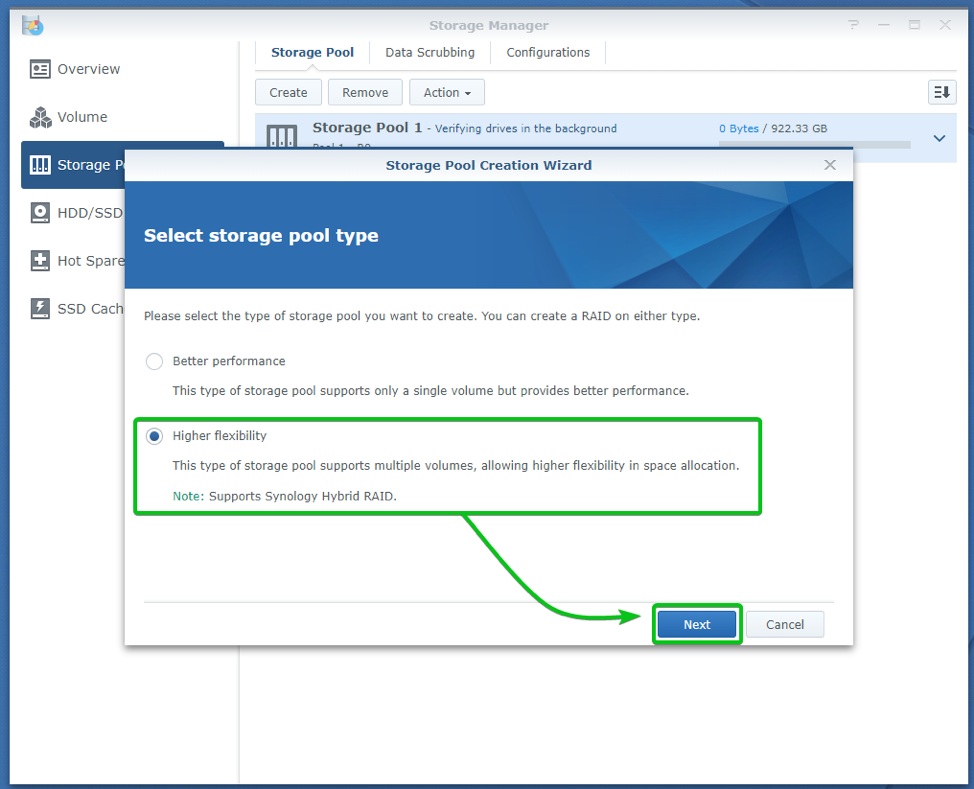
Now, you have to select the type of storage pool you want to create:
- Better performance: This option will allow you to create a single volume/partition on the storage pools.
- Higher flexibility: This option will let you create every type of Synology-supported storage pool.
To create storage pools that are optimized for performance only, select Better performance and click on Next.
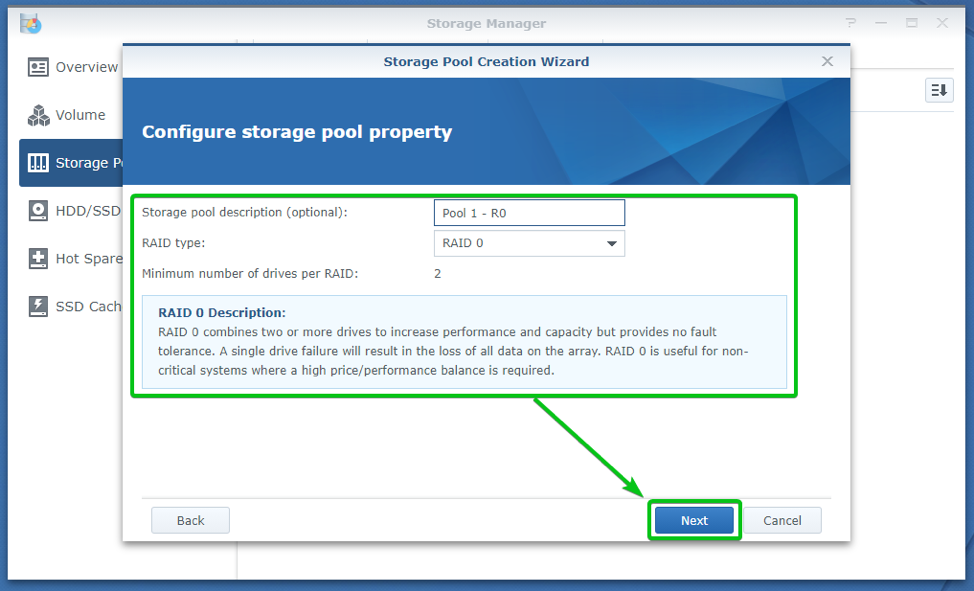
Type in a pool description (optional).
Select the type of RAID you want to set up for the storage pool from the RAID type dropdown menu, as shown in the screenshot below:
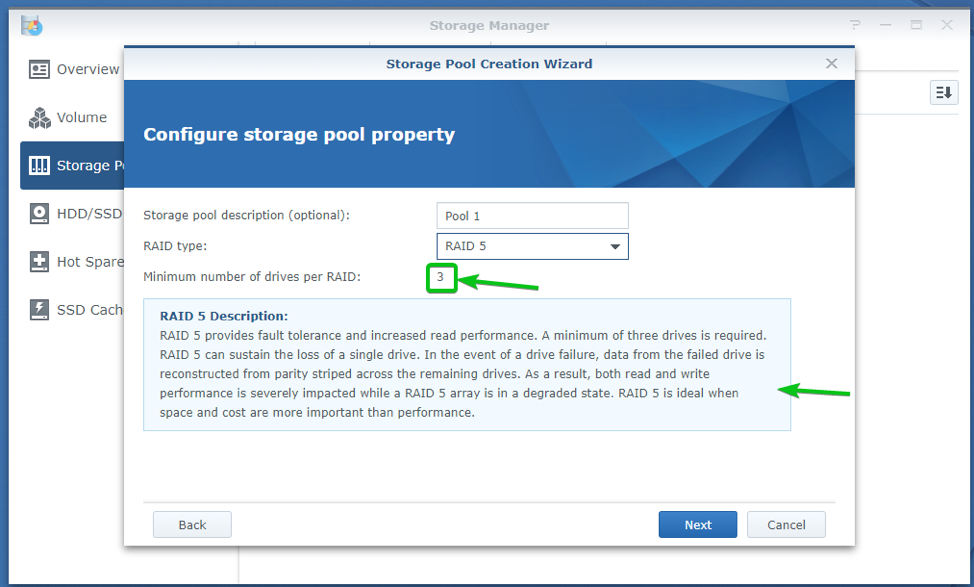
The minimum number of HDDs/SSDs you need for this RAID should be displayed in the Minimum number of drives per RAID section. A short description of how your selected RAID will work, its advantages, and disadvantages will be displayed in the Description section, as you can see in the screenshot below:
Once you’ve set up the RAID settings of your storage pool, click on Next.
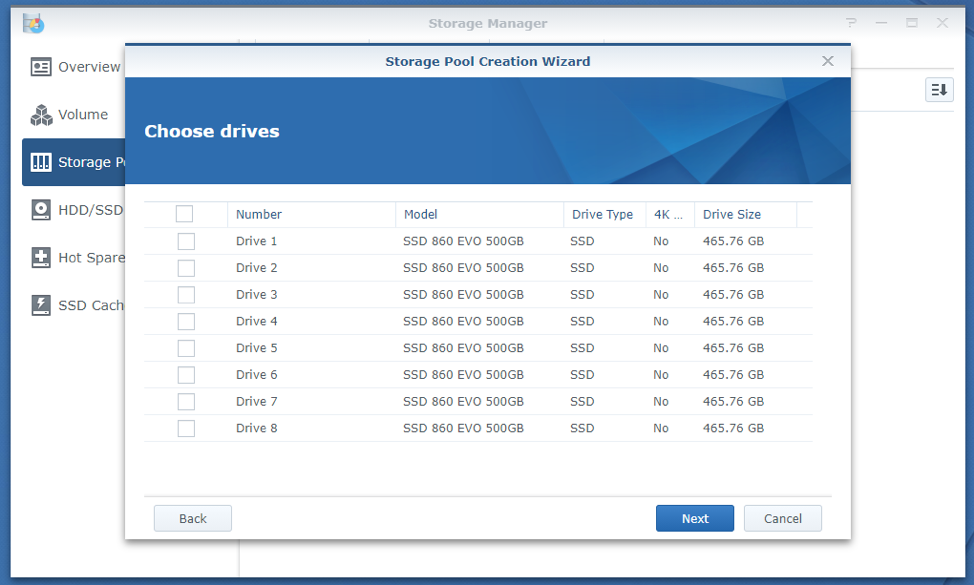
The unused HDDs/SSDs installed on your NAS should be displayed.
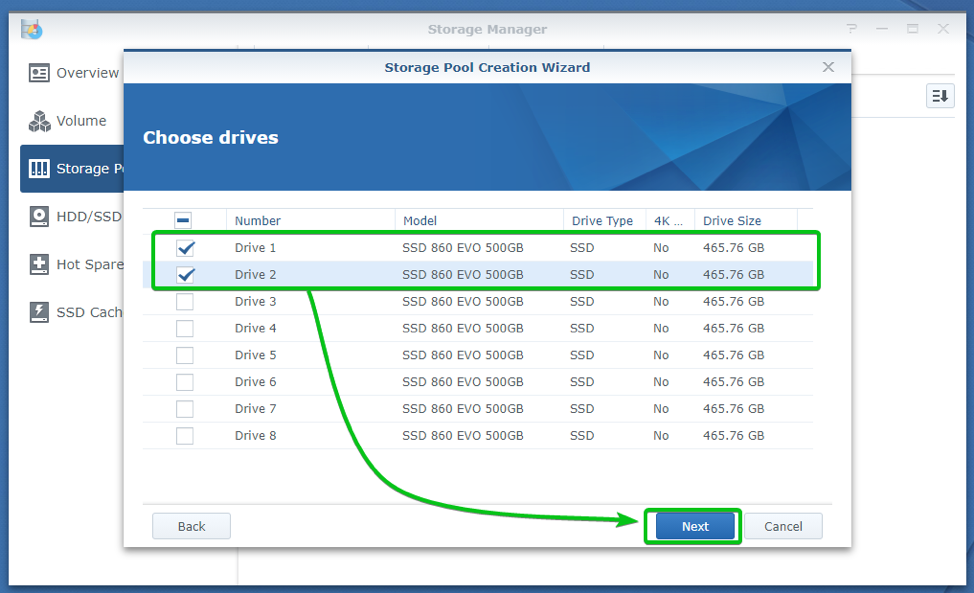
Select the HDDs/SSDs that you want to use for this storage pool and click on Next.
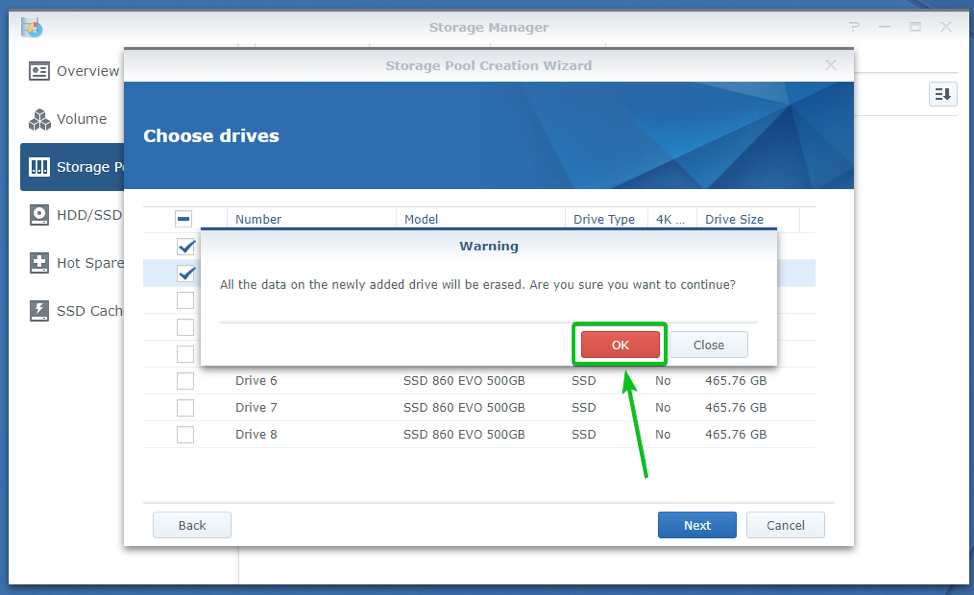
The existing data of the HDDs/SSDs you have selected must be removed to add them to your storage pool. To confirm the erase operation, click on OK.
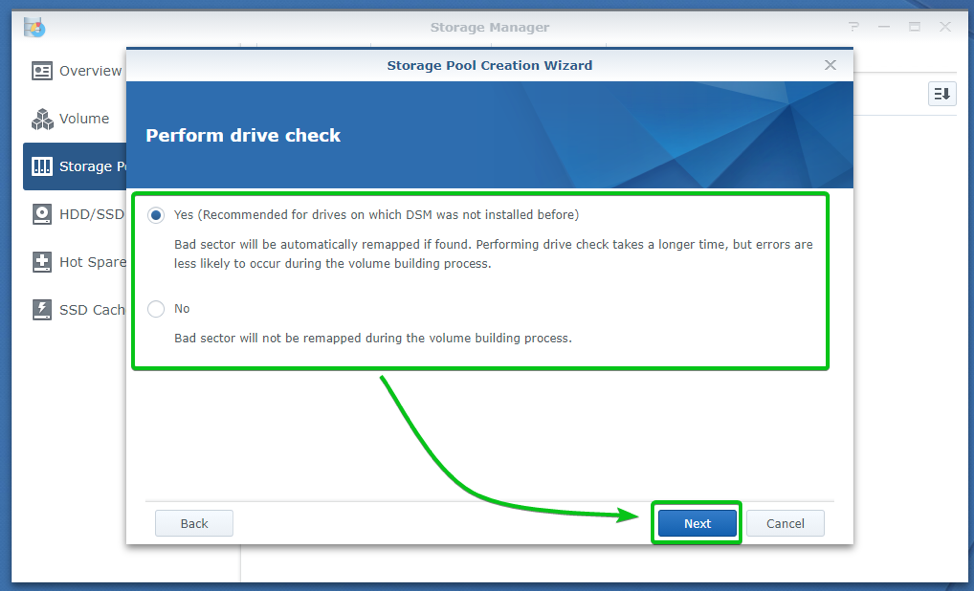
You will be asked whether you want to check the HDDs/SSDs (for bad sectors or errors) you are adding to the storage pool.
If you want to check the HDDs/SSDs for bad sectors and other problems, select Yes and click on Next.
Otherwise, select No and click on Next.
The settings to be used to create the storage pool should be displayed. To create a storage pool with these settings, click on Apply.
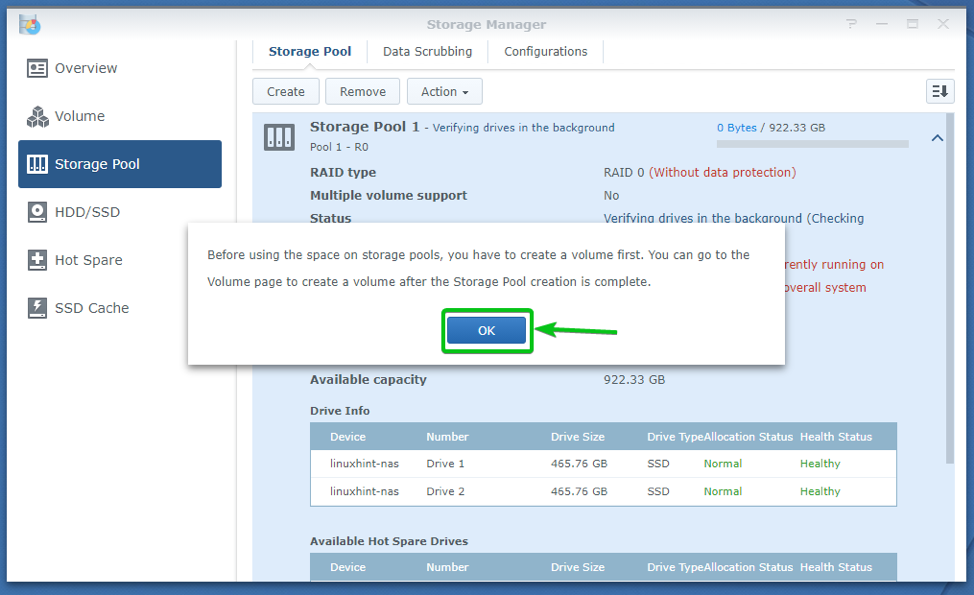
A storage pool is being created. It may take a few seconds to complete.
Click on OK.
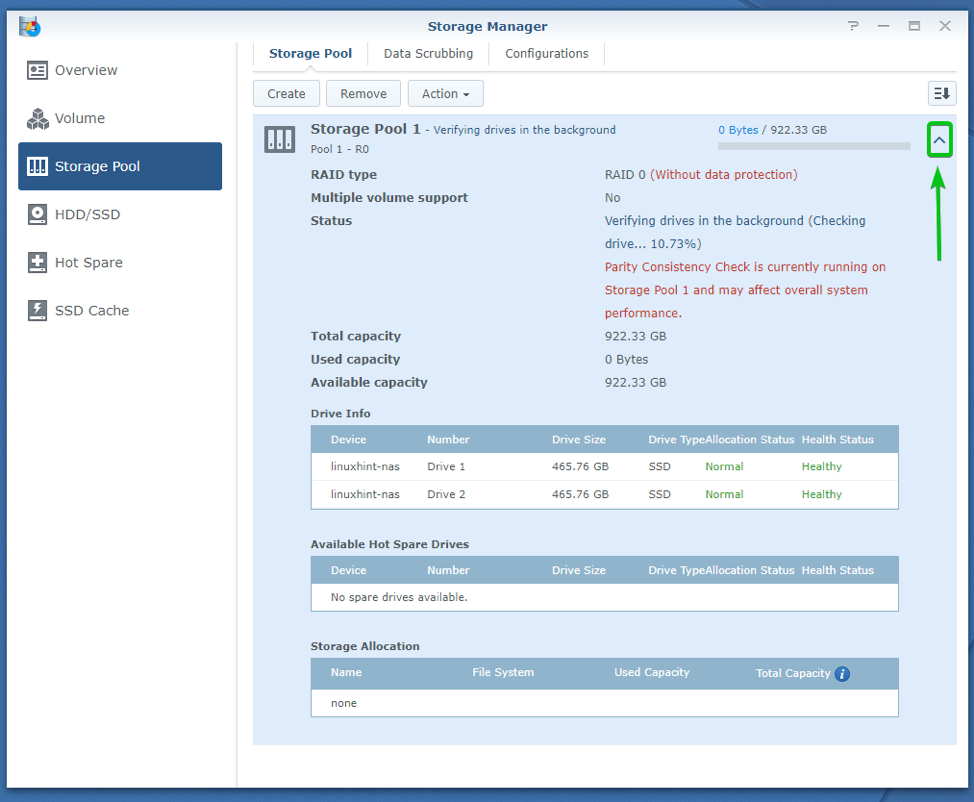
As you can see, a storage pool is created. The HDDs/SSDs you have selected are also added to the storage pool.
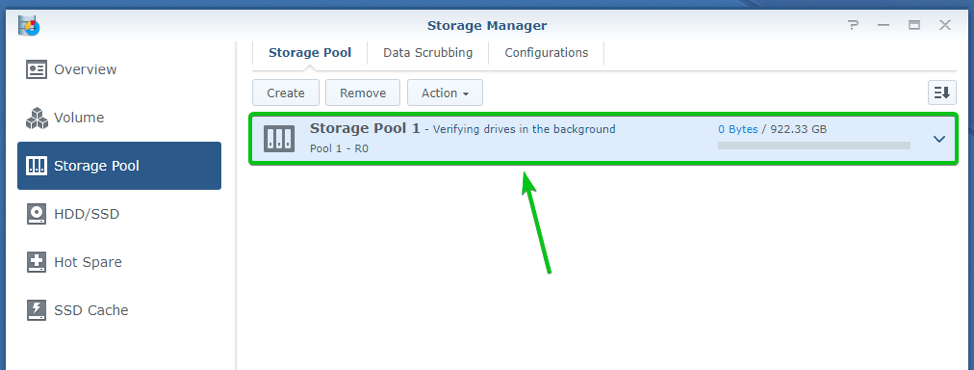
By default, a lot of information about the storage pool is displayed in the Storage Pool section of the Storage Manager. To hide this information, click on the arrow up icon, as marked in the screenshot below:
The storage pool information should be hidden.
Let’s create another storage pool.
In the same way, navigate to the Storage Pool section and click on Create, as shown in the screenshot below:
Now, select Higher flexibility storage pool type and click on Next.
Type in a pool description (optional).
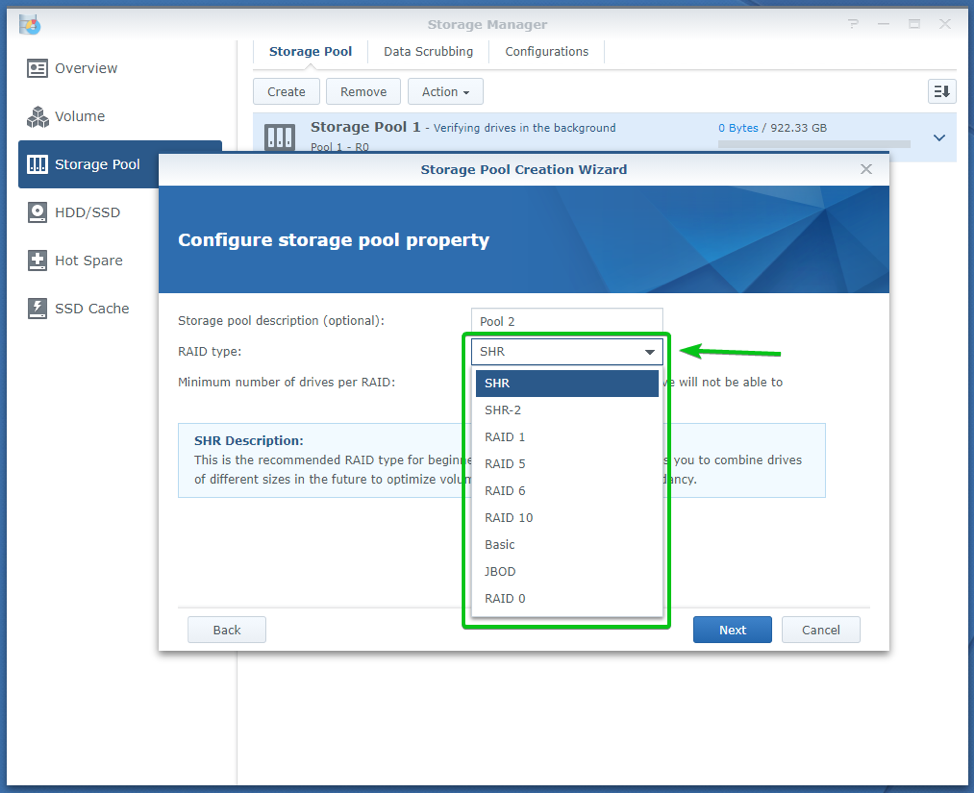
As you can see, you have more RAID types available in the Higher flexibility section.
Select the RAID type you want from the RAID type drop-down menu, as marked in the screenshot below:
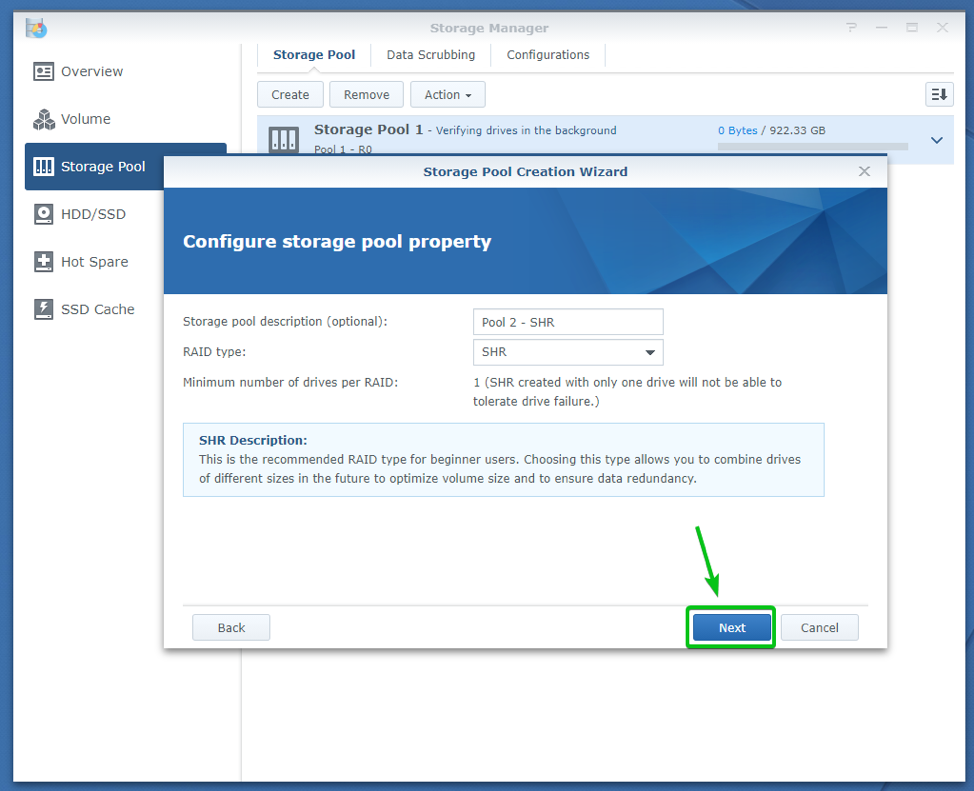
The minimum number of HDDs/SSDs you need for this type of RAID should be displayed in the Minimum number of drives per RAID section. A short description of how your selected RAID will work, its advantages, and disadvantages will be displayed in the Description section, as you can see in the screenshot below:
Once you’re done setting up the RAID type, click on Next.
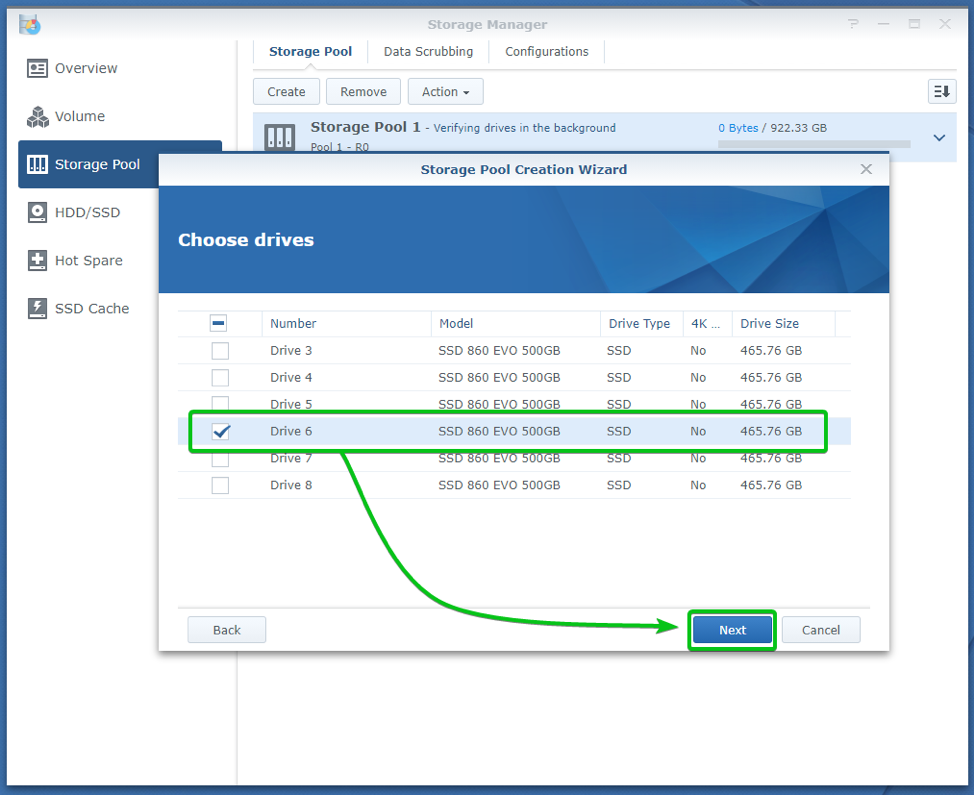
Select the HDDs/SSDs you want to add to the storage pool and click on Next.
The existing data of the HDDs/SSDs you have selected must be removed to add them to your storage pool. To confirm the erase operation, click on OK.
You will be asked whether you want to check the HDDs/SSDs (for bad sectors or errors) you are adding to the storage pool.
If you want to check the HDDs/SSDs for bad sectors and other problems, select Yes and click on Next.
Otherwise, select No and click on Next.
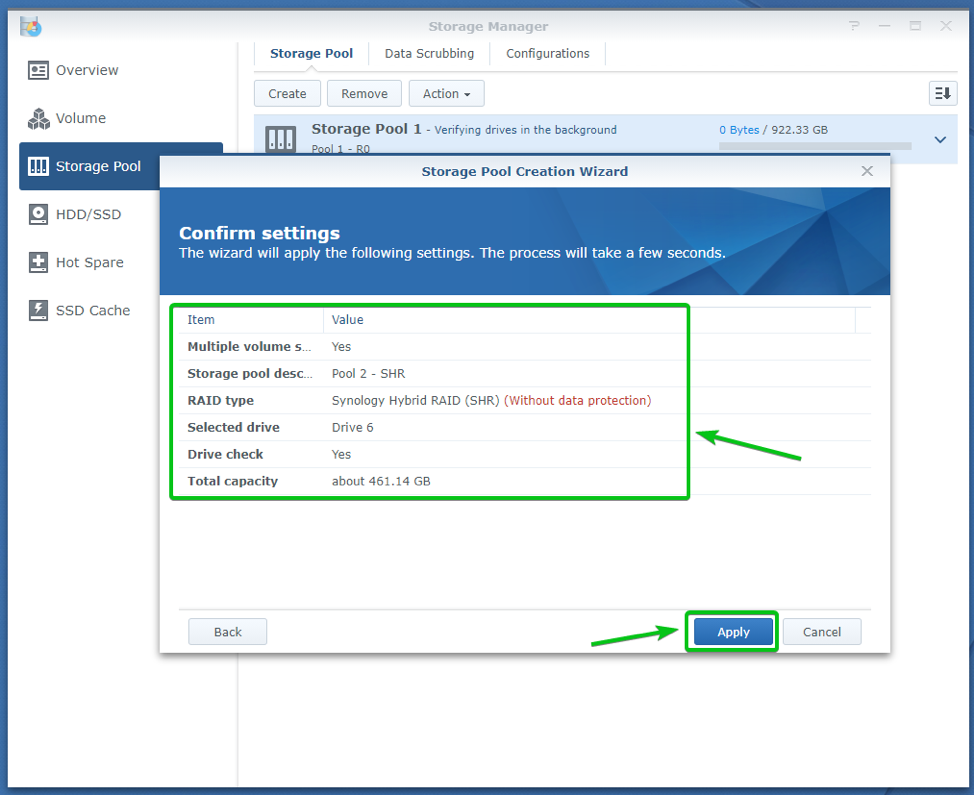
The settings to be used to create the storage pool should be displayed. To create a storage pool with these settings, click on Apply.
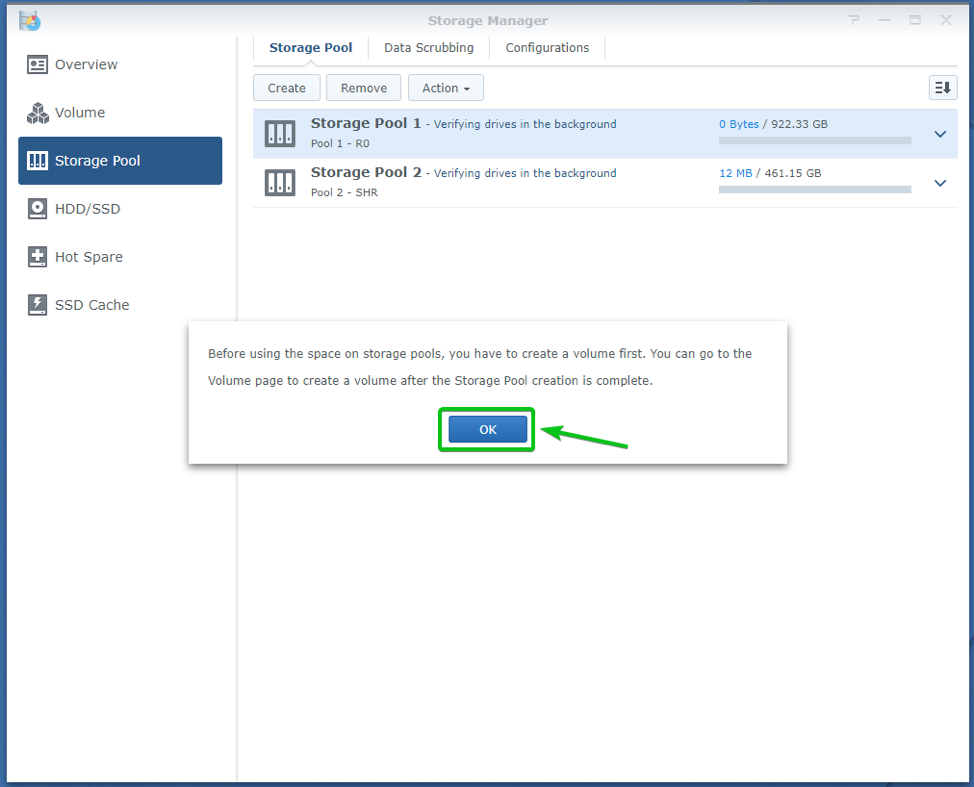
A storage pool is being created. It may take a few seconds to complete.
Click on OK.
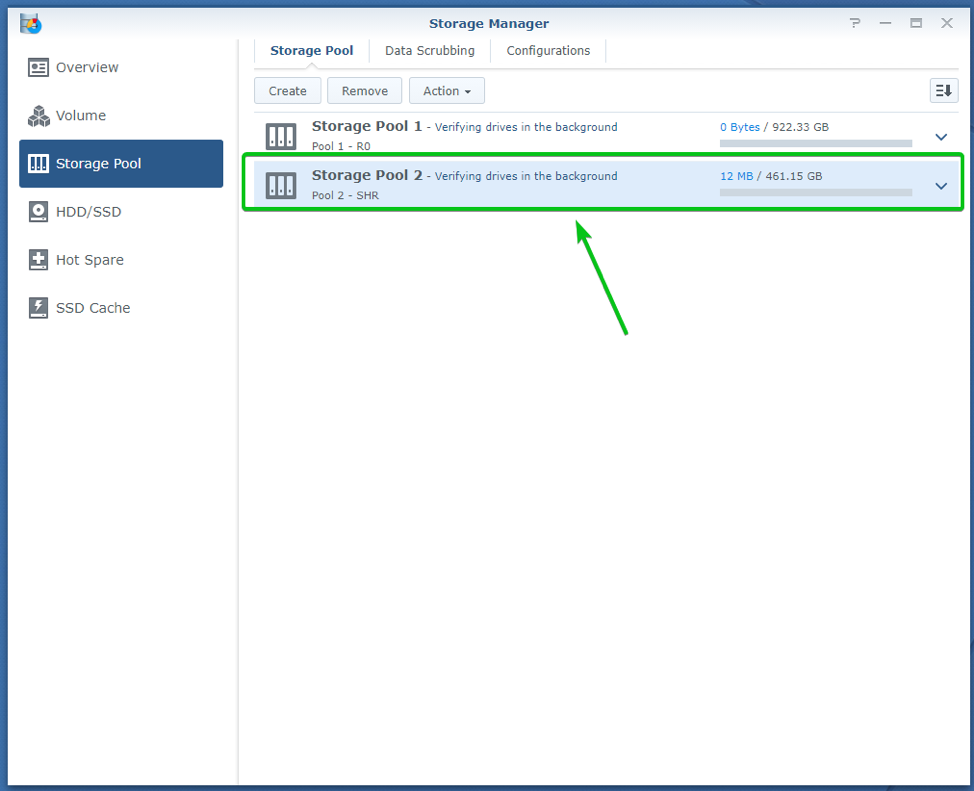
As you can see, a new storage pool is created.
To see more information about the newly created storage pool, click on the arrow down icon at the right side of the storage pool, as marked in the screenshot below:
A lot of information about the selected storage pool should be displayed, as you can see in the screenshot below:
Creating a Volume
Once you’ve created the necessary storage pools, you can create as many volumes as you want on each of these storage pools. Volumes are like partitions (of a storage device) for the Synology NAS storage pools.
To create a volume, navigate to the Volume section of Storage Manager and click on Create.
Select Custom and click on Next.
Select Choose an existing storage pool and click on Next.
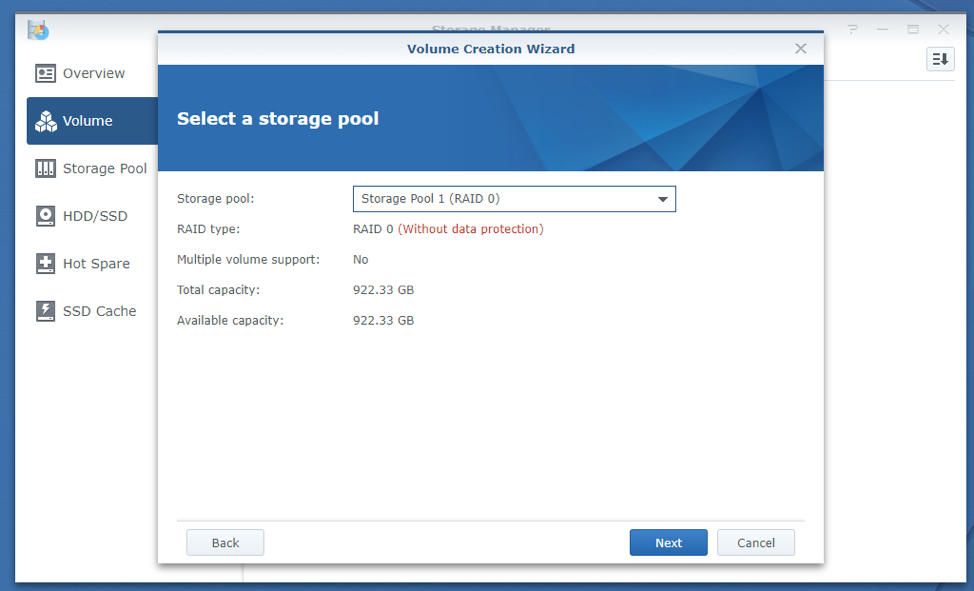
From here, you have to select a storage pool where you want to create the volume.
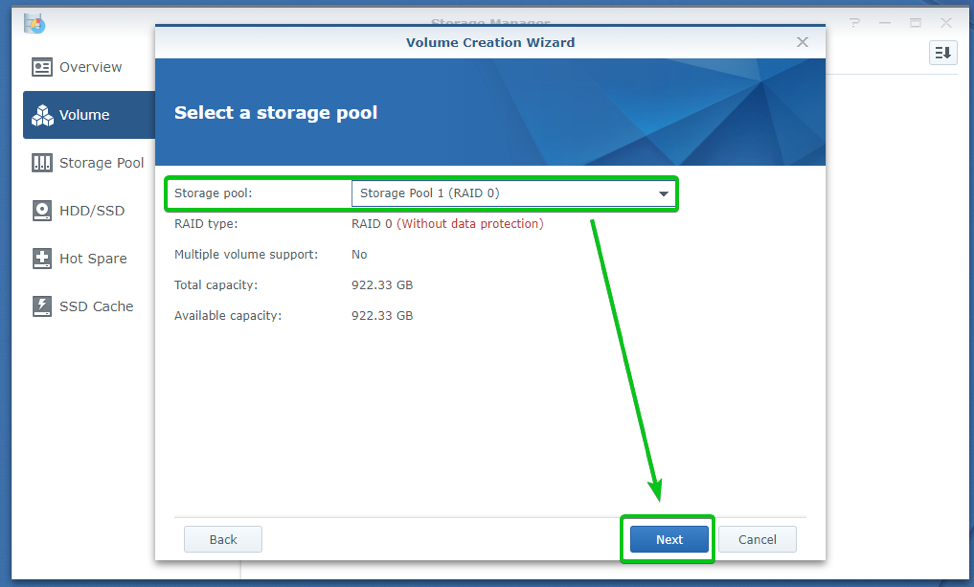
Select a storage pool where you want to create the volume from the Storage pool drop-down menu, as shown in the screenshot below:
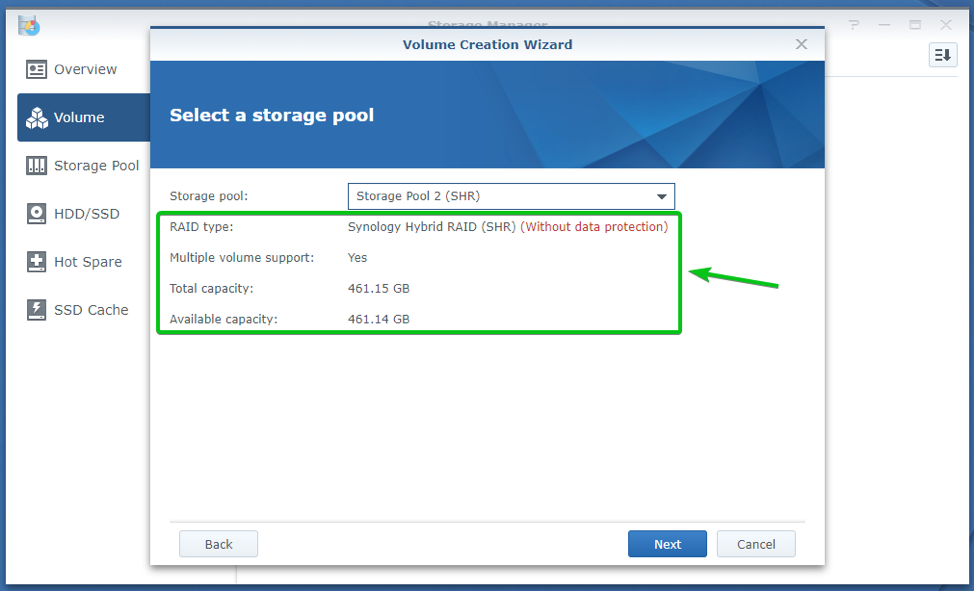
Once you’ve selected a storage pool, you should see more information about it.
Once you’ve selected a storage pool where you want to create the volume, click on Next.
Select the filesystem you want to format the volume with and click on Next.
You should see the following page.
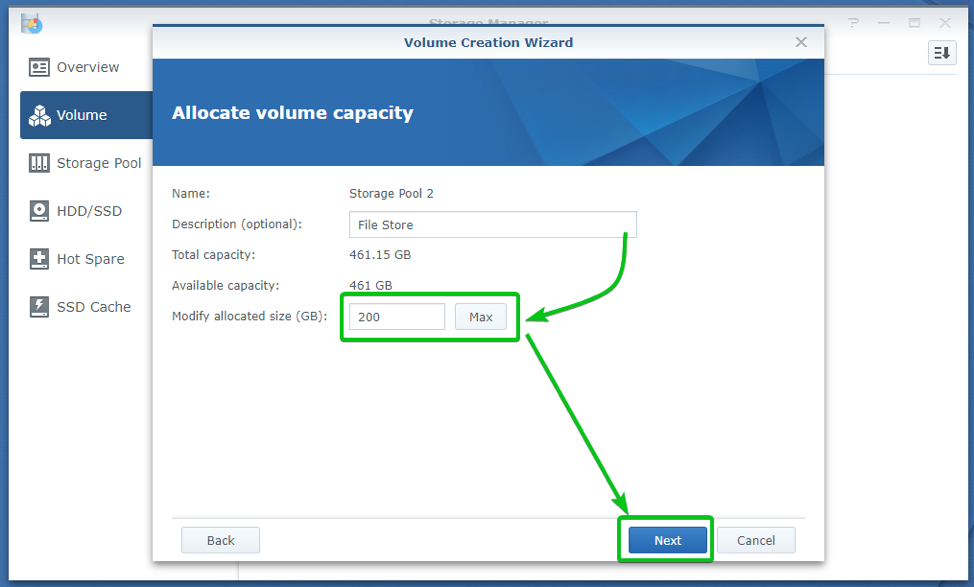
Type in a description for the new volume (optional).
If you’ve selected a storage pool that supports multiple volumes, then you will be allowed to allocate the maximum space available on it or a portion of the available space from it.
Once you’re done, click on Next.
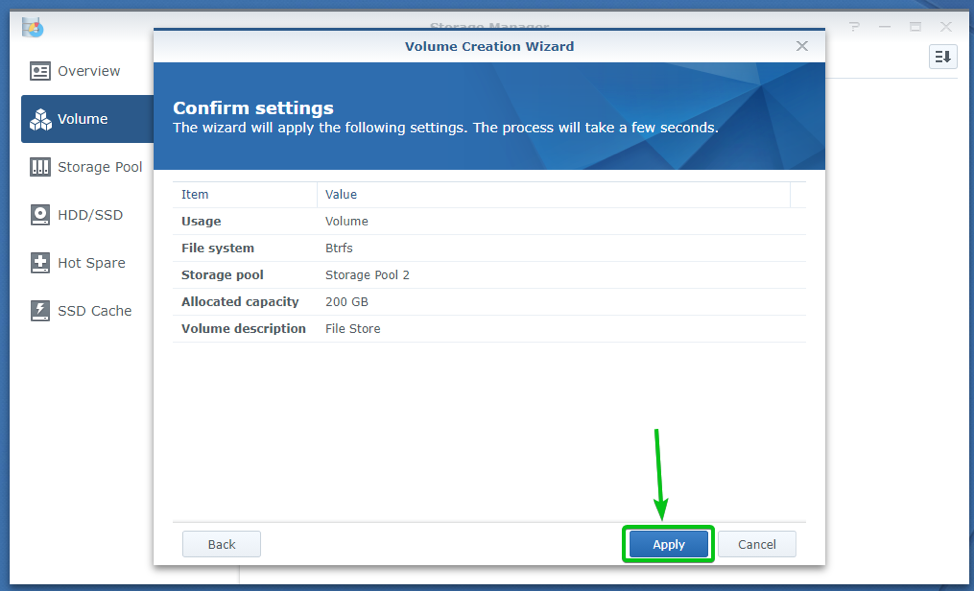
The settings to be used to create the volume should be displayed. To create a volume with these settings, click on Apply.
A new volume is being created. It may take a while to complete.
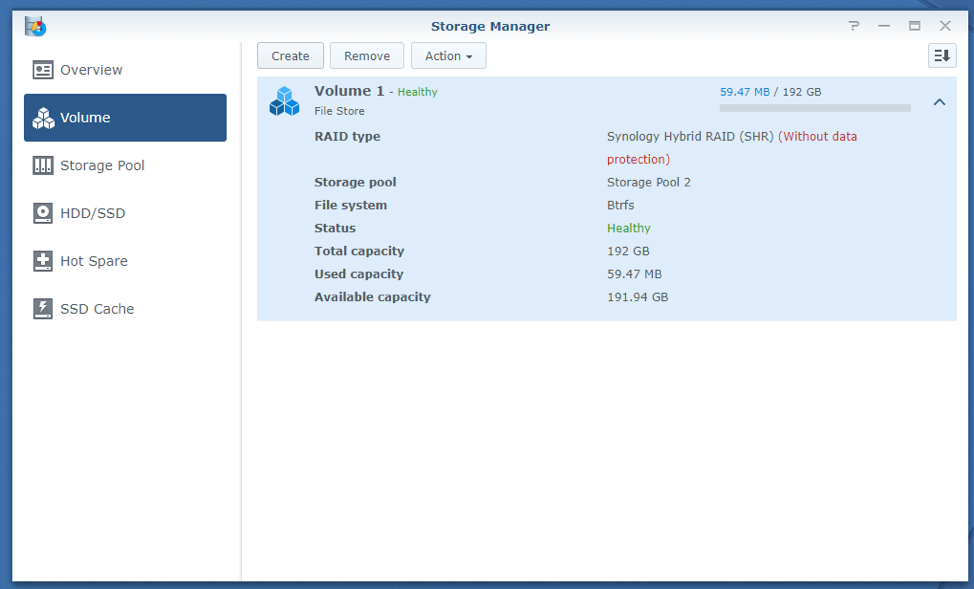
A new volume should be created, as you can see in the screenshot below:
Creating a Share
Once you’ve created the necessary volumes, you need to create shares on these volumes to be able to store files on the NAS and access them remotely.
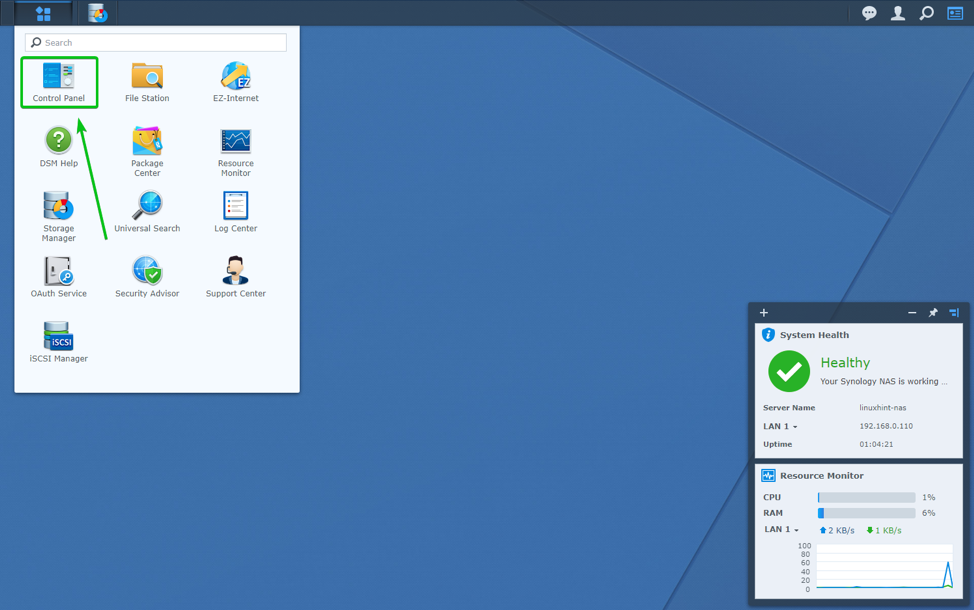
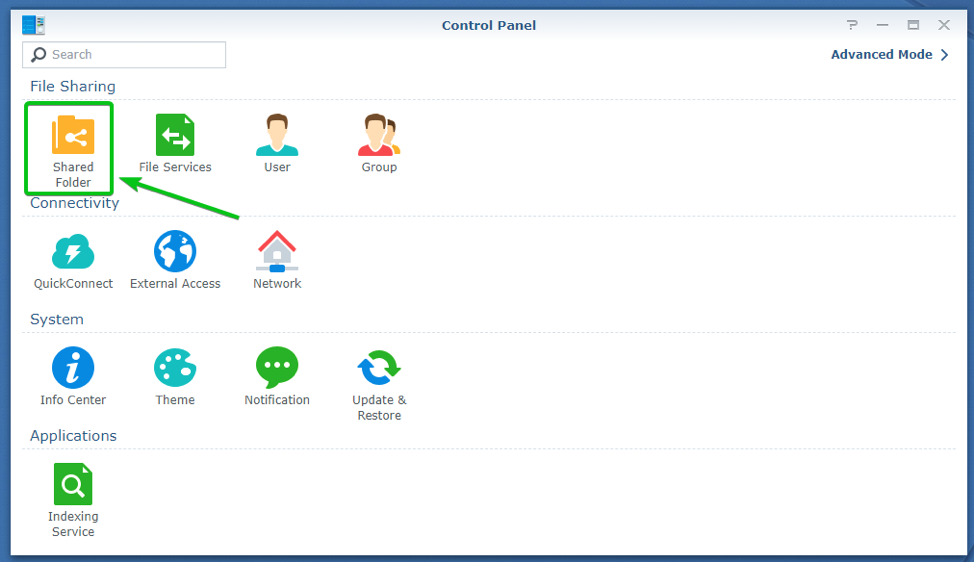
To create a share, open the Control Panel app from the Main Menu of Synology Web GUI, as marked in the screenshot below:
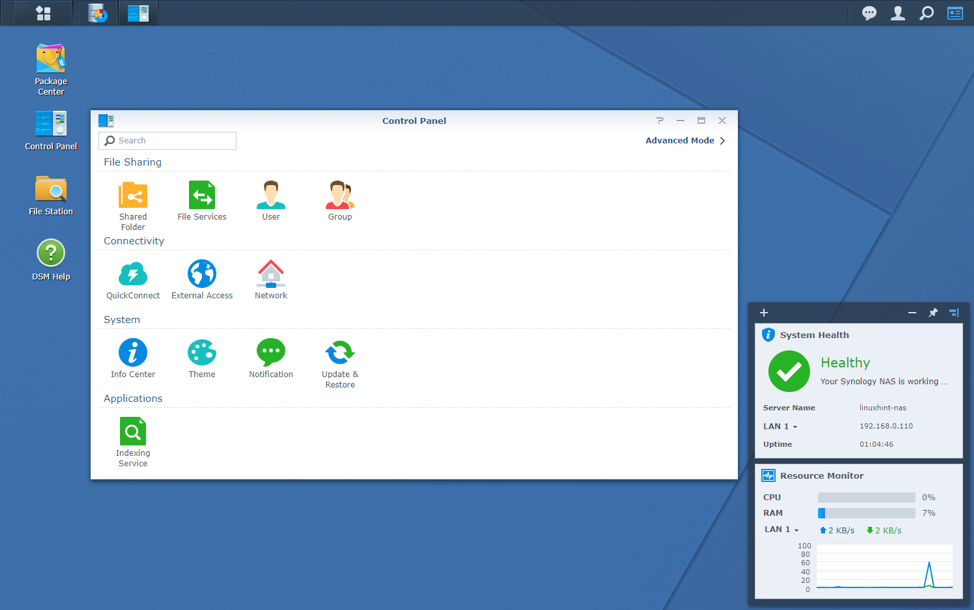
The Control Panel app should be opened.
Click on Shared Folder, as marked in the screenshot below:
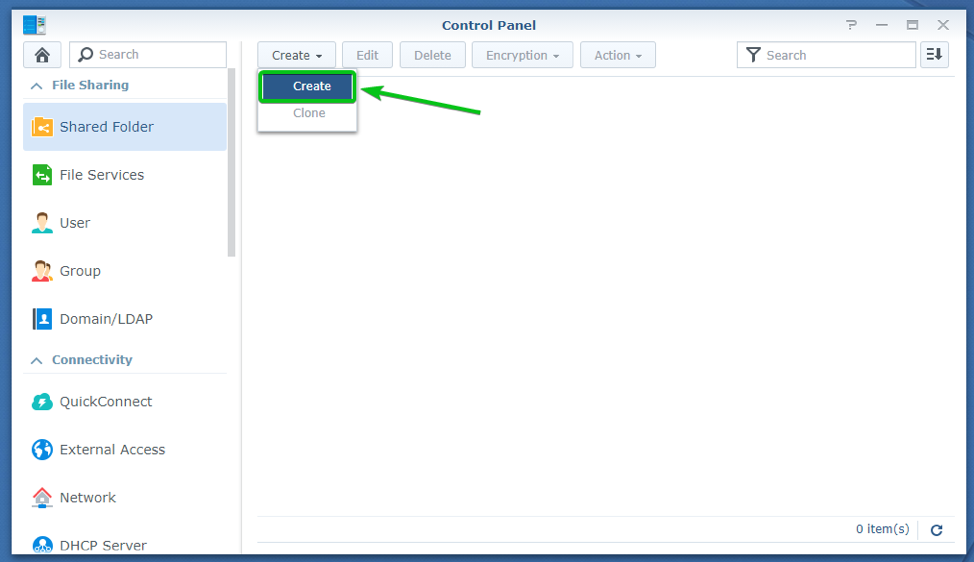
Click on Create.
Click on Create.
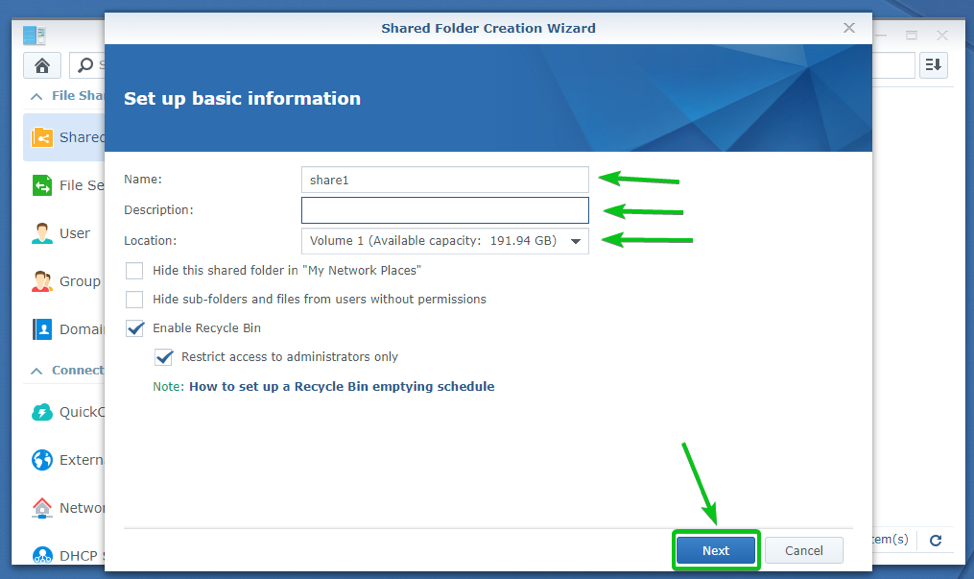
Type in the share name, a short description (optional), and select a volume from the Location dropdown menu, as marked in the screenshot below:
Once you’re done, click on Next.
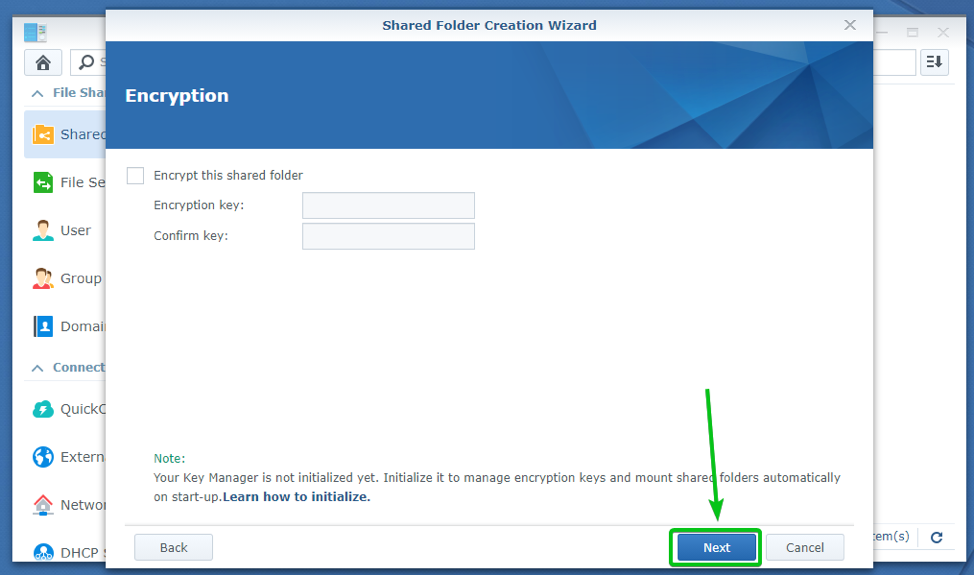
If you want to encrypt your share, you can check the Encrypt this shared folder checkbox and type in an encryption key.
If you don’t want to encrypt the share, you don’t have to do anything here.
Once you’re done with this step, click on Next.
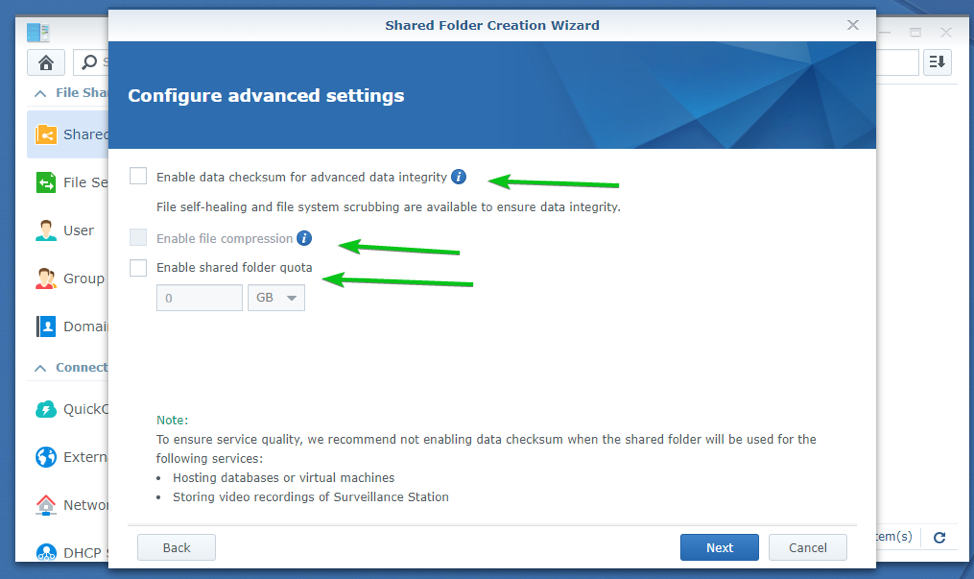
You can configure some advanced settings for the share from here.
If you want to perform checksums on the files you store on this share to make sure not a single bit is flipped in any way, check the Enable data checksum for advanced data integrity checkbox.
If you enable data checksum, then you can also check the Enable file compression checkbox to automatically compress the files you store on this share.
You can enable quota for this share as well by checking the Enable shared folder quota checkbox and typing in the amount of disk space (in GB) you want this share to use from your selected volume.
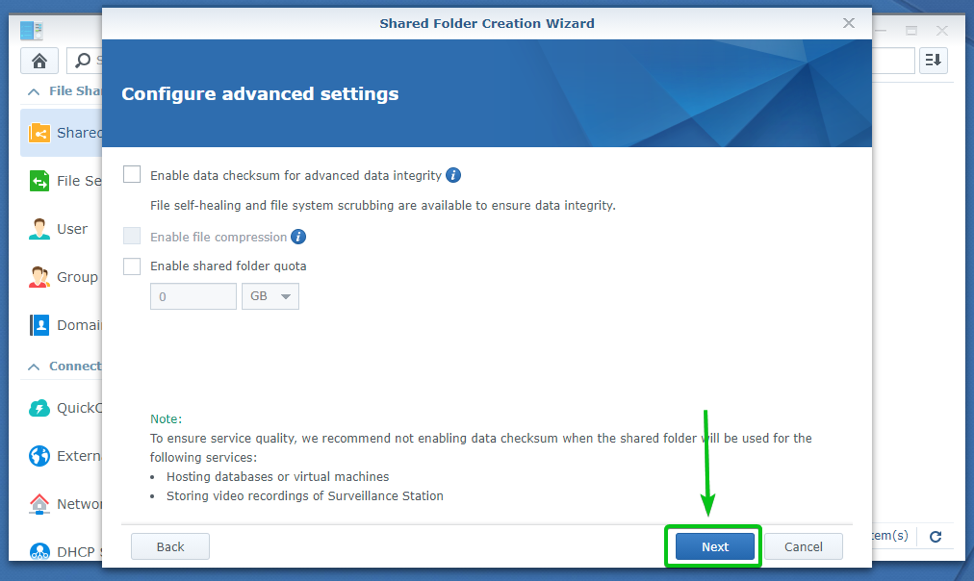
Once you’re done, click on Next.
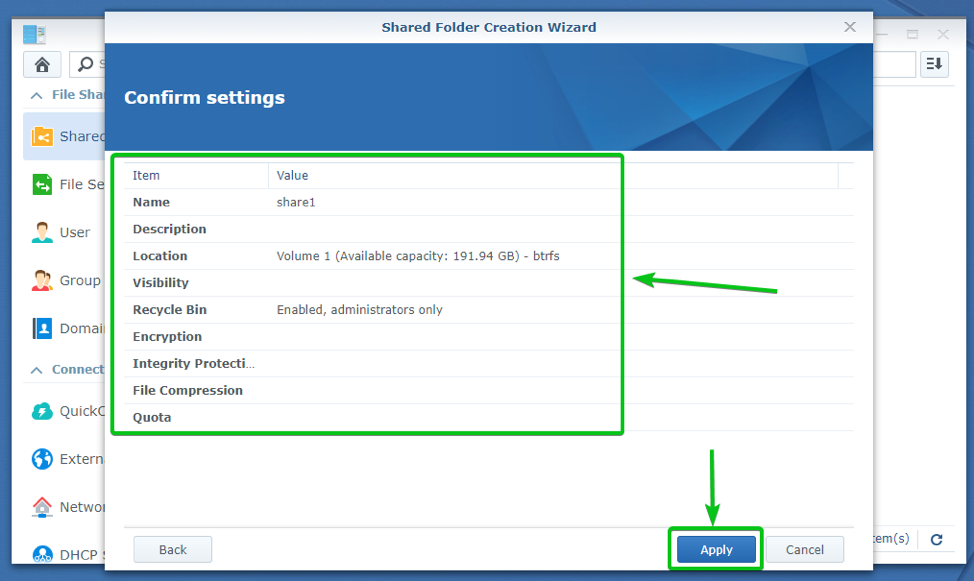
The settings to be used to create the share should be displayed. To create a share with these settings, click on Apply.
Now, you have to set the necessary permissions for the users you want to give access to this share.
Once you’re done, click on OK.
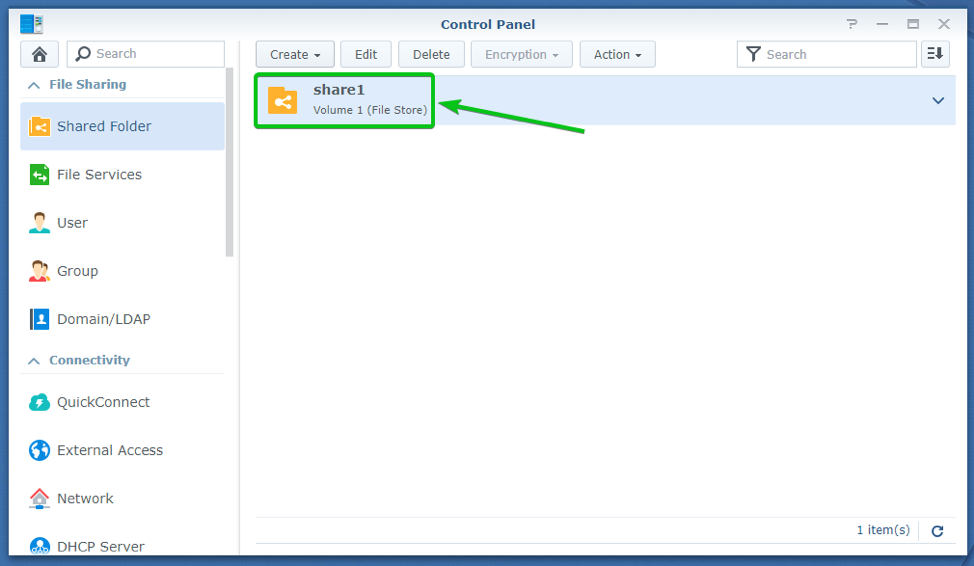
A new share should be created.
Accessing the Share from Windows 10
You can access the share you’ve created on your Synology NAS very easily from a Windows 10 computer.
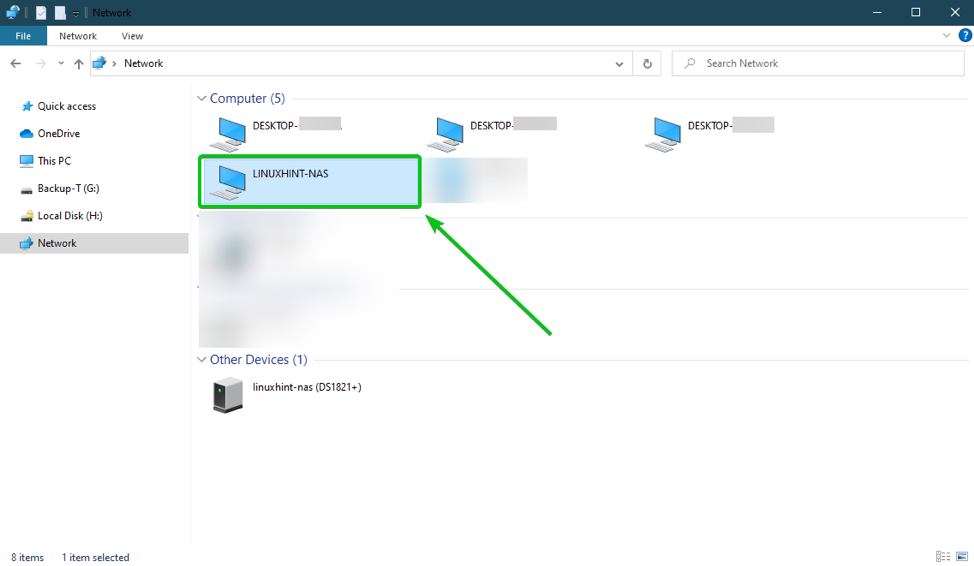
If you go to the Network section of the Explorer app, the Synology NAS should show up. You can access the share you’ve created on your Synology NAS from here. As you can see in the screenshot below:
You can also use the IP address of your Synology NAS to access the shares you’ve created on the NAS.
You can find the IP address of your Synology NAS in the Synology Web UI, as you can see in the screenshot below. In my case, the IP address is 192.168.0.110. It will be different for you. So make sure to replace it with yours from now on.
To connect to your Synology NAS shares using the IP address 192.168.0.110, open the Explorer app and navigate to the \\192.168.0.110 location, as shown in the screenshot below:
Type in the username and password of your Synology NAS and click on OK.
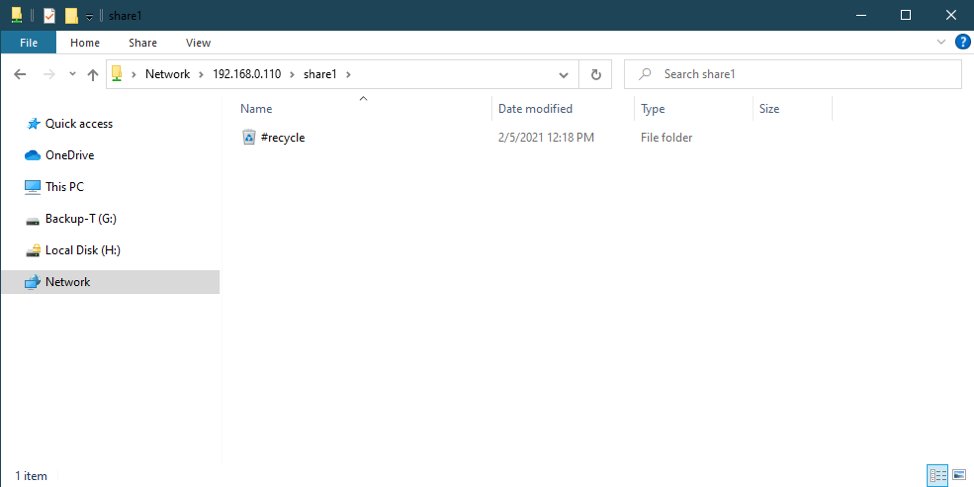
The shares that are accessible to the user you’ve logged in with should be displayed.
As you can see, I can access the share share1.
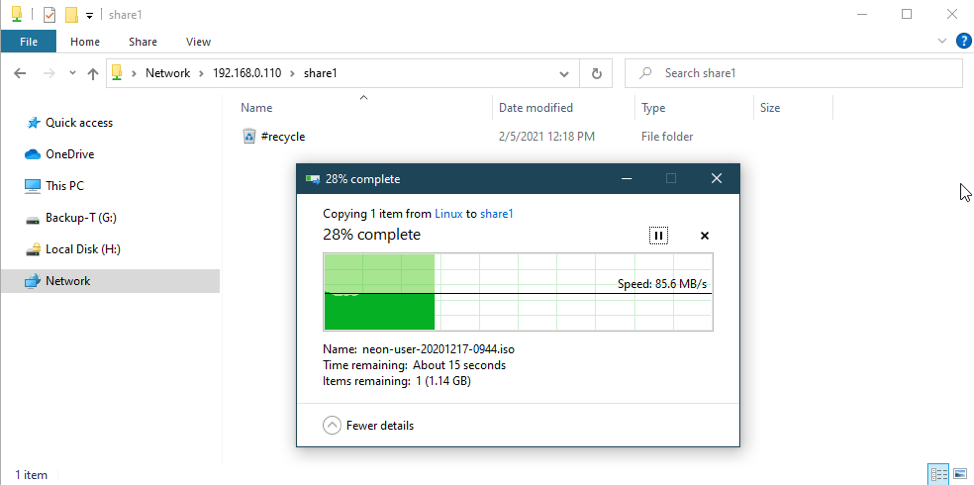
I can also copy files to the share with pretty good speeds.
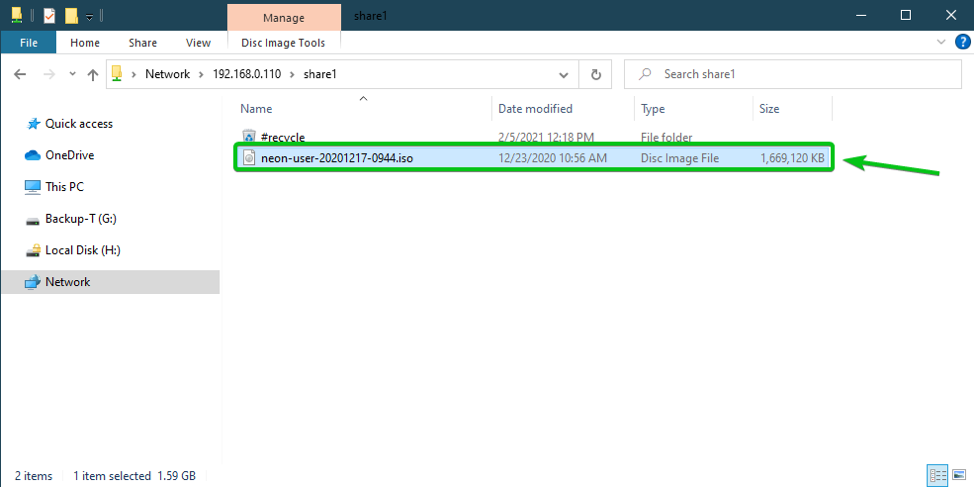
The file is copied to the share share1, as you can see in the screenshot below:
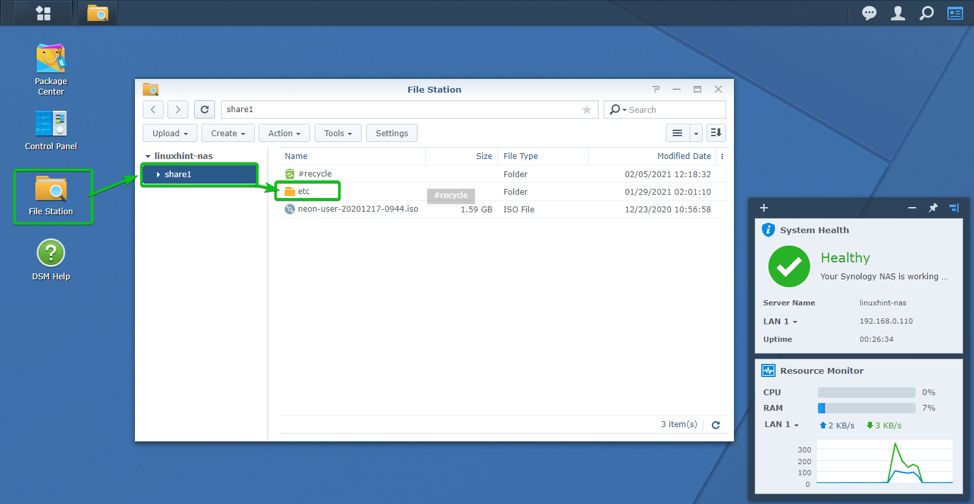
You can also access the share from the Synology Web GUI using the File Station app. As you can see, the file I have copied to the share is accessible from the File Station app.
Accessing the Share from Linux
You can access the share you’ve created on your Synology NAS from Linux as well. You need to have Samba installed on your Linux distribution. Luckily, most of the desktop Linux distributions have Samba preinstalled. So, you probably won’t have to do anything to access the shares from Linux. You just need to know the IP address of your Synology NAS to connect to the shares on Synology NAS from Linux.
You can find the IP address of your Synology NAS in the Synology Web UI, as you can see in the screenshot below. In my case, the IP address is 192.168.0.110. It will be different for you. So, make sure to replace it with yours from now on.
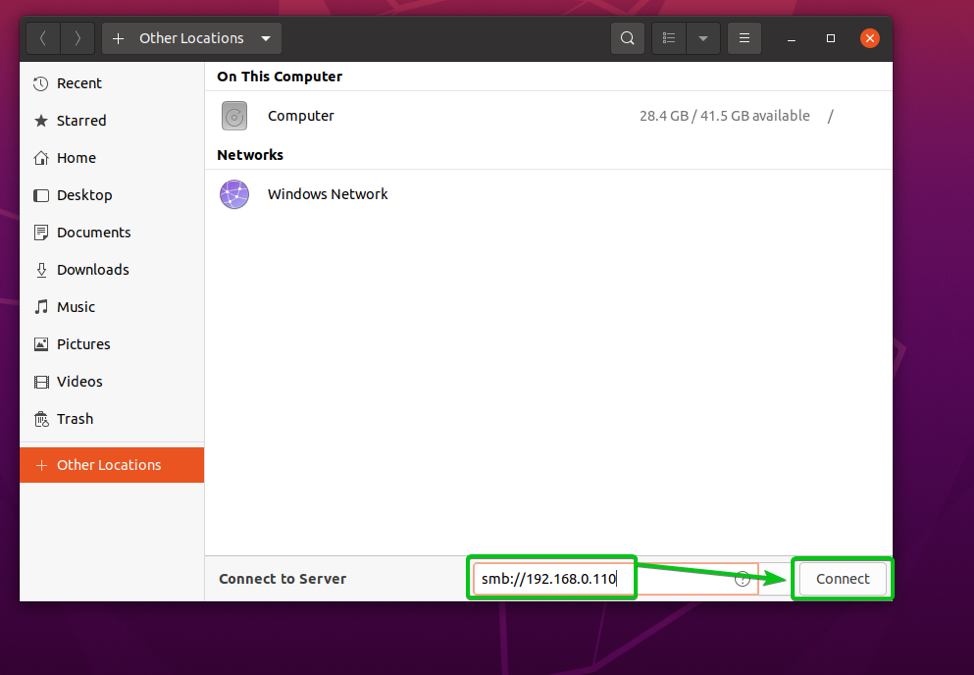
Open the File Manager app and navigate to the location smb://192.168.0.110 and click on Connect.
Type in the username and password of your Synology NAS and click on Connect.
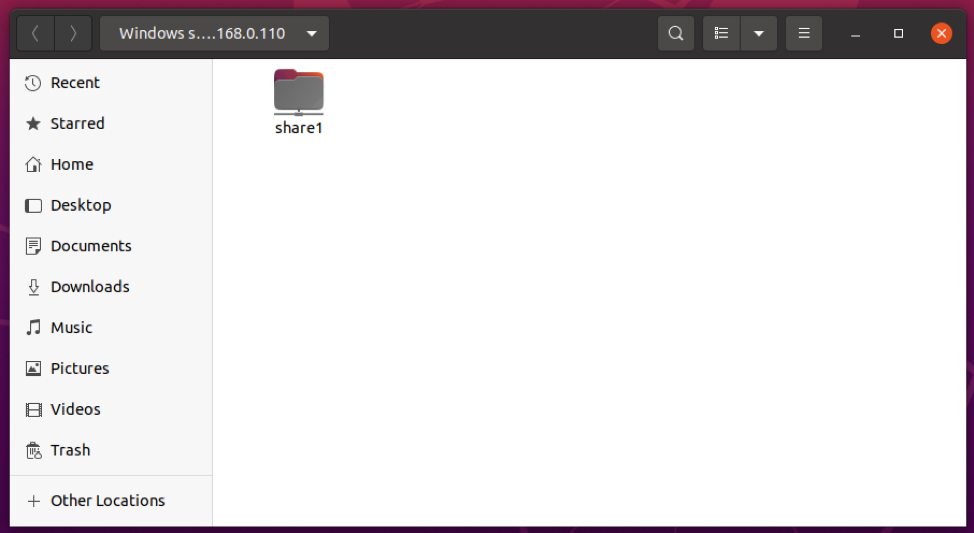
The shares that the user you’ve logged in, which has access to, should be listed.
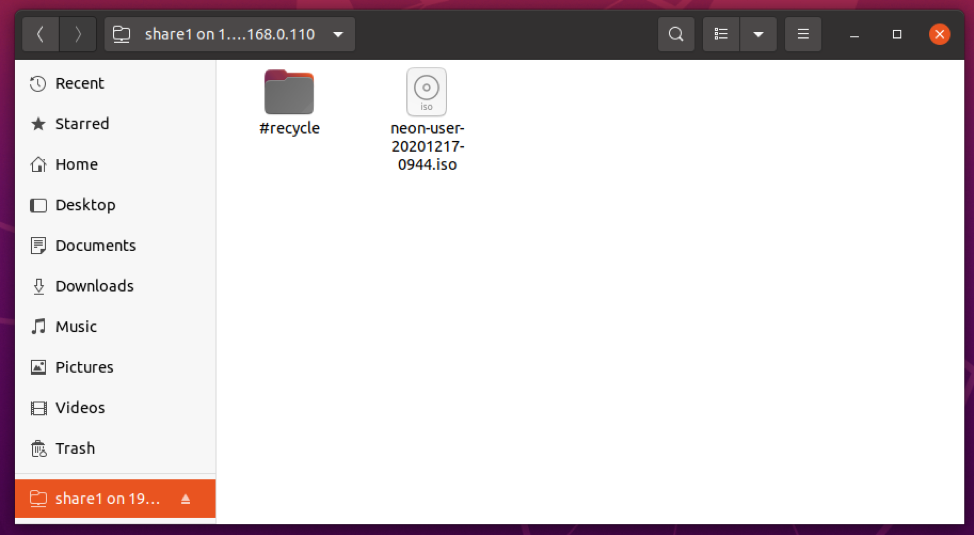
As you can see, I can access the share1 share.
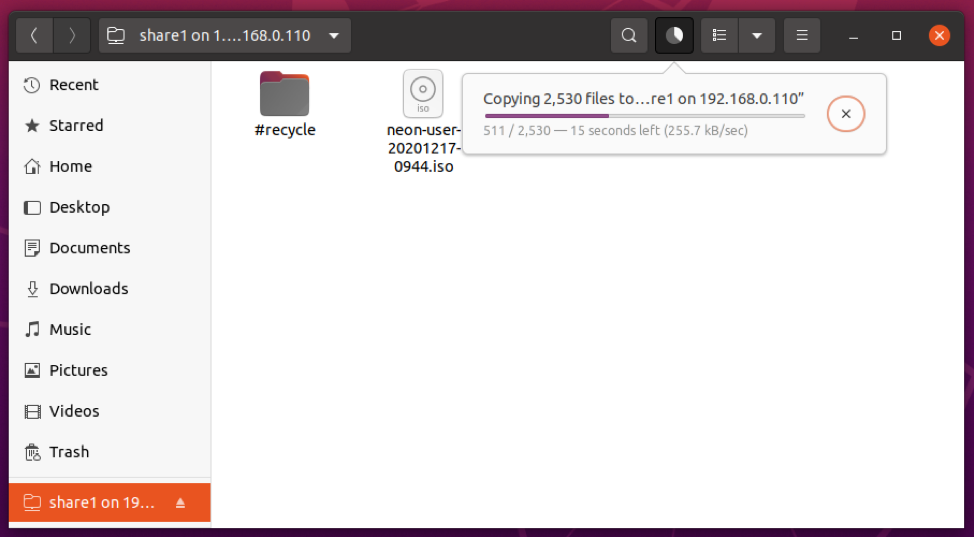
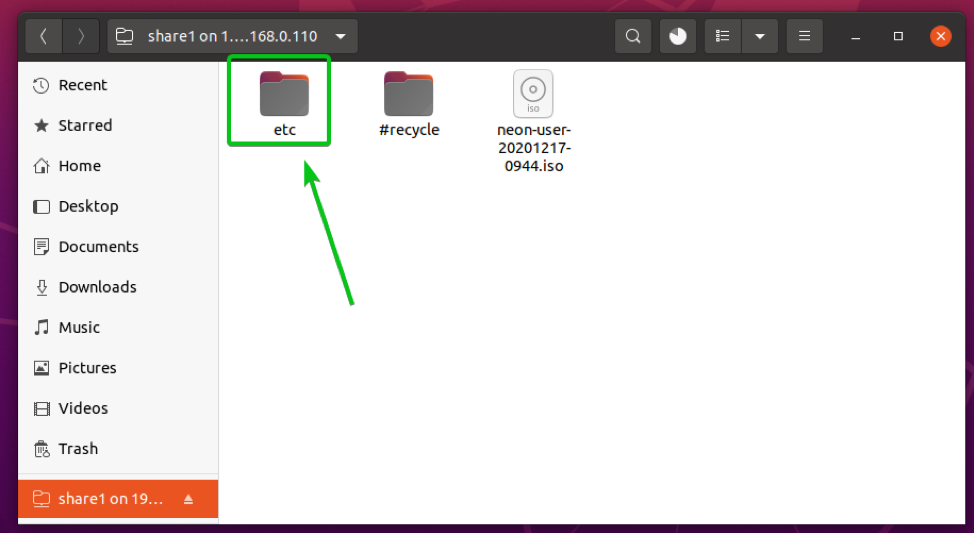
I can also copy files to the share, as you can see in the screenshot below:
I have copied the /etc directory to my share share1, as you can see in the screenshot below:
The /etc directory I have copied to the share1 share is also displayed in the File Station app, as you can see in the screenshot below:
Conclusion
In this article, I have shown you how to set up the Synology NAS model DS1821+, as well as how to install 2.5/3.5-inch HDDs/SSDs on the drive trays of the Synology NAS. How to power on the Synology NAS and install the DSM operating system on the Synology NAS is also taught here. Finally, you have learned how to create storage pools, volumes, and shares on the Synology NAS and access the shares from Windows and Linux operating systems.























 And if you use 3 X 1 TB HDD in SHR RAID, you can use only 2 TB (2 x 1 TB HDD) for data and 1 TB (1 x 1 TB HDD) for protection. So that the RAID can survive 1 drive failure.


